Showing posts with label Gadgets. Show all posts

5 Ways How Wearable Technology Will Improve Our Daily Life

These are exciting & moving times. Technology has made new breakthroughs, and we're fortunate to witness things that almost seemed impossible a couple of few years ago. Some time back, your children would rely entirely on their coaching staff to monitor their progress and fitness. What is wearable technology? Sports Training Is Getting Smarter With Wearable Devices � Back in the day, injuries were a lot scarier than they are today. Concussions and broken bones have never been alien to professional athletes, but with technology now it's possible to measure the impact and analyze the condition of an athlete at a minimal cost and prevent major injuries. Even the daily progress of our physical performance can be monitored using fitness trackers. Isn't it amazing that these tiny gadgets can monitor a range of other metrics like our heart rate, calories burnt, blood pressure, blood glucose levels, hydration, and the number of strokes made in the pool? There is a giant list of smart wearables in the making, so what we're seeing is just the beginning. This wearable technology Infographic shows how smart devices are benefiting the insurance industry.
5 Ways Wearable Technology will Improve Our Life
Last time we saw, the greatest invention after the Steve Job's iPhone - Phonebloks Prototype - Motorola Project Ara module prototype developed by HeartsBy Giulio Minotti - A new smartphone that'll change the world again. And today we are going to discuss something different and that make you updated on the development in wearable technology and see the current changes that are driving wearable tech into health care, education to make our lives more broader.

Also read: Greenify - Make Android Run 10x Faster

Before we proceed, let's go back to the beginning of wearable technology.

The History Of Wearable Technology

The first ever wearable device was invented by Edward Thorp and Claude Shannon back in the mid 60's. The makers created a tiny computerized wearable to beat opponents in a game of roulette. They did win but were later barred from entering Las Vegas casinos.

Since then, wearable devices have evolved by wearable technology companies and today they've become an extension of our life itself. Whether it's managing our health, fitness, safety or productivity, they do an awesome job.

If you haven't started using wearables, here are five ways you how they can improve your life.

How Wearable Technology Wearables will Improve & Enhance Our Daily Life

The fast growing technology by new connections with the human body and enhancing solutions enabled by wearable tech will help to develop almost every aspect of our lives. These wearable tech devices not only improve our overall productivity but also strengthen our working capabilities. But how are these wearable tech devices influencing our personal and professional life? Learn how these new technology tech gadgets are changing our daily life through wearable technology wearables which intend to make our lives comfortable.

1. Wearables can increase your productivity

As a working professional, you are expected to complete one or more tasks in less time. The same is the case with business owners, entrepreneurs and just about every individual. In turn, that causes stress and loss of concentration, which affects your productivity.

Wearables can help improve your productivity by 8.5 percent, reveals Rackspace.co.uk. You can update your routine tasks on your wearable device. For example, a voice-enabled smart gadget like MYLE can act as your personal assistant and handle the less priority tasks for you, so you focus only on the top priority tasks.

2. They go beyond tracking to help you achieve your fitness goals

5 Ways Wearable Technology will Improve Our Life
Yes, wearables can track critical data � like how many hours you slept last night, how many steps you walked down the street, and how much calories you burnt in a workout. But, the most astounding thing about these devices is what they can do with your data. Wearables can guide you to eat right, lose weight, quit smoking, and motivate you to reach your fitness goals.

Check out the new breed of wearable health technology wearables called smart socks. They consist of textile pressure points that track your feet movement and provide feedback to improve your running and playing skills. They are ideal for walking, running, skiing, hiking, cycling, and playing. Some wearable technology fitness equipment like the LifeBEAM Smart Helmet helps you to protect your head from falls while we tracking our fitness levels.

3. Wearables can help protect you and your personal belongings

5 Ways Wearable Technology will Improve Our Life
Taser has introduced Axon Flex Glasses that let you see what the cops see. Considered the best video platform for on-officers, these glasses come with a wide camera angle allowing you to watch and record incidents at 130 degrees.

Concerned about your own safety and that of your personal belongings? The good news is there are smart devices like Safelet that help protect you and your items. It's a smart bracelet that alerts your friends, family, and the cops by broadcasting your location when you are unable to reach the phone during an emergency. It makes easy for people to track your location and come to your rescue.

With people traveling so often, wearables like safelet do seem to have a promising role to play in the future.

4. The future of healthcare will be influenced by wearables

5 Ways Wearable Technology will Improve Our Life
Wearable health technology improved the face of healthcare. In a research conducted by Soreon, it was found that the healthcare sector will be immensely benefited from the evolution of wearable technology. The source estimated that the industry, which was evaluated at $2 billion in 2014, will grow into $41 billion by 2020.

Another report released by CDW research estimated that the use of wearable devices will help cut healthcare expenses of people by up to 16 percent in the next five years.

Physicians suggest that 88 percent of their patients are using wearables to keep track of their health. The statistical data provided by these handy devices are also helping doctors to understand their patient's problem better. If prevention is better than cure, wearable devices are a big boon for people looking to keep track of their health and nip deadly diseases in their early stages.

Big brands in wearable tech development? are already working on developing wearable devices that will help people suffering from neuropathic pain, macular degeneration, Alzheimer's, and diabetes.

5. Wearables to improve the life of disabled and senior citizens

5 Ways Wearable Technology will Improve Our Life
Senior citizens and physically challenged people can become more independent and rely less on their caregivers by using wearable devices. For example, there are smart glasses to help people with permanent movement disorders to surf the web and take pictures. Likewise, there is help with Tempo for aged people to identify potential problems that occur because of changes in their daily routine. There is another amazing wearable called eSight that allows blind people to see the world again.

Bottom Line
These are mind-blowing ways how wearable technology improving our daily life and how high-tech wearables will boost work capabilities & impact to change your everyday life. There is no doubt about the fact that wearables are opening up new avenues for people to identify their health and fitness problems and take action before even disaster strikes their life.

Have you started using smart devices to improve the quality of your life? Which wearable are you using?

Article By Cathy Vincent - Cathy is the writer and social media strategist at lifeinsurancepost.com, a community of life insurance experts offering advice to people on how they can protect their family with the right insurance. She is a technology freak and spends most of her time exploring new gadgets and apps.

Displaying a gadget only on the home page - or only on a specific page

This article is about how to set up a gadget / widget in Blogger so that it is only visible on the first place that a reader sees when they visit your blog (often called the "home page").  It is one of a series of articles about controlling what goes on the homepage of your blogspot blog.


Front Page Bob
By Paginator (Own work)
 [CC-BY-3.0], via Wikimedia Commons
There are a number of reasons why you might want to put a gadget only the screen that shows when a visitor first navigates to your blog's home page.

You may want to show a welcome message, or a topic-index page, or to give a view of your recent tweets or some other RSS feed.    

No matter what the reason, the process is very similar:

How to make a gadget only appear on the first page

Note:  in Blogger, the words "gadget", "widget", and even "page-element" all mean the same thing.  I generally use "gadget", because the Page Elements tab currently says "Add a Gadget".  But they're absolutely the same.

1   Add the gadget

Do this in the usual way.


2  Place the gadget

Drag-and-drop the gadget to the place where you want it.   It may be over or under your blog-posts gadget, or in a totally different place.

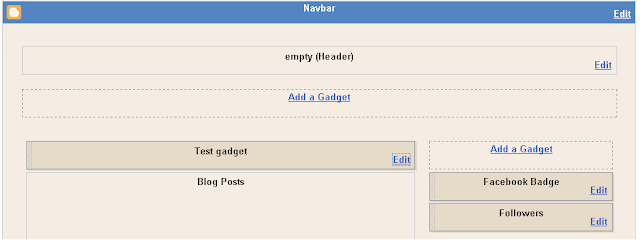
A popular place for a gadget that is going to look like a "home page" would be in the Body section, just above the Blog Posts gadget, where "Test Gadget" is in this example:


3   Find the Gadget-ID  in the usual way.


4  Find the code for your gadget:

Edit your template.

Click in the search box inside the template editor, and look for the widget name that you noted in step 3.   Once you've found it, notice what comes after it.   In this example, it's the line for Blog1:
          <b:section class='main' id='main' showaddelement='no'>
<b:widget id='Text1' locked='false' title='Test gadget' type='Text'/>
<b:widget id='Blog1' locked='true' title='Blog Posts' type='Blog'/>

Use the expansion triangle at the left side of the template editor to expand this section of the code.  After you do, it will look like:
 <b:section class='main' id='main' showaddelement='no'>
<b:widget id='Text1' locked='false' title='Test gadget' type='Text'>
<b:includable id='main'>
  <!-- only display title if it's non-empty -->
  <b:if cond='data:title != &quot;&quot;'>
    <h2 class='title'><data:title/></h2>
  </b:if>
  <div class='widget-content'>
    <data:content/>
  </div>
  <b:include name='quickedit'/>
</b:includable>
</b:widget>
<b:widget id='Blog1' locked='true' title='Blog Posts' type='Blog'>

5   Add conditional formatting

You need to put conditional formatting code around the code for the gadget - makings sure that it doesn't go around the code for anything else!  (which is why you noted what comes afterwards in step 4)

And to avoid leaving blank space where the gadget would have gone, you need to update a "hide" instruction to apply it to the gadget-id you noted in step 3.

The code to use is this - except put the gadget-id instead of the XXX.

<b:if cond='data:blog.canonicalUrl == data:blog.homepageUrl'>

THE red CODE FOR YOUR GADGET GOES IN HERE 
<b:else/>

<style type='text/css'>
#XXXX {display:none;}/*remove blank space that the gadget leaves*/
</style>
</b:if>

The example above looks like this, when the code has been added:
<b:section class='main' id='main' showaddelement='no'>
<b:widget id='Text1' locked='false' title='Test gadget' type='Text'>
<b:includable id='main'>
  <b:if cond='data:blog.canonicalUrl == data:blog.homepageUrl'>  <!-- only display title if it's non-empty -->
  <b:if cond='data:title != &quot;&quot;'>
    <h2 class='title'><data:title/></h2>
  </b:if>
  <div class='widget-content'>
    <data:content/>
  </div>

  <b:include name='quickedit'/>

<b:else/>

<style type='text/css'>
#Text1 {display:none;}/*remove blank space that the gadget leaves*/
</style>

</b:if>
</b:includable>
</b:widget>
<b:widget id='Blog1' locked='true' title='Blog Posts' type='Blog'>


6  Check that it's worked

Preview your blog before you save the changes:  check that the the widget is visible.

Save the template changes, and look at your blog.  Check that
  • The widget is on the first page
  • The widget is not seen when you look at an older page (eg one from your archive)
  • The other elements of your blog (other widgets, blog post titles, dates and contents) are all as you expect them - on the first screen, and on other screens too.

If anything is wrong with how your blog is working, go back to the template editor (Layout > Edit HTML), and upload from the copy of your template that you made at the beginning of step 1.   This will let you blog work properly, while you figure out what went wrong.


How to display a gadget only on a specific post or page


Follow exactly the same approach as above.

But instead of  
<b:if cond='data:blog.canonicalUrl == data:blog.homepageUrl'>

Make the conditional statement based on something else.

This can be a different condition, or a specific page URL.    For example to display a gadget only on a specific page, use this code, and put the address of the page instead of POST-URL:
<b:if cond='data:blog.canonicalUrl == "POST-URL"'>>

Note:   for the address of the page, if your blog does not have a custom domain, then be careful to use the "blogspot.com" version of the address, not one with a country-level name  (eg the blogspot.in or blogspot.co.uk version)


To display a gadget on every page except a specifc one, replace the double equals signs (==) with the HTML code for not, which is an exclamation mark followed by an equal sign (!=).   For example:
<b:if cond='data:blog.canonicalUrl != data:blog.homepageUrl'>

Blogger have now provided an expanded list of conditional statements - you can find information about it:


Where to get more information

Controlling what goes on the homepage

Adding a gadget / widget / page-element to your blog

Editing your blogger template

Putting a slideshow from Picasa onto your blog

Getting the HTML code to put a picture into your blog

Making a gadget that looks like a posthttp://buzz.blogger.com/2015/06/even-more-expansions-to-blogger.html

How to find a gadget in the Add a Gadget list - quickly

This article explains a quick way to find the widget that you are looking for in the list that Blogger displays when you use the Add a Gadget tool.


When you start to add a gadget to your blog, Blogger opens a new window listing all the existing page-elements that are available (in two tabs) and allowing you to upload a widget of your own (in a third tab.)

Currently, the first tab (called Basics) has 28 gadgets listed, while the second one (called More gadgets) has 899, displayed in pages of 30.

There is a search-for-gadgets feature available on the second tab - but it doesn't return gadgets that are listed on the first tab.   And even when it did, I didn't recommend it, because sometimes 3rd party gadgets with similar names were listed before the official widgets developed by Blogger.

So, to find a gadget that's listed in the Basics tab, you have to scroll down the list until you see the gadget you want.   However there are some problems with this.
  • Given that there are 28 gadgets listed, but only about 4 shown at each click (may be different if you have a larger screen), this can be a lot of clicks.
  • It's very easy to miss the gadget you want, and keep clicking through to the bottom instead.

But there is a very simple way to go directly to the gadget you want, provided you know what it is called, or some words that are shown in the description of that gadget and no other.


How to navigate directly to your desired gadget

Choose Add a gadget

When the new window has opened, use your browser's "find" command.
  • In Chrome and Firefox, this is ctrl /f ,   ie hold down the Control key while pressing the "f" key once.

Type in a  few letters of the name (or description) of the gadget you want.  
Note:  these can be any letter, they don't have to be at the start.  But they must appear together.


Usually, as soon as you start typing, your web-browser will start scrolling down to the first place in the screen where the letters you type appear.   So if you choose the gadget details you type carefully, you should end up scrolled down to the gadget you want very quickly indeed.

The scroll bar at the side shows how far down the window you have come, and also if there are more cases of those letters further down the page.

And once you are at the gadget you want, you can just click the name or the blue plus-sign on the right side to open the gadget configuration page.

To sum up:

Use your browser's Find tool to go straight to what your're looking for in the Add a Gadget list. 
[tweet this]


What to search for to find popular gadgets

The words that I search for most often when I'm adding gadgets are:
  • HTM - for the HTML/Javsascript gadget
  • Ads - for the Adsense gadget
  • Link L - for the linked-list gadget.


What about you - what gadgets do you most frequently add to your blogs?


Related Articles:

Backing up your gadget settings

How to add a gadget to your blog

Where to find the HTML code for popular Blogger widgets

How to add a Google Contacts button to your blog, website or desktop

This article shows how to add a button that takes a user straight to Google Contacts to your blog or website.   It also distributes a picture that you can use in other places (eg your PC desktop) to make your own Google Contacts icon.


Most people have a button on their computer or smartphone, which they use to start their email.  For some, this goes straight to their Gmail account in a web-browser, while others use an system like Thunderbird or Outlook to look at their email messages in a Gmail account and/or in email accounts they have with other services.

If you use Gmail as your email system, then Google also gives you an address book, which they call Contacts. This is not the same as the address book in Thunderbird or Outlook etc, which is saved on your local computer.   Instead, the Google address book is saved on the internet, in your Google account.

Google Contacts is tightly linked to your Gmail account, and the way that most people access it is by:
  • Going to Gmail 
  • Clicking on the Contacts button in the left-sidebar.

But you can go straight into your Google Contacts, without having to load Gmail first.   And I often find that it is faster, especially if I just want to look up an address or phone number and not send an email.

To go directly into your Google Contacts book, just type    www.google.com/contacts into the address-bar of your web-browser.

This is easy - but some people would prefer to have a button that they can click, rather than having to manually type an address.

So I have created a picture that can be used on such a button, and written up instructions on how to add it to your website, or your computer.   This is licensed under Creative Commons:  I am giving permission for it to be freely used on any website, so long as you say where it came from in the way that I've shown below.

(If you a wondering "why on earth would anyone want that" - then please don't waste time reading further - you are clearly not the target audience of this post!   I know that there are some people who will be delighted with the idea, and that's who I'm writing for today.)


How to add a Google Contacts button to your blog or website

Set up a place to put the button

If you want to add the button to Blogger, then just add a gadget in the usual way, and choose gadget-type of HTML/Javascript.

If you want to add it to some other type of blog or website, then you need to use whatever procedure is required to add 3rd-party HTML to your site.

Add the code

The HTML code to add is:
<div class="separator" style="clear: both; text-align: center;"><a href="https://www.google.com/contacts" imageanchor="1" style="margin-left: 1em; margin-right: 1em;" target="_blank"><img border="0" src="https://blogger.googleusercontent.com/img/b/R29vZ2xl/AVvXsEh1CaB5McxEVnpYHaYk2j3pN570Px46DBSue3AnlCUybqahXWBPSgGtHkd8p0t84v9khaokpDFKbt2dnx6Z2Xtf_077a77Q7piR8qnd_96MA6eIAEqSYf9LAhb3q-gvYugZaSzmhoopWuy9/s490/google-contacts-icon.png" width="50%" /><!-- Google Contacts Start button from www.Blogger-hints-and-tips.blogspot.com   Design � Blogger Hints-an-Tips, 2014.   Licensed under Creative Commons Attribution-ShareAlike 4.0 International (CC BY-SA 4.0)  -->  </a></div>

Make sure you all all the code, including the Creative Commons license information - this is what says you are allowed to use the picture.

Configure the size

You can change the size of the button by changing the number in this statement:
width="98%"
On my sidebar in Blogger-Hint-and-tips, I have it set to 50%.

You can use either a percentage value, as shown, or a pixels or em measure, for example
width="50px"
width="10em"

Job done!

Save the change in the usual way, and you will have a button on your website which opens Google Contacts


How to add a Google Contacts button to your computer / laptop / desktop

This is a little more difficult to describe, because it depends on exactly what computer and operating system you have, and what you mean by adding the button "to your computer".   But here are some options.

Browser Favorites

One option is to go to  www.google.com/contacts   and then before you do anything else save it to the Favourites section in your browser - and then you know you can get to Contacts using your regular internet button and choosing it from your favourites.


In the Windows desktop

Right click on your desktop
  1. Choose New
  2. Choose Shortcut
  3. In the screen that asks what you want the shortcut to, enter  www.google.com/contacts
  4. Click Next
  5. Enter the Name you want the link to have, eg "Google Contacts", and click Finish


The shortcut that is added to your desktop has a standard internet picture.   To change it to another
  1. Download this file to your computer, and save it somewhere.
  2. Right click on the shortcut that was created, and choose Properties.
  3. Choose Change Icon
  4. Choose the file that you saved in step 1


Note:   these instructions were prepared using Windows 8 - they may vary slightly for earlier versions.   But the same general approach applies.


Related Articles:

Copyright, blogs and bloggers

How to add a gadget to your blog

Keep a backup copy of complicated gadget settings

This article explains why it's a good idea to keep a backup copy of settings for your gadget, in particular for HTML/Javascript gadgets that have complicated, hard-to-regenerate, code.


Blogger's backup tools let you take copies of:
  • your post-contents and (separately) 
  • your template. 

Some 3rd party backup tools (eg HTTRack) let you make backup copies of how your blog looks - including the consequences of displaying your gadgets.

But as far as i know, there is no way that you can back up the settings (ie parameters or configuration) that are stored inside the widgets on your blog.

This can be a problem if you accidentally remove a gadget, or if you have an HTML gadget and get the code wrong in it: Blogger is quite unforgiving sometimes, and the HTML/Javascript gadget editor simply removes any code that it doesn't understand.

In some cases, this isn't not a big problem  eg if you show a picture as a gadget, then it's generally easy enough to work out characteristics that you would need to enter to re-create the gadget.

But if you lose a complex gadget (eg your own customised set of subscription buttons), then re-creating it could be difficult and time-consuming.

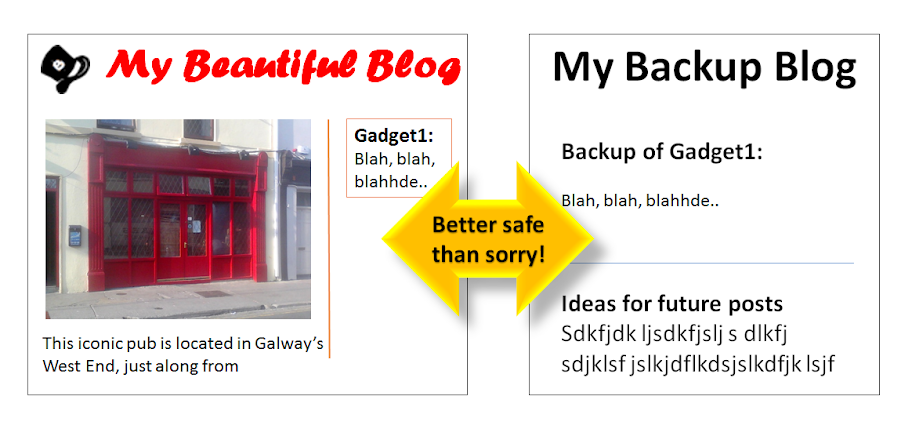
So - for HTML/Javascript gadgets which have code which you think is complex, I recommend keeping a backup copy of the gadget code somewhere.

Personally I usually put it in a post in a private blog where I draft posts and keep the documentation for each blog - but you could use a range of other places, eg a text file on your computer or on Google Drive, or even any email message to yourself.


How to back up code from HTML/Javascript gadgets in a private blog post

Every time you edit a gadget that you want to keep a backup for, then just before you click Save:
  • Press Ctrl/a to select all the text in the gadget window.
  • Press ctrl/C to copy it
  • Switch to use Blogger in a different window
  • Open up the documentation blog, and navigate to the post where you keep the code for that gadget
  • Edit that post - or make a new one if you don't have one already.
  • Make sure that you're in Compose view, and the Options > Compose Mode setting is on "show HTML literally" (ie not on "interpret HTML")
  • Paste the gadget code into the post, and publish it.

Although this sounds tedious, it's really very quick to do. And losing complicated gadget code, even once, is a good incentive to remember to back it up every time.

Hint: Put a comment to remind yourself where to back this gadget at the top and/or bottom of the gadget code. This reduces the chance that you will forget. A comment is done in HTML like this:
<!-- DON'T FORGET TO BACK UP THIS GADGET CODE  -->


How to back up complicated non-code gadgets

If your gadget has complicated settings which aren't code, one option is to take a screen-shot and save it to your photo collection, or even just a text-file or documentation-blog post where you keep notes about what the settings are.

You won't be able to automatically restore your gadget settings from this, but it should be a good reminder of what you need to do (provided you can find the picture when you need it).

Unfortunately there's no easy way to pack up linked-list or blogroll gadgets at the moment. However making a copy of your site using HTTracker will show you the list, and what the items link to.

Or you could build your linked list code manually (using the same trick that that I recommend for getting picture code) and put it into a HTML/Javascript gadget, which is based up as described above. The code for a handcrafted linked-list gadget looks like this:
<ul>
<li>PUT THE TEXT HERE FOR YOUR FIRST LINK TEXT.</li>
<li>PUT THE TEXT HERE FOR YOUR SECOND LINK TEXT.</li>
<li>PUT THE TEXT HERE FOR YOUR THIRD LINK TEXT.</li>
<li>etc</li>
</ul>


Related Articles:

How to add a picture as a gadget in Blogger

Using the post-editor to build HTML code for gadgets

Prepare your blog-posts in private, using a documentation blog

Putting a picture on your blog as a Gadget

You can put a picture anywhere in your Blogger blog that you can insert a gadget - and you can make it link to a post in your blog or to any other website.

The Image gadget

Dry dock in Claddagh Basin
A very simple way to put a picture into your blog is to use an Image gadget (previously called a Picture gadget).  

This is a tool that Blogger provides to make is easy to add a picture that shows up on all screen and is linked to somewhere.

Often gadgets (sometimes called widgets or page elements) are put on the sidebar - but in many blogger templates they can go in other places too (header, footer, etc).


Follow these steps to add a picture gadget:


1  Make sure you know where the original picture is and that you have copyright permission to use it.


2  Copy the location (URL or file system full path-name) of the picture - and remember whether it's on your computer, or on the internet.  
(This article tells you how to find the URL of a picture that's already stored in Picasa.   To find the URL of a picture on the internet, you can often right-click on it and choose "copy image location")


3  In Blogger, follow the usual Add a Gadget procedure, and choose the Image gadget from the list of options (you may have to scroll down to find it in the list).


4  In the Configure-Image box, enter the options you want for your picture.   These include:

  • The title for the Gadget,
  • The caption for the picture
    (the small words that go underneath it, usually explaining it, or where it came from),
  • What should happen when a reader clicks the picture - put this into the Link field
  • Where to find the picture
    (ie the file-location that you copied in step 2)
  • Whether to re-size (ie shrink) the picture to fix the space in the sidebar in your current template.


5 Press Save.


6  If necessary, drag-and-drop the new gadget to the place where you want the picture to go, and press Save.


What your visitors see:

People who visit your blog in a web-browser, will see the picture, in the place where you put the gadget.  However pictures are not supported gadgets for dynamic view templates, so it won't be see if you use one of these.

Also, people who see your blog through an RSS reader, or by receiving emailed updates don't see any gadgets, so they will not see the picture.  

If you entered a value for Link, your visitor's browser leaves your blog and goes to the Link location:  with the Picture gadget, then there is no way to make this open a new window.   If you want to do so, then use an HTML gadget instead, get the code for the picture, and put target = "_blank"   into it:, so the code looks something like: 
<a href="YOUR LINK" imageanchor="1" style="margin-left: 1em; margin-right: 1em;" target = "_blank"><img border="0" src="YOUR PICTURE LOCATION" /></a>


Related Articles

Options for putting pictures into your blog

Copyright, blogs and bloggers

Picasa and Blogger - an overview

Getting the HTML to add a picture to your blog

Finding a picture's location in Pisasa-web-albums

Finding the URL of a picture stored in Flickr

Showing a PowerPoint presentation in your blog

Why RSS / Subscribe to Posts is important for bloggers

Following a blog by email

Kategori

Kategori