How To Optimize Blogger Blog For Mobile Phones

how-to-optimize-blogger-blog-for-mobile-sites

Many blogging networks like wordpress, weebly, hostgator etc provides mobile sites to their users, similar to them blogger also provides this feature to its users. Blogger provides mobile site as well as templates for mobile sites which are well made for all mobile phone screens. Although blogger is good for blogging as it has desktop and mobile sites but like desktop template you have to optimize your blog for mobile phones. And for this you need to add some Gadgets, so that you could get benefit of your desktop as well as mobile site. 

Initially all blogger mobile sites have simple or default templates which allow only specific gadgets such as: 
  • Header(logo)
  • Footer(powered by blogger)
  • Page list
  • Blog(posts)
  • Adsense
  • Profile
So you can't get full benefit of your mobile site until you have optimized it. So in this post I will help you to optimize your blog for mobiles so that you could get benefit from your mobile visitors.

In this post you will learn following things:
  • How to optimize mobile template(basics).
  • How to hide all useless things in mobile site which shouldn't appear on mobile site.
  • How to show essential gadgets in mobile template(Related posts, Ads, Follow/Share buttons, Search box).
So lets begin, we will start from optimizing mobile template.

Optimizing Mobile Template In Blogger:

Blogger has many mobile templates e.g simple, dynamic, picture view, Awesome inc, Water mark tec.

mobile-templates-blogger-101helper

And all the templates have different views, all blogger templates have an awesome look but they do not give you full benefit as they don't allow ads and other custom gadgets. So you can't add related posts widget(which is essential to increase page-views). 

So you need to use custom template and optimize it. Follow below steps to switch on your custom mobile template.

Step 1: Go to template and click on the icon shown below mobile template.

How-to-optimize-blogger-blogs

Step 2: Choose the custom template and click on save.

Blogger-mobile-template-101helper

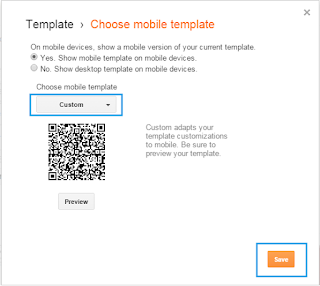
Congratulations! you have successfully switched on custom template for your blogger mobile site.

Hiding Things In Blogger Mobile Site:

Every blog has something that should be only on desktop such as a gadget. But when a blogger mobile template is switched to custom every thing you have added in your blog template will start appearing in mobile view too. Here I have to mention that only those things appear in mobile sites also if you have added it in template, but if you have added something in layout as a new gadget, it won't appear in mobile site until you have enabled it. So here I am going to show you how to hide something in mobile view of blogger by using xml.

Step 1: Go to template and click on edit html.

Step 2: Click inside the code and search for something which you want to show only in desktop and hide it in mobile site.


OR

Add something to your template for example a gadget or a comment or a picture.

Step 3: Now just before the code which you want to hide in mobile site paste the following piece of code:

<b:if cond='data:blog.isMobile == &quot;false&quot;'>

and after the code(which you want to hide in mobile site) type </b:if>

Explanation:

For example you have following code and you want to hide it in your mobile site:

<html>
<body>

<em>Emphasized text</em><br>
<strong>Strong text</strong><br>
<code>A piece of computer code</code><br>
<samp>Sample output from a computer program</samp><br>
<kbd>Keyboard input</kbd><br>
<var>Variable</var>

</body>
</html>

Then according to above method your code should look like below code:

<b:if cond='data:blog.isMobile == &quot;false&quot;'>
<html>
<body>

<em>Emphasized text</em><br>
<strong>Strong text</strong><br>
<code>A piece of computer code</code><br>
<samp>Sample output from a computer program</samp><br>
<kbd>Keyboard input</kbd><br>
<var>Variable</var>

</body>
</html> 
</b:if>

Gadgets For Blogger Mobile Site:

Blogger gadgets created by blogger or other websites aren't compatible with mobile sites so you have to use special gadgets for blogger mobile site you can find some mobile site gadgets here.

Showing Things Only In Blogger Mobile Site:

If your blog has something that you would like to show in mobile site only then its possible now, how? Just use the below piece of code above the content which you would like to show only in mobile site:

<b:if cond='data:blog.isMobile == &quot;true&quot;'>

and after it just add this piece of code:

</b:if>

For example I want to show this line in mobile site only "I am fahim, you can call me FK" then in my template it should be like this:

<b:if cond='data:blog.isMobile == &quot;true&quot;'>
I am fahim, you can call me FK
</b:if>

Now it will be shown only in mobile site. You can use this to show related posts widget in blogger mobile site.

Check out: More Mobile Blogging Tutorials To Improve You Mobile Site!

Hope you like this post. If you have any question please help me know by leaving a comment below.

Seach tags: Blogger mobile site,Blogger mobile site,Optimize Blogger Blog For Mobile Phones,Blogger mobile site gadgets,101helper

Search Box For Blogger Mobile Site

Search Box For Blogger Mobile View

Like other blogging networks blogger also has mobile view for mobile users. It loads very quickly as it is in kilo-bites so mobile users can also read blogs by wifi connections or by mobile data. Blogger provides mobile view and also templates for it, but you have to optimize it in your way to get benefit of it e.g enabling ads, enabling essential gadgets(follow button, search box, related posts etc). It will help you to get more traffic as after optimizing your blog for mobile phones, you will be able to get mobile views too instead of loosing it. The default gadgets aren't optimized for mobile view so you need to use optimized gadgets for mobile view, One of the most essential gadgets(search box) which is powered by blogger doesn't work in all mobiles, it works only in smartphones like Iphone, Android, Htc, Nokia lumia phone etc but the phones which don't have android or ios aren't optimized for the common search box so you have to optimize search box to make it work in all mobile phones whether it is smart or not. Although the default search box works in smartphones but if it is used to search something, it works very slowly and the pages take too much time to load because the page is first searched for desktop fist and then converted to mobile view. So in this post I will share a well optimized search box for blogger mobile view which will work in all mobile phones.

How to add search box in blogger mobile view:

Step 1: Go to blogger dashboard and navigate to layout:

search-box-for-mobile-view-blogger

Step 2: Click on Add a gadget > Html/javascript.

how-to-add-a-gadget-in-blogger
Step 3: Copy below code and paste it into Html//javascript window:

<!-- Search box for blogger mobile by 101helper.blogspot.com -->

<form id="searchbox" method="get" action="/search">

<input name="q" type="text" id="search-in" size="19" required />

<input name="m" type="hidden" value="1" />

<button type="submit"  class="_54k8 _56bs _56b_ _56bw _56bu"  id="u_0_1" data-sigil="touchable"><span class="_55sr">Go!</span></button>

</form>

<style>

form#searchbox {
  position: relative;
  left: -40px;
  right: 0px;
  margin-left: 24%;
  margin-right: 24%;
width: 85%;
}
button#u_0_1 {
  position: relative;
  width: 45px;
  height: 25px;
color:white;
background:#4491f0;
border-color:#4491f0;
}
input#search-in {
  height: 20px;
}
</style>
<!-- Search box for blogger mobile by 101helper.blogspot.com -->

Step 4: Click on save and you are almost done but it will show up in desktop so you have to hide it from desktop and show it only in mobile view, follow next step to move ahead!

Related post: How to show a widget in mobile view only in blogger?

Step 5: Edit the mobile search box gadget which you added now and search for the widget id, see below image for instance.

how-to-find-id-of-a-widget-in-blogger


Step 6: Note the widget ID and go to template > Edit Html:

how-to-edit-html-in-blogger

Step 7: Click on Jump to widget and click on the widget ID of search box gadget which you found in step 5.
how-to-find-a-widget-in-blogger-template

Step 8: After finding the widget type mobile='only' beside locked='false'.

enable-a-widget-in-blogger-mobile-only

Step 9: Click on save template and you are done.

If the search box still fails to appear in mobile view of your blog then go to template > Click on Customize mobile template icon > Switch default template to custom and click on save.

custom-template-blogger-mobile

custom-template-blogger

Open your blog by using this link http://myblog.blogspot.com/?m=1 to see your search box. This search box will work in all mobile phones and will work fast.

Hope you like this article and it was helpful to you, if you have any question please help me know by leaving a comment below.

How To Optimize Post Links In Blogger For Higher Search Results

How-To-Optimize-Post-Links-in-Blogger-seo


For higher search results seo optimization is very important and for that you have to keep all things in mind like description, title and links. As description and title optimization is discussed before so in this post we will talk about link optimization only. So in this post I will tell you how to optimize your blogger blog post links for higher results and also how does it help in search results.

How It Works?

It works in a very simple way for example if you search "101helper" on Google you will find following results:

Optimize-Post-Links-in-Blogger-seo

In above search results "101helper" is shown in bold style(highlighted) which we searched on Google. You can see that "101helper" is highlighted two times one in description and other in link so in this way link optimization is good for seo.

How To Optimize Post Links In Blogger: 

Follow below steps to optimize your blog post's links for seo. You have to follow it whenever you are going to publish a post:

Step 1: Go to blogger dashboard > Posts > New post.

Step 2: write title of your post and click on save:

How-To-Optimize-Post-Links-in-Blogger-seo-101helper

Step 3: Click on Permalink on right side of the editor below Schedule:

Seo-tutorials-blogger-101helper

Step 4: Switch to Custom Permalink from Automatic Permalink.

How-To-Optimize-Post-Links-in-Blogger-seo-blogspot

Step 5: Type keywords of your post which are searched on Google more frequently and click on Done.

Note: Use a hyphen(-) after each keyword you write. For example if your link is http://myblog.blogspot.com/2015/05/this-is-my-link and you want to optimize it by adding some keywords to it then you have to type a hyphen after each word e.g http://myblog.blogspot.com/2015/05/this-is-my-link-fully-optimized

If you use dots(.) or blank space blogger won't accept it.

http://myblog.blogspot.com/2015/05/this-is-my-link-fully-optimized ?

http://myblog.blogspot.com/2015/05/this is my link and its not optimized ?
http://myblog.blogspot.com/2015/05/this.is.my.link.and.its.not.optimized ?

Step 6: Publish your post and you are done.

Don't try to use underscores(_) in your links its not good for seo. 

Hope you like this post and it was helpful to you. Follow and subscribe to get more seo tutorials in your inbox. Share this post with others and visit 101Helper again for new posts.

How to change the author for a published blog-post

This article explains how to change the author of a post that has already been published in Blogger.

Blogger posts and changing post-authors

When you Publish a post in Blogger, a number of features are set up for the post, as well as the contents.  These include:

Some of these can be changed by editing the published post.

But there are some features that cannot be altered after they are set.

In particular, Author is not changed even if a different Google account is used to edit the post - or if the original author has their permission to write to the blog removed.

This can lead to interesting situations on multi-author blogs, especially when one writer leaves the team and perhaps even deletes their Google account.   Because of this, some blog owners choose to not show the "Posted-by"field (set on the Layout > Blog Posts edit > "Posted by" option).

But even if post-author is not displayed on the blog, it is useful for administrator to know who exactly posted each post.

That said, when someone asks how to change the posted-by (ie author) value, the simple, and correct, answer is "You can't."

But there is a way to make it look like the author has been changed, so that only the most eagle-eyed readers will be able to tell the difference.


How to change the author of an existing blog-post

In short, you need to make a new post with the same contents, and then use a custom-redirect so that anyone who tries to look at the old post (eg by following a link to it) is automatically taken to the new post.


Follow these steps:

You need to take note of several values during this procedure, which are used later on. It may good to open a text-editor (eg Notepad) before you start.


1   Look at the URL of the existing post, and note the part that is from the single-slash after your blog's name,  For example in
http://www.Example.blogspot.com/2012/06/my-post-title   
the part you are looking for is the bold part, ie "/2012/06/my-post-title" - including the single slash a the start.


2    Edit the existing post, go to the HTML tab and


3    Log in to Blogger with the account that you want to use as the new post author-name.


4    Create a new post, and make sure you have the same setting under Options > Line breaks, to be sure that you get the spacing right.


5   Edit the post to be just like the old one:
  • Put the HTML that you copied into in the HTML view of the new post.
  • Apply any Labels or Location values that applied to the old post.
  • Make the title the same as it was in the old post.
  • Change the date to the same as the old post.


6   Make the URL of the new post similar but not quite the same:
  • Put the value you found in 1 step into the custom-permalink field
  • Add some text to it so that it is not the same as the original value,
    eg make "my-post-title" into "my-post-title1"


7   Publish the post and  note the part of  the post-URL from the single-slash after your blog's name


8   Set up a re-direct from the old post to the new post:
  • Go to Settings > Search Preferences
  • Edit the Custom Redirects
  • Add a new redirection (only needed if you already have some)
  • Enter the value from step 1 into From
  • Enter the value from step 7 into To
  • Tick Permanent
  • Click the save link for this particular re-direction, and then the Save Changes button.

picture of the Settings > Search Preferences > add re-direction settings screen in Google's Blogger tool


9   Check your blog, to make sure that the re-direction is working correctly.


10  Once you are happy that the re-direction is working correctly, delete the old post.
You will need either the existing author account, or a Google account with administrator rights, to do this.   If SEO matters for your blog, then it is good to do it as soon as you can, so you are not penalized for having duplicate content.


What your readers will see

eyeglasses underneath orange RSS chiclet icon
Everyone who is subscribed to your blog's RSS-feed or follow-by-email gadget will see a new post.
(I you don't want this, turn your feed off before you start - but don't forget to turn on again when you are finished!)

Visitors who browse your blog posts will see the "old" post, with the new author, in the original place.

Visitors who try to go directly to the old post via an existing link or from search-engine results will automatically be re-directed to the "new" version of the post. Very observant ones may notice that the URL is slightly different from the original. Most won't.


A quicker way:  get control of the original Author account

The method described above is fiddly and tedious - especially if you want to change the author of many posts.

An alternative is to ask the original author if they still want the Google account  that they used to make the posts. If you are lucky they
  • Don't want it, and 
  • Are willing to hand the password over to you. 

In this case, you could
  1. Quickly change the password (before they change their mind!), and
  2. Edit their profile to the new author name that you would like to have displayed. You may also want to change some other details - and if they are using a Google+ profile and you already have one, then you should probably delete this.

This isn't a total solution, of course: no matter how you edit their profile, it will still be different to your own profile. But it may be better than nothing.


Related Articles

How to edit a post that has already been published

Understanding Google accounts

Copying a post from one blog to another

Giving someone permission to author posts

Changing the publication date for a blogger post

Setting the URL for Blogger posts

Why SEO doesn't matter for some blogs

How To Show Ads Below/Above Post Footer And Header In Blogger

How To Show Ads Below/Above Post Footer And Header In Blogger

Making money through a blog is not easy if you don't know tricks to get more clicks on your ads. Its a common problem with everyone that they get enough views but ad click rate is very low, some reasons for this are low traffic, wrong position of ads or use of text ads only etc. Position of ads has major effect on clicks rate so to get more clicks on your ads you have to show your ads in such positions which are clear to users e.g below post header, in sidebar and above footer. Since blogger has no option to show ads below post titles and above footer so you have to do it manually. In this post I will show you how to show your ads below post titles and above footer.

How To Show Ads Below Post Titles In Blogger:


How To Show Ads Below Post Titles In Blogger

Follow below steps to show your ads below post titles:

Step 1: Go to Blogger Dashboard > Template > Search for <div class='post-header'> by using Ctrl+F.

Note: Search <div class='post-header'> two times.

Step 2: Copy below code and paste it below the above code which you have searched:

<b:if cond='data:blog.pageType == "item"'>Your ad code</b:if>

Note: Remember to add the code below the second one.

Step 3: Replace "Your ad code" with your ad code.

Step 4: Click on save template and you are done.

How To Show Ads Above Post Footer In Blogger:


Follow below steps to show your ads above post footer:

Step 1: Navigate to Blogger Dashboard > Template > Search <div class='post-footer'> by using Ctrl+F.

Note: Search <div class='post-footer'> two times.

Step 2: Copy below code and paste it above <div class='post-footer'>:

<b:if cond='data:blog.pageType == "item"'>Your ad code</b:if>

Note: Remember to add the code below the second one.

Step 3: Replace "Your ad code" with your ad code.

Step 4: Click on save template and you are done.


videostutorialsHope you like this post and you founf it helpful. Follow and subscribe to get instant updates about blogger tricks. Share this post with others and spread my voice. Thank you for visiting 101Helper.

Search tags: Show ads below post titles in blogger, Show ads above post footer in blogger, 101Helper blogging tricks, Get clicks on ads, Increase Adsense earnings.

Kategori

Kategori