Google Doodles for New Year's Eve 2016!

Happy new year 2016

It goes without say that every year we celebrate New Year�s Eve. I hope this year won�t be different. However every sites, company, organization expressing their wishes by doing something different and something new. Some of them released new calendar, wallpapers, or Software Company giving biggest discount on this occasion.

But as a Blogger we should celebrate many ways for our Blog readers. Such as by releasing new widget, Template or giving something free of cost. Anyway, the most dominating search engine Google wishing to the entire search visitors through then website by using Google doodles.

This is not any special or new to Google Fan. I am sure that you have seen many Google doodles on various occasions. Similarly for the New Year 2016 Google has released another new Google doodle which can be seen by visiting google.com page.


What�s new this Year?

Every year Google doodle design with something new design. And this year Google doodle is very simple. 5 birds are waiting for hatching eggs that when it will come out. And another bird is frequently following the watch. This is really beautiful. Here GOOGLE is written with 6 letters and 5 birds means GOOG*E and after hatching the 6th Bird the GOOGLE word will be complete. I think 31st Night 12 A.M 6th Bird will be visible. This is the mystery here. So they have kept us waiting to see the 6thBird. This is really cool Idea.

Blogger Spice

You may think how can we decorate our site in this New Year? We can use various widget for making our site little different. You can use fireworks widget from below link.


Or you can add New Year countdown widget. Though I have created it for 2015 but by changing date and time we can use it.


Finally Egg has hatched after 12 AM on 1st January 2016... check out the below doodle.


Happy new year 2016


I wish all the best to BloggerSpice.com readers and well wisher. Thanks for being a part of us and continuous support that help us to stand alone over the crowed and Happy New Year 2016. Thank you. 

How to set auto reply to your Facebook Initial Messages?

enable instant reply on facebook

These days are getting really busy. As a Blogger we haven�t enough time to response to all the email instantly. Those who are part time Blogger like me they are also get little chance to sign in to their Blog all the time. However if we spend much time on our Blog then we are unable to give much time on our Blog�s social media site.

Almost all Blog sites having Facebook Fan page. There many visitors love to make comment or exchange thoughts. In addition many Blogger want to hide their identity and interact through social media site. Actually this is totally wrong Idea. However whenever I get time I make comments on other�s Blog. Now days a tendency has grown that as a Blogger if I make any comment on other Blog then my status will go down around the web. But remember that you won�t be able to grow until expend your readers circle.

Anyway, for solving the delay reply issue on social media site like Facebook, we have a great feature. This is called Instant replies to initial messages.

This feature work like charm, because whenever a new message sent by your Fan then a automatically reply will send through this facebook feature. But you have to write a message previously. You can activate this feature for any purpose. Suppose you are going in vacation and you aren�t able to reply to all message then you can set auto reply message and your Facebook fan will understand that you are on vacation now and unable to reply.

This feature will help to reduce misunderstanding. We make comments on various Facebook fan page for help. But if we don�t get any response within shortest period of time then we may unlike that page. So this is very useful for Blogger to maintain their social media site.   


How to set auto reply to your Facebook Initial Messages?

After knowing benefits of auto reply message now I will show you the procedure to set auto reply on your Blogger facebook fan page. Just go through the below steps-

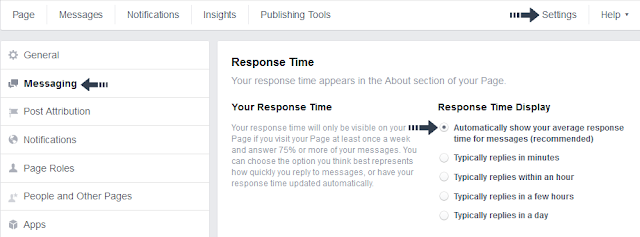
Step 1 Visit https://www.facebook.com/ and click Settings option from the top right corner.

Step 2 From Settingspage click Messaging link from left side and locate Response Time.

auto reply setting

Step 3 There you will able to set the reply time. Suppose you want to reply within minutes or, within an hour then you can select option by clicking on radio button. But if you are uncertain about sign in to your Facebook fan page and make reply to the messages then simply select Automatically show your average response time for messages (recommended). After selecting this option page Fan will see how long you take to reply a message, because this feature will display average reply time in your Blog�s facebook fan page.

instant reply on Facebook

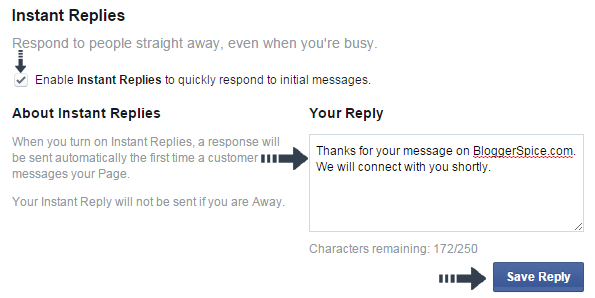
Step 3 After that scroll down and locate Instant Replies. And click on check box where written Enable Instant Replies to quickly respond to initial messages.

Step 4 Now reply message Box will activate. Simply write down your short message within 250 characters and finally click Save Reply button.

auto reply message


Now whenever any Fan will send you message then they will see that instant reply. And later you can reply according to the message. I think this feature will help you to manage your Blog fan page more professional way. 

Tutorial to add Video Cover in Facebook Video

custom cover for facebook video

Everyday huge videos are sharing on facebook and various social media site. This is very good for social media users. Because any short length videos can give a break on our mind, while spending longer time on social media side. However there are millions of videos you will find uploading and also same videos sharing and uploading by many users. As a result your video may not get enough hit while others already uploaded and shared on their social media profiles.

I believe that first impression is very important for diverting on website, Blog or videos. If you see a dull video thumbnail then you may not feel interest to click on it. As a result that video won�t get enough hits; even video quality is so good. This maybe seems to you making up your videos for better presentation.

So we have to find out a way to make our video more interesting and attractive for the viewers. And the solution is to add different thumbnail. Thought facebook hasn�t any option to use different thumbnail like YouTube. Because while you upload a video on YouTube then it creates 4 different thumbnails for videos and easily you can use anyone from that.

So the solution is to use any attractive wallpaper from other free image provider site. Note that you must use copyright free image. In this tutorial I will show you how to add or use a custom wallpaper or video cover on your uploaded video on Facebook fan page.

HOW TO ADD VIDEO COVER IN FACEBOOK VIDEO?

This is really easy trick to add a custom image thumbnail or wallpaper whatever you like.  And this will work as video cover. Please read it through for applying the trick.

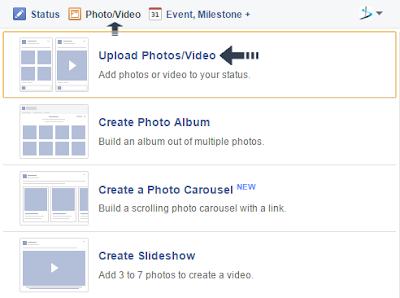
Step 1 Visit https://www.facebook.com/ and click Photo/Video option from the top.

Step 2 Photos/Videoupload option will be visible instantly. So click on there and choose a video file from your PC.

upload video on facebook

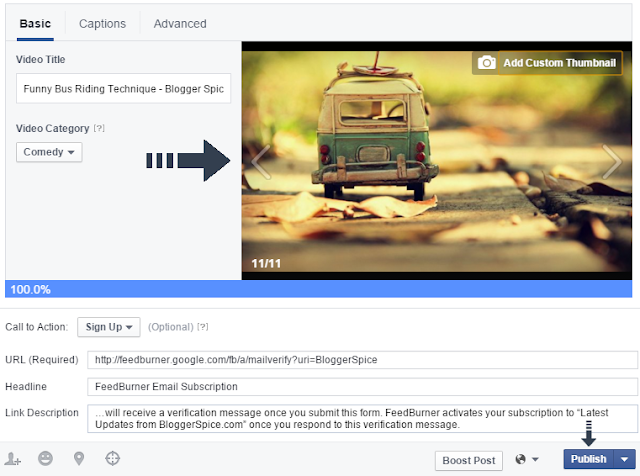
Step 3 Now give a suitable title for your Video in Video Title field under Basic tab. And select Video category by using drop down option. Your video will begin to upload 100%.

Step 4 After completion of video upload locate Add Custom Thumbnail from preview screen and select any wallpaper or image from your PC.

add custom image thumbnail

Step 5 Instantly wallpaper or image will add upon your main video. And it will cover up the main video thumbnail. Finally hit the Publishbutton from bottom of the window.

facebook video cover uploaded

Now see different video thumbnail showing on your facebook profile or fan page. And now video thumbnail is looking far better than original thumbnail. As a result while this video will visible on Facebook news feed then social media viewers will easily attract to click on it. And your video will get more hits.

This trick is best for Blogger. Because when we create video tutorial for our Blog visitors then they may not feel interest to watch the video. On the other hand if you create couple of videos for Blogger tutorial then you will see same image thumbnail is displaying on your all video tutorial. This makes a bad impression and viewers feel dull or monotonous. So to give a break Blogger can apply this trick and bring more hits on videos. No matter how is your video quality, but you must make the video thumbnail attractive to get more views on your videos tutorials. Happy Blogging!!!

What Is A Blog and How To Create A Blog?


In present time Blogging, Blogger, Blog are most popular & common well known word. Thereafter many people who still do not understand What a blog is? What is blogging? Who is a Blogger. And also why is blogging so much expanding in the cyberspace. I feel all these people need to know the right thing all about Blog and how can a Blog be created along with some other similar questions. So for those who just heard of a Blog from their friends, media or any other source, here is a brief and precise articles to help you learn overthrough about Blog.

 The most common question's  asked by newbies are,
  • What is a Blog?
  • How do I create a Blog?
  • What is the advantage of blogging?
  • What is Blogger or Wordpress?

Useful answers for these demanded question

What is a Blog?


A blog is gallery where we write something that we feel important to be recorder and shared with our friends and family and all over the world. We, May also say that A blog is an Online Notebook Diary. A notebook diary can be based on any topic based on writer/ownner choice. For example Writer can write on your  hobbies, tutorials, pets, activities, poems, songs, home and family, personal thoughts and so on. People may also read that Online Notebook Diary on daily basis and may leave comment, suggestion or feedback.

        A personal diary in a notebook made of papers can be reached only limited people.But with an online diary like a Blog can be made for the whole world!

       So In short "A Blog is a personal / professional website where you can write and share things you knowledge, like, opinion with millions of people who are eager to read."

That Mean's;

  • Blog:   A Online Notebook Diary
  • Blogger:    Who writes on Online Notebook Diary.
  • Blogging:   Overall process of writting & sharing articles through Online Notebook Diary


How do I create a Blog?


There are two option to create a blog. One Of them are Free & Another are Paid 

Paid: There are many quality Blog hosting services where you can create a blog by payong some money. For this process you have to buy domain & hosting.
I prefer free Blogging platform. Which are completely free. There are so many top ranked website which are also using free blogging platform. For example
helplogger.blogspot.com
www.mybloggertricks.com
www.mybloggerlab.com
www.probloggertricks.com
www.blogolect.com
www.newbloggertricks.com

Free:  There are so many popular platform which are providing free Blogging hosting service. Most popular of them are BLOGGER & WORDPRESS The best among them is Blogger. I have created this blog with Blogger without even paying money!
Here are a brief Tutorial to create  A Blog using BLOGGER & WORDPRESS

Create using Blogger:

Create using Wordpress:

 What is the advantage of blogging?


You pay nothing Instead you Earn in $$ !! You earn by displaying advertisements on your Blog. People are earning from $100 to $100,000 monthly! I am not kidding an example is shoemoney.com and problogger.net

Plus you will make new friends in the Blogosphere and you earn respect in the eyes of thousands of people. You can become a celebrity! But all this with a little hard work and great patience.

And the best advantage which I have experienced is that you learn every second online! Your internet and computer skills will improve to an extreme edge and this is what the coming era demands from you. Every second on blogging is undoubtedly a new experience! I have learnt HMTL, CSS, XML and a bit of JavaScript without taking any classes. I learnt them all within a year of my blogging career and today I am able to design a quality blogger template in less than three hours MashAllah!

What is Blogger or Wordpress?

These are the major blogging platforms which help you create a free Blog.  But if you are confused which one to start with then go for Blogger. It has many features which wordpress doesn�t have and the best part is that Blogger allows you to customize your template in any way you like by editing the CSS style sheet! So what are you looking? Start blogging now and build up a new cyber life. Best of luck!

To know in detail whether Blogger is better or WordPress then read this post �> Comparison Chart 2010 for WordPress Vs Blogger

Tags:
What Is A Blog and How To Create A Blog? How to Start a Blog, How To Start a Blog - Free Beginner's Guide. How to Start a Blog In 20 Minutes. Start Blogging Online. How to create a blog site? How to Start a Blog (with Example Blog Post). How to Create a Blogger Blog Step by Step Tutorial. How To Create A Free Blog On BlogSpot Blogging Platform,How To Create A Free Blog On Wordpress Blogging Platform. Creating a Blog using Blogger.com. How to Start a Successful Blog Today Creating a Blog using wordpress.com. 

How to Make Visible Search Description in Blogger Blog Post?

META description

If you say what is the best part for SEO then I must say about Search Description. Because this is a very significant part of a Blog�s SEO. Most of users add search description about Blog which will display in search engine result page. But many of us ignore adding search description in Blog post. Though Search Description always remain hidden inside Blog post but we must write good Search Description from divert organic traffic from search engine. Whatever you write as a Search Description it won�t be visible. But this Search Description will be visible in search engine result page.

You might see when you make any search query then many links with small description is showing up on search engine result page. That small description is Search Description. When you add a better and unique search description then search users from search result page instantly decide whether to visit this site or not?  So always try to write a better Search Description for each post.

I did many relevant talked about Search Description but the main purpose of this tutorial to make Search Description visible inside Blog post. Thus after entering into your Blog post page readers get a short idea by reading Search Descriptions. This will work like 2 in 1. Your post will get better visibility on search engine result page on the other hand readers on your Blog post page will get a clear idea of what your Blog post is all about. To make it visible I will use a Meta tag which will make it visible below post Blog Post title inside the post. But don�t worry this summary won�t be visible on your Blogger home page as post snippets.

However before proceed you can see my Blog Post that I have applied this trick to make my search description visible below Post tile above first image.


Step 1 Log in to your Blogger Account and Go to your Blogger Dashboard

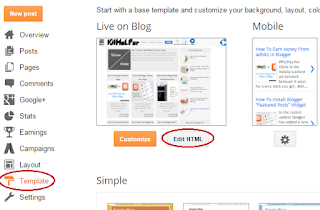
Step 2 Click on -> Template -> Edit HTML->

Step 3 Now Find]]></b:skin> By Pressing Ctrl+F (Windows) or CMD+F (Mac) 

Step 4
 Copy the below code and Paste it above/before ]]></b:skin>

/*Search Description by http://www.bloggerspice.com*/
. BSDesc{background-color:#ECECEC;overflow:hidden;padding:10px;font-size:15px;margin-bottom:15px}
. BSDesc p{margin:0;opacity:0.8}


Meta description inside Blog post

Alternative Design Box Style

/*Search Description by http://www.bloggerspice.com*/
.BSDesc{background-color:#F6F7F9;border:1px solid #E3EAF0;overflow:hidden;padding:10px;font-size:15px;margin-bottom:15px}
.BSDesc p{margin:0;opacity:0.8}

search description

Customization

  • Please alter #ECECEC to change the search description box background color.
  • Alter font-size:15px; for changing font size of the widget.
Step 5 Now again locate <data:post.body/>  you will find 3 or 4 times this code but use the code for second one.

Step 6 Copy the below code and Paste it above/before<data:post.body/> 
<div class=�BSDesc'><p itemprop='description'><data:blog.metaDescription/></p></div>
  • The final code will be like below
<div class='BSDesc'><p itemprop='description'><data:blog.metaDescription/></p></div><data:post.body/>

Step 7 Finally click Save template button and exit from there.

In this post I have apply a simple trick. Generally we use a Blog Meta description to give more information to search engine about search description. The Meta description code is like below.
<meta expr:content='data:blog.metaDescription' itemprop='description'/>
I just used data:blog.metaDescription� code and added simple design by wrapping up by using CSS code. However you can spice up this search description area by modifying the CSS code such as color, background, Font style, size etc.

You are done... to see it live check your Blog post and see search description is visible. And your Blog readers easily can get clear idea by reading search description before go through the whole article. Happy Blogging!!!

How to Optimize Blog Post SEO by Adding Search Description?

search engine optimization

Do you want to take your Blog in next level? Do you want more organic traffic from search engine? Then you must optimize your Blog Post for better search visibility. There is a wrong idea about Google Blogger SEO that users won�t able to add different search description for each post. As a result most of them talk about WordPress that it has great features. But you may not notice that from the beginning of Blogger platform it has introduced about adding search description for each post.

Can�t believe? You would see how I make you learn easily about adding search description for each Blog post. But before that, let�s talk about some benefits of using search description.
  • You will able to add relevant Keyword
  • You can Brand your Post title by adding supporting title
  • Differentiate the descriptions for different pages.
  • Easily can be use quality descriptions for better search visibility
  • Visitors search experience will improve rapidly
So we can see there are bunch of positive site for using search description in Blogger site. But for adding search description in Blogger template we must enable the search description feature from the backend of our Blogger dashboard. I will show you how to enable it?

How to Activate and write Search Description for Blogger Post Page?

While you create a new Blog then you won�t see any search description implementing option for each Post page. There are simple trick to activate search description option for your Blog post. Before enabling this feature the Blog post will editor will look like below. You can see under Post settings there are not any Search description input option.

Blog post settings

Now we will make it visible. Just follow the blow steps-

Step 1 Sign in to your blogger account and go to blogger dashboard

Step 2 On Blogger Dashboard Click ->Settings -> Search preferences

Step 3 Now locate Description under Meta tags, which is [Disabled]. To enable it click on Edit link.  

Meta description disable

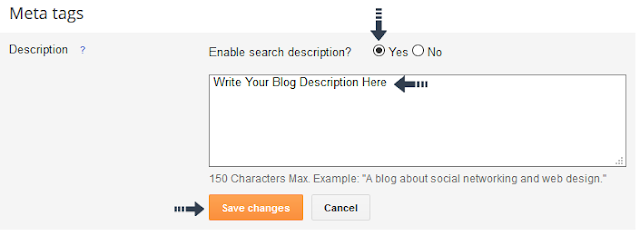
Step 4 Now select Yesradio button. And you can write here brief description about your Blog within 150 characters. This will display on search engine result page. And click on Save Changes button.

enable Meta description

Step 5 After that go to your any Post and check the Post settings and see Search Description enabled. Just click on Search Description and Write a descriptive and concise Search Description for Blog Post. After that click Done button.

write search description

That�s it. You have successfully enable search description option for your Blog. Now write a good search description each time while you create new post. And publish it. I hope you will get positive result from search engine soon.

There are many Blogger write very short or paste the post title inside search description but this is wrong. However search descriptions remain hidden in Blog Post page for this reason Blogger users don�t give any special attention on it. But believe me! for better SEO optimization you won�t find a good alternative of search description.  

Simply Fix AMP Error dateModified:missing and recommended

date modified error

While we do Blogging then we try to develop our Rich Snippets for Articles thus in Search engine our content may display properly. In addition better optimized Rich Snippets for Articles will increase chances to get frequent visibility on Google search engine. But this isn�t easy. We have to make our Blogger template error free by all means.

Recently Google is has introduced Accelerated Mobile Pages (AMP), the main purpose of this AMP to sending faster and neat and clean website to Mobile traffic. So if your site is faster to load then there is a greater chance to get huge traffic from Mobile device user. Now traffic sources increases due to invention of various smart devices.  So any how we should make your Blogger template mobile friendly.  But by using only mobile friendly site you won�t able to improve your site for AMP friendly.

Nevertheless there is a pre requisition to make your site AMP friendly. Almost all major search engines like Google, Bing, Yahoo, Yandex has set a standard machine readable language which is known as schema.org markup. And for proper optimizing a site according to schema.org markup we have to code our templates that match structured data.

I know you are feeling dizzy� lots of critical things I have brought. But don�t worry I am making it easy. The dateModified error shows while we test our template on structured data testing tool. You can check it by visiting below link-
  • https://developers.google.com/structured-data/testing-tool/
If you find that dateModified:missing and recommended error on structured data testing result then you should fix this issue. I am showing you how?

AMP articles error


Before solving this issue you have to fix datePublished: missing and required Error from your Blogger template. I have already published article with solution to fix this issue. Please visit below link and fix it first.


I assume that you have fix the date published error and now proceed to the next level.

Step 1 Go to https://www.blogger.com and Sign in to your account

Step 2 From Blogger Dashboard click on ->Template ->Edit HTML 

Step 3 And locate script like below which you have already added while fixing the datePublished: missing and required Error from your Blogger template

<span class='post-timestamp'>
<b:if cond='data:top.showTimestamp'>
<b:if cond='data:post.url'>
<a class='timestamp-link' expr:href='data:post.url' rel='bookmark' title='permanent link'><abbr class='published updated' expr:title='data:post.timestampISO8601' itemprop='datePublished'><data:post.timestamp/></abbr></a>
</b:if>
</b:if>
</span>
</span>

Step 4 Now locate itemprop='datePublished' from above script and replace it by itemprop='datePublished dateModified'

Step 5 The final step output of the script will be like below

<span class='post-timestamp'>
<b:if cond='data:top.showTimestamp'>
<b:if cond='data:post.url'>
<a class='timestamp-link' expr:href='data:post.url' rel='bookmark' title='permanent link'><abbr class='published updated' expr:title='data:post.timestampISO8601' itemprop='datePublished dateModified '><data:post.timestamp/></abbr></a>
</b:if>
</b:if>
</span>
</span>

Step 6 Now simply hit the Save template button.

You might think what I have added in above script? This is very simple search engine robot can understand the schema.org markup. And while I fix the error about date published then I have given the search robot additional information by itemprop='datePublished� and in secondly I have added another itemprop=' dateModified�to tell search robot about the Post modification date. Though we are allowed to combine the code as a result I have combined the both code by itemprop='datePublished dateModified �. Now you can check your Blogger template in Google structured data testing tools and see error has fixed.

solve dateModified error

The main purpose to fix this error, after publishing a Blog post sometimes we need to modify the post and update it. As a result search robot wants to know when you have updated the post. I mean post update date. And after fixing this error search robot will easily understand about post modification date. If you have any query regarding this, don�t hesitate to write. Thank you.

How to Make New PIN Request 2nd Time from Google AdSense?

address verification

Payment address verification is so important for new Google AdSense. After getting approval from Google AdSense first you have to generate minimum $10 by delivering your ads on website. After that you will able to make a PIN request for verifying your payment address. This is more significant those who want to receive payment through check after reaching minimum threshold. Even if you want to receive payment through Bank account then it required address verification.

But when you failed to receive your fist PIN number then you will feel fear on your mind that what will happen about my earnings? Will I able to receive payment or not?

The answer is pretty simple Yes! You will able to receive payment but before that you must request PIN to Google AdSense team for address verification.

If you are living in remote area then it may delay to receive your first PIN from Google AdSense. Not this issue arises only on remote area but also sometime you may fail to receive your first PIN for simple reasons. Suppose after applying for PIN you have changed the payment address or you have moved in different area then you will fail to receive your first PIN for payment address verification. As a result Google AdSense will hold your payment until you verify your address.

This is a simple issue but when my friend failed to receive her first PIN then he was little worried. For this reason I thought I should share a short guideline about requesting new PIN from Google AdSense.

Please go ahead through simple procedure to receive your second PIN from Google AdSense thus you can verify your address.

Step 1 First log into your AdSenseaccount and click on Action button from PIN Hold red alert or visit https://www.google.com/adsense/app#main/verify-address and you will be directed on verify address page.

adsense payment hold

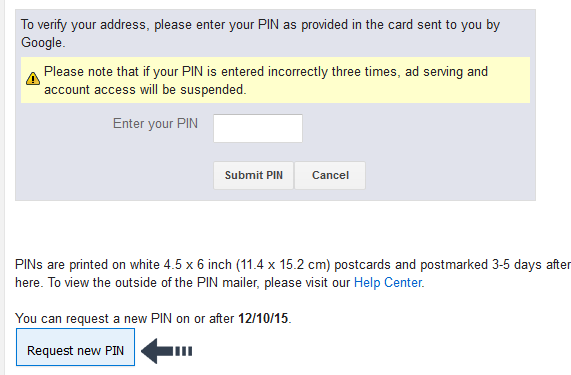
Step 2 Scroll down and locate Request new PIN box.  And click on it. A new page will open with confirmation that do you want to generate new PIN or not?

request new PIN

Step 3 Click Yes, generate and mail PIN button for receiving new PIN in your previously set address. However if you have recently moved to new address then simply click No, change my address first. There you will find option to change your mailing address.

change new address in AdSense

That�s it your New PIN will arrive within 3 to 4 weeks. Remember that you can send PIN request for maximum 3 times. If you failed to receive PIN three times then Google Adsense team will go through different address verification system. This requires your Photo ID, National ID or domestic Utility bills where bill is printed on your name.

This is not possible to get payment from Google AdSense until verifying your payment address. Other than if you again not succeed to receive your second PIN then apply for third PIN by following similar procedure.

Therefore don�t worry and be happy!!! Hope you would receive your second PIN as soon as possible and able to verify your address in AdSense account. Wish you best of luck.

How To Verify Your Site/Blogger Blog With Alexa

how to verify a site with alexa

Alexa is a site which keeps data of sites and blogs and give them a rank in that site's region and a Global rank which depends on its traffic, traffic sources, keywords used to reach that site etc in other words Alexa is rich of sites history. It tells people about how famous a site is that's why webmasters try to increase their site traffic and improve their Alexa rank to show people how popular their site is and it improves a site's impression too. But most of people who are not too friendly with site development and internet get confuse with how Alexa works which is very easy to understand. Alexa gets info from search engines and site analytics and show a rank on traffic and search analytics basis.

One more thing is webmasters want to show a desired country on Alexa rank page and don't know how to do that. Only a few know that it could be done by verifying a site with alexa. So in this post I will tell you how to verify your site with alexa. After verifying your site with Alexa you will get following things!
  • More accurate and clear analytics of your site e.g search keywords, traffic sources, daily time on page etc.
  • You can specify a site to be shown on rank page.
  • You can add info about your site e.g contact info, logo etc.

Follow: +101Helper On Google To Stay Up To Date!

How To Verify A Site With Alexa?

Follow below steps to get your site verified with Alexa!

Step 1: Create an Alexa account.

Step 2: Sign in to your account.

Step 3: Now go to http://www.alexa.com/siteowners/claim?ax_atid=7a1cf237-f464-4daf-98d6-50ef8b4072a0 to claim your site's ownership.

OR

If the above link is not working then follow below link but replace 101helpervideos.blogspot.com with your site url:

http://www.alexa.com/pro/subscription/claim?site=101helpervideos.blogspot.com

Step 5: Now you will be taken to a page where you have two methods to claim your site's ownership:
  1. Upload an Alexa verification file to your site's root directory.
  2. Add an Aelxa verification  ID to your homepage.
Click on the second one.


Step 6: Now copy your meta verification code.

Step 7: Go to blogger, navigate to template and click on Edit Html.

how to edit html in blogger

Step 8: Paste the copied verification code inside the <head> region of your template like this and click on save template:

alexa site verification blogger

Step 9: Now go back to the alexa verification page and click on Verify my ID.

how to verify a site with alexa blogger 101helper

That's it you will see Your site is successfully claimed.

Also Read: How To Improve Your Blog's Alexa Rank

How To Edit Your Site's Data In Alexa?

Follow below steps to edit your site's data in alexa!

Step 1: Go to Alexa and Login to your account if you are not already logged in.

Step 2: Go to Dashboard and hover Site Management beside site metrics and click on Edit Site Listing.

how to change country in alexa

Step 3: Fill out your site's info e.g: Your site's name, description, site's owner name, address, city, contact info etc.

how to verify blogger blog with alexa

Step 4: Choose a country of your rank, it will be shown in your site's info.

how to show your country in alexa

Step 5: Click on save changes and you are done!

Note: It will take about two days to update changes.

You can get more features like comparison between your site and other sites, adding your site's logo etc but for that you have to upgrade your account.

Thanks for visiting 101Helper. Follow and subscribe for more posts. Keep visiting us.

Search Tags: How to add site info in alexa, Improve Alexa rank, Show rank in your country in Alexa, 101 helper alexa rank tips, verify blogger blof with alexa, seo tips and tutorials for blogger 101helper.

How to Build Pinterest Follower Widget for Website and App?

Pinterest widget for Blogger and website

I think you won�t find any website that hasn�t build Pinterest profile. I haven�t exact data but strongly can be said almost 80% website owner having Pinterest profile. There is some amazing fact about Pinterest which is really unbelievable.  

Pinterest has currently over 70 million active users. So there is a big opportunity to divert traffic from Pinterest. Furthermore total of active users 68% are female and 32% are male users. So Pinterest is best for Health and beauty type Blog those who wants to target female users for promoting fashion and beauty products.

I hope you have already created Pinterest profile but you might have seen very little growth on followers. There are many factors work behind growing Pinterest followers. But with very little effort we can boost up Pinterest follower from our Blog.

Though majority of Blog getting traffic from various social media source and search engines so why don�t you try to add a Pinterest follower board in your Website? It will help your Blog traffic to get connect with Pinterest. This is a great idea!! Isn�t it?


So don�t stop reading and go ahead to learn how to generate Pinterest follower board by few clicks.

How to generate Pinterest Specific Board widget?

Among 2 options Pinterest will allow us to display either specific board or Profile. I will show you first about generating a widget for displaying specific board like Tips, Wedding Board, SEO board etc.

Step 1 First visit https://developers.pinterest.com/tools/widget-builderand you will be headed on Pinterest weight builder page.

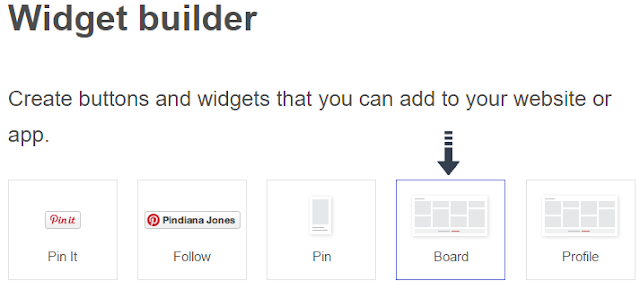
Step 2 Now you have 2 options to create Pinterest follower board. You can display specific board or you can display full Pinterest board. First we will create Pinterest specific board. So select Board from the top.


pinterest widget builder

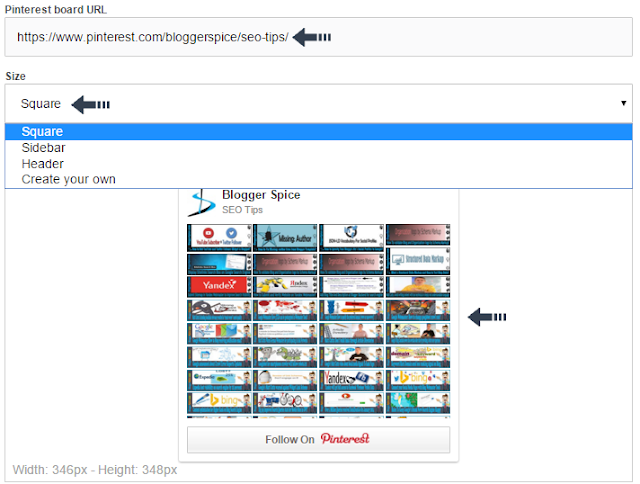
Step 3 After selecting Board now we will add a Pinterest Board URL. This can be found from your Pinterest profile. Just click on a Board and copy the URL from Browser�s address bar. For example purpose I have use my SEO Tips board URL from Pinterest. And paste the URL (https://www.pinterest.com/bloggerspice/seo-tips/) on Pinterest board URL field.


Pinterest board follower widget

Step 4 Great!!! Now you will see your content images on preview but we have more opportunity to customize board size. So from Size field use dropdown options to select pre generated size or create your own.  I think Square size is best for setting the widget.

Step 5 After creating Pinterest board widget we need script for using it in our Website or Blog. So locate code location at the end of preview section. And use both code together. For example the code will be look like below for working in Website.

<script async defer src="//assets.pinterest.com/js/pinit.js"></script>

<a data-pin-do="embedBoard" data-pin-board-width="400" data-pin-scale-height="240" data-pin-scale-width="80" href="https://www.pinterest.com/bloggerspice/seo-tips/"></a>

How to generate Pinterest Profile Follower widget?

You not like to display only one board on pinterest widget. So don�t worries Pinterest will allow us to display whole profile randomly? We can generate the Pinterest profile follower widget by few simple clicks. I think this is not difficult for you.

Step 1 Again visit https://developers.pinterest.com/tools/widget-builderand you will be headed on Pinterest weight builder page.

Step 2 Now select Profile from top of the page. This will enable you to generate a Pinterest profile follower board.


pinterest profile widget

Step 3 Similarly write your Pinterest profile URL on Pintere user URL field. Also select your desired size for placing on your Blog and website. Instantly you will see preview according to your custom settings.


widget code

Step 4 From the bottom of the Preview section get the widget code.

Congratulation you have successfully generated your Pinterest profile follower widget. Now it�s time to placing the widget board on our Website. As a Blogger Platform user I will show you about adding this beautiful widget in Blogger template.

How to add Pinterest Follower Widget in Blogger site?

This is usual system for placing widget on Blogger sidebar or footer section. However this is important for newbie Blogger. So if you are expert then skip this section and newbie please follow the below instruction.

Step 1 Log in to your Blogger account and Go to your Blogger Dashboard

Step 2 Go to your Layout tab.

Step 3 Click on "Add a Gadget" then select "HTML/JavaScript" Gadget. Leave the Title field blank or write any desired title whatever you would like.

Step 4 Now Paste the Pinterest Follower widget code in "HTML/JavaScript" Gadget. Code will be like below.

<a data-pin-do="embedUser" data-pin-board-width="900" data-pin-scale-height="120" data-pin-scale-width="115" href="https://www.pinterest.com/BloggerSpice"></a>

<script async defer src="//assets.pinterest.com/js/pinit.js"></script>

Step 5 And finally click orange color Save button. You�re done!

Great Job!!! Now check your Blogger template and see the brand new Pinterest follower Board that beautified your Blogger template. WordPress user can add this widget similar way by adding the widget code in a HTML gadget. Happy Blogging!!!

Kategori

Kategori