Plain Red Navigation for Blogger

menu widget

A menu is an important part of any blog. It is very essential tool for any blog. Many visitors that come on site usually search more useful information through Menus. A menu is a widget in which different categories are available in one widget. Because stylish menu are not available in blogger default templates that's why Today I am sharing a drop down gradient menu. It is created with HTML and CSS. This menu will spice your blog. Drop down menu has a lot of subcategories. This menu has a gradient color.

Live Demo
Step 1 Log in to your Blogger account and Go to your Blogger Dashboard

Step 2 Go to your Layout tab.

Step 3 Click on "Add a Gadget" then select "HTML/JavaScript" Gadget.

Step 4 Now Copy the below code and paste it in "HTML/JavaScript" Gadget and Save it.

Step 5 Place the Gadget below header. that's it.


<style>
@import "http://fonts.googleapis.com/css?family=ABeeZee";
nav ul ul {
    display: none;
}
nav ul li:hover > ul {
    display: block;
    width: auto;
}
nav ul {
    background: -ms-linear-gradient(top, #b40c1f 25%, #c00c20 50%);
    background: -moz-linear-gradient(top, #b40c1f 25%, #c00c20 50%);
    background: -webkit-linear-gradient(top, #b40c1f 25%, #c00c20 50%);
    box-shadow: 0 0 20px rgba(0, 0, 0, 0.42);
    list-style: none;
    position: relative;
    display: inline-block;
    font-family: "ABeeZee",tahoma,serif;
    width: 100%;
    padding: 0;
}
nav{
    margin: 0 auto;
    width: 70%;
}
nav ul:after {
    content: ""; clear: both; display: block;
    color:#ffffff;
}
nav ul li {
    float: left;
    color:#ffffff;
}
nav ul li:hover {
    background: #aa0c20;
}
nav ul li:hover a {
    color: #fff;
}
nav ul li a {
    display: block; padding: 10px; text-decoration: none;
    color:#ffffff;
}
nav ul ul {
    background:#b40c1f;
    box-shadow: 0 0 12px rgba(0,0,0,0.15);
    border-radius: 0px;
    padding: 0;
    position: absolute;
    top: 100%;
}
nav ul ul li {
    float: none;
    border-top: 1px solid #aa0c20;
    border-bottom: 1px solid #aa0c20;
    position: relative;
}
nav ul ul li a {
    padding: 15px 40px;
    color: #fff;
}
nav ul ul li:hover {
    background: #aa0c20;
 }
nav ul ul ul {
    position: absolute; left: 100%; top:-1px;
}
</style>
<nav>
<ul>
<li><a href="#">Home</a></li>
<li><a href="#">About Us</a></li>
<li><a href="#">link 1</a><ul>
<li><a href="#">sub link 1</a></li>
<li><a href="#">sub link 2</a></li>
<li><a href="#">sub link 3</a></li>
</ul></li>
<li><a href="#">Contact Us</a></li>
</ul>
</nav>

Customization


  • Replace # with your label's links

Write For Us Guest Writer
Guest Post by Furqan Haider
Furqan Haider is a young blogger from Pakistan, Karachi. He loves to read articles about Make Money, Blogging Tips And Tricks etc. He is currently running his entertainment blog OnlineFunBook.

Nagor Dola Blogger Template Download

templates

Nagor Dola Premium Blogger Template can be used for any purpose. This template has some unique features with elite color combination. This is 4 Column Grid style boxed blogger template which is attractive in design and Layout. In addition this Nagor Dola blogger template based on neat and clean design.

Template Name: Nagordola
Platform: Blogger / Blogspot
Release date : 28th November 2013
Author : Mohammad Fazle Rabbi
Website: www.bloggerspice.com
License : Creative Commons Attribution 3.0

Live Demo  Download


Some key features that I have incorporated in this premium blogger template that might be helpful for potential users. The main features of this blogger template are as follows-

Flexible  Dropdown menu

Nagor Dola Blogger Template contain flexible 2 sets dropdown menu which will help your visitor to navigate to different categories.

News Ticker

Foorti Blogger Template  contain news ticker which will display your recent posts nicely.

Label Base Recent Post

You would able to display 4 Lables base recent posts which will appear at the bottom of the home page above footer.

SEO friendly Breadcrumb

I have added very attractive and SEO friendly wide style Breadcrumb which will love Visitors and Search Engine. The breadcrumbs will display parent categories of the contents thus visitors can easily navigate your site in depth.

List Style Related Posts with Thumbnails

List Style Related Posts with Thumbnails has included which will perfect to display related posts thumbnail with post summary.

Page Navigation

Through page navigation made this template more user friendly. Your visitors can navigate so easily and flexibly.

Social Media Icon

A set of social media icon has added at the top of the template. Which will help your visitors to connect with your social media profile.

Smooth Scroll To Top

CSS scroll to top features has added. This widget will help your visitors to go from bottom to top of the pages.

Other features

Ads ready space, 4 column Grid Style blogger template, 3 column Footer section, Customized Label, Threaded comment, Royal color combination. Fast loading.

Social Median Widget Setup

Step 1 Log in to your Blogger Account and Go to your Blogger Dashboard

Step 2 Now click on -> Template -> Edit HTML

Step 3 Now Find this code like below by Pressing Ctrl + F

<li><a class='fbiconx' href='https://www.facebook.com/ID'>Facebook</a></li>
<li><a class='twiconx' href='https://twitter.com/ ID '>Twitter</a></li>
<li><a class='goiconx' href='https://plus.google.com/ ID '>Google+</a></li>
<li><a class='piniconx' href='http://pinterest.com/ ID '>Pinterest</a></li>
<li><a class='liniconx' href='http://linkedin.com/ ID '>Linkedin</a></li>
<li><a class='rssiconx' href='http://feeds.feedburner.com/ID '>RSS</a></li>

Step 4 After finding it Replace ID with your URLs and ID.

Step 5 Save the template Now.

Top Menu Set up (1st Menu)

Step 1 Log in to your Blogger Account and Go to your Blogger Dashboard

Step 2 Now click on -> Template -> Edit HTML

Step 3 Now Find this code like below by Pressing Ctrl + F

<li><a href='#'>Menu 1</a></li>
<li><a href='#'>Menu 2</a></li>
<li><a href='#'>Menu 3</a></li>
<li><a href='#'>Menu 4</a></li>
<li><a href='#'>Menu 5</a></li>
<li><a href='#'>Menu 6 Drop Down Menu</a></li>
<li class='dgnsub'><a href='#'>Menu 7</a>
<ul class='submenu hidden'>
<li><a href='#'>Drop Down Menu 1</a></li>
<li><a href='#'>Drop Down Menu 2</a></li>
<li><a href='#'>Drop Down Menu 3</a></li>
<li><a href='#'>Drop Down Menu 4</a></li>
<li><a href='#'>Drop Down Menu 5</a></li>
<li><a href='#'>Drop Down Menu 6</a></li>
<li><a href='#'>Drop Down Menu 7</a></li>

Step 4 After finding it Replace # with your URLs and change the category name

Step 5 Save the template Now.

Mani Menu Set up (2nd Menu)

Step 1 Log in to your Blogger Account and Go to your Blogger Dashboard

Step 2 Now click on -> Template -> Edit HTML

Step 3 Now Find this code like below by pressing Ctrl + F

<li><a class='home' href='http://www.bloggerspice.com/'>Home</a></li>
<li><a href='#'>Nav 1</a></li>
<li><a href='#'>Nav 2</a></li>
<li><a href='#'>Nav 3</a></li>
<li><a href='#'>Nav 4 With Sub Menu</a>
<ul>
<li><a href='#'>Sub Menu</a></li>
<li><a href='#'>Sub Sub Menu</a>
<ul>
<li><a href='#'>Sub Menu 1</a></li>
<li><a href='#'>Sub Menu 2</a></li>
<li><a href='#'>Sub Menu 3</a></li>
<li><a href='#'>Sub Menu 4</a></li>
</ul>
</li>
<li><a href='#'>Sub Menu 1.1</a></li>
</ul>
</li>
<li><a href='#'>Nav 5</a></li>

Step 4 After finding it Replace # with your URLs and change the category name

Step 5 Save the template Now.

RECENT POSTS WITH LABEL CUSTOMIZATION

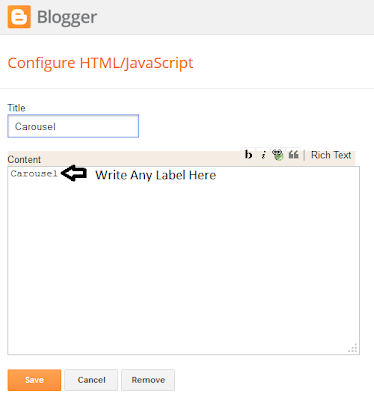
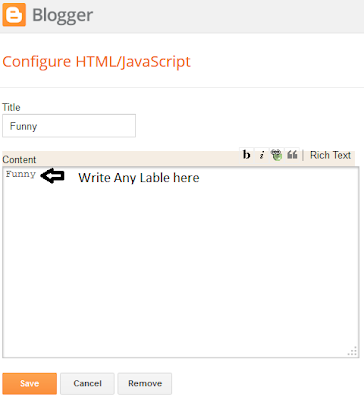
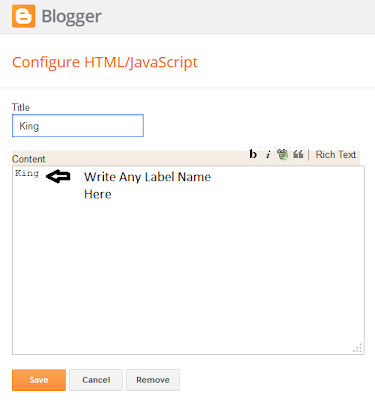
You would get 4 recent posts container. Just write there label name then it will display posts.


widget

Step 1 Log in to your Blogger Account and Go to your Blogger Dashboard

Step 2 Now click on -> Layout -> Edit 

Write label name like below after Edit each label.

theme

Step 3 Save the template Now.

SET UP NEWS TICKER

Step 1 Log in to your Blogger Account and Go to your Blogger Dashboard

Step 2 Now click on -> Template -> Edit HTML

Step 3 Now Find this code like below by pressing Ctrl + F

&quot;http://nagordola-bsdesign.blogspot.com/feeds/posts/default&quot;)

Step 4 After finding it Replace nagordola-bsdesign.blogspot.com with your Blog URLs and change the category name.

SET UP PAGE NAVIGATION

Step 1 Log in to your Blogger Account and Go to your Blogger Dashboard

Step 2 Now click on -> Template -> Edit HTML

Step 3 Now Find this code like below by pressing Ctrl + F

<script type='text/javascript'>
varpageNaviConf = {
perPage: 4,numPages: 3,firstText: &quot;First&quot;,
lastText: &quot;Last&quot;,
nextText: &quot;&#187;&quot;,
prevText: &quot;&#171;&quot;
}
</script>

Step 4 After finding it alter perPage: 4,numPages: 3, digit only.


  • Please select 3 or 6 posts per page.

License

This free Blogger template is licensed under the Creative Commons Attribution 3.0 License, which permits both personal and commercial use.

However, to satisfy the 'attribution' clause of the license, you are required to keep the footer links intact which provides due credit to its authors. For more specific details about the license, you may visit the URL below:

  • http://creativecommons.org/licenses/by/3.0/

Credits

  • Auto read-more` hack for Blogger by Taufik Nurrohman modified by Blogger Spice
  • Menu and Social Icon by MKR modified by Blogger Spice

7 Most Horrible Design Mistakes That Bloggers Make

guest posts

Most bloggers make their own blog website, which is mostly due to the fact that content management systems are readily and freely available on the Internet. In fact, if you use Google�s Blogger, you can create a blog and put it online with absolutely no cost. However, there are problems with this scenario. Bloggers are not web designers and so are not adept at making websites, which means they often make mistakes that result in ugly looking websites. This article details some of their most horrible design mistakes.

1 - Having a website that looks blocky

This often happens when a content management system is used because they do not allow any sort of overlap in most cases. One element may not overlap another, which is something you may do if you were drawing a design by hand. As a result, the design looks blocky to the point of where if you colored in the page elements then it would look like a Tetris game. This also happens because compatibility issues make it hard to size and resize some elements without them looking odd. This makes bloggers take a more conservative route to their design, which results in it looking blocky.

2 - Frames and boxes (and no overlap)

Frames does not reply to the old fashioned method of web design, but instead refers to the graphical frames and boxes that people put around images and text, or that are used as page elements. One or two may look okay, but it starts to look really ugly if you use too many because they do not overlap. They do not overlap because there are few content management systems that overlap page elements. As a result you see some odd looking and ugly website/blog designs.

If you create a website and frame everything with outlines or frames, then the page will start to look a little bit like a newspaper. The same is true for putting your page elements into boxes. A few is okay, but it if to the point where you are lining them up next to each other, then your website is going to start looking ugly.

3 - Bold colors in abundance

Bold colors are okay if they are used with skill, or if they are small part of a mostly empty or bland looking website design. But, they are hard to look at for extended periods--which makes them terrible for blog posts. They may work great for websites that have kids games on them, but blogs are there for adults and the adults have to look at this visual assault for a long time whilst they are reading your blog posts.

blog design

Take a look at other mainstream websites and you will see a web design that has bold patches that are offset by plain or white colors. For example, the PayPal website has very bold blue on it, but the rest of the website is mostly white. Amazon have a similar design that is a little more toned down and orange is used. The Play.com website also uses bold orange that is on top of a mostly white website design.

4 - A horrible and repetitive patterned background

This happens all the time, and the fact is that a blank website background is better looking than a horrible repetitive pattern. This sort of thing is also possible if you have an eBay shop. You may have seen the backgrounds with candy hearts or rose petals. They may look great on Valentine's cards, but they look ugly on blog backgrounds. They have a tacky and cheap look about them as if the back of the blog website has been papered over with cheap wrapping paper.

5 - Horrible graphic fonts and tacky animations

The problem with designing your own website is the fact that it is fun, and this pleasure blinds you to how crappy your work is. That is why people say you should spend about three months away from your work if you want to really see how good it is. It gives your brain time to forget the pleasure associated with the creation process and so makes you more impartial.

Sadly, most people are not able to sit on their designs for three months and so start using their tacky looking designs right away. Things such as big graphics, cartoony graphics and tacky animations all look like great fun on a website, but in reality they are quite ugly. Many times the most simple approach is the best, but keeping things simple is not a fun design process, so people add more and more without realizing they are spoiling their own work.

Write For Us Guest Writer
Guest Post by Sonia Jackson
My name is Sonia Jackson. I write for http://www.royal-essay.com that provides well-written and quality essays and research papers for college and university students.

Foorti Premium Blogger Template Download

blogger

Foorti Premium Blogger Template can be used for any purpose. This template has some unique features with elite color combination. This is 3 Column box style blogger template which is attractive in design and Layout. In addition this Foorti blogger template based on neat and clean design.


Template Name: Foorti
Platform: Blogger / Blogspot
Release date : 26th November 2013
Author : Mohammad Fazle Rabbi
Website: www.bloggerspice.com
License : Creative Commons Attribution 3.0

Live Demo  Download


Some key features that I have incorporated in this premium blogger template that might be helpful for potential users. The main features of this blogger template are as follows-

Flexible  Dropdown menu

Foorti Blogger Template contain flexible 2 sets dropdown menu which will help your visitor to navigate to different categories.

News Ticker

Foorti Blogger Template  contain news ticker which will display your recent posts nicely.

Label Base Recent Post

You would able to display 2 Lables base recent posts which will appear at the bottom of the home page above footer.

SEO friendly Colorful Breadcrumb

I have added very attractive and SEO friendly wide style Breadcrumb which will love Visitors and Search Engine. The breadcrumbs will display parent categories of the contents thus visitors can easily navigate your site in depth.

List Style Related Posts with Thumbnails

List Style Related Posts with Thumbnails has included which will perfect to display related posts thumbnail with post summary.

Page Navigation

Through page navigation made this template more user friendly. Your visitors can navigate so easily and flexibly.

Social Media Icon

A set of social media icon has added at the top of the template. Which will help your visitors to connect with your social media profile.

Smooth Scroll To Top

CSS scroll to top features has added. This widget will help your visitors to go from bottom to top of the pages.

Other features

Ads ready space, 3 column blogger template, 3 column Footer section, Customized Label, Threaded comment, Royal color combination. Fast loading.

Social Median Widget Setup

Step 1 Log in to your Blogger Account and Go to your Blogger Dashboard

Step 2 Now click on -> Template -> Edit HTML

Step 3 Now Find this code like below by pressing Ctrl + F

<li><a class='fbiconx' href='https://www.facebook.com/ID'>Facebook</a></li><li><a class='twiconx' href='https://twitter.com/ ID '>Twitter</a></li><li><a class='goiconx' href='https://plus.google.com/ ID '>Google+</a></li><li><a class='piniconx' href='http://pinterest.com/ ID '>Pinterest</a></li><li><a class='liniconx' href='http://linkedin.com/ ID '>Linkedin</a></li><li><a class='rssiconx' href='http://feeds.feedburner.com/ID '>RSS</a></li>

Step 4 After finding it Replace ID with your URLs and ID.

Step 5 Save the template Now.

Top Menu Set up (1st Menu)

Step 1 Log in to your Blogger Account and Go to your Blogger Dashboard

Step 2 Now click on -> Template -> Edit HTML

Step 3 Now Find this code like below by pressing Ctrl + F

<li><a href='#'>Menu 1</a></li>
<li><a href='#'>Menu 2</a></li>
<li><a href='#'>Menu 3</a></li>
<li><a href='#'>Menu 4</a></li>
<li><a href='#'>Menu 5</a></li>
<li><a href='#'>Menu 6 Drop Down Menu</a></li>
<li class='dgnsub'><a href='#'>Menu 7</a>
<ul class='submenu hidden'>
<li><a href='#'>Drop Down Menu 1</a></li>
<li><a href='#'>Drop Down Menu 2</a></li>
<li><a href='#'>Drop Down Menu 3</a></li>
<li><a href='#'>Drop Down Menu 4</a></li>
<li><a href='#'>Drop Down Menu 5</a></li>
<li><a href='#'>Drop Down Menu 6</a></li>
<li><a href='#'>Drop Down Menu 7</a></li>


Step 4 After finding it Replace # with your URLs and change the category name

Step 5 Save the template Now.

Mani Menu Set up (2nd Menu)

Step 1 Log in to your Blogger Account and Go to your Blogger Dashboard

Step 2 Now click on -> Template -> Edit HTML

Step 3 Now Find this code like below by pressing Ctrl + F

<li><a class='home' href='http://www.bloggerspice.com/'>Home</a></li>
<li><a href='#'>Nav 1</a></li>
<li><a href='#'>Nav 2</a></li>
<li><a href='#'>Nav 3</a></li>
<li><a href='#'>Nav 4 With Sub Menu</a>
<ul>
<li><a href='#'>Sub Menu</a></li>
<li><a href='#'>Sub Sub Menu</a>
<ul>
<li><a href='#'>Sub Menu 1</a></li>
<li><a href='#'>Sub Menu 2</a></li>
<li><a href='#'>Sub Menu 3</a></li>
<li><a href='#'>Sub Menu 4</a></li>
</ul>
</li>
<li><a href='#'>Sub Menu 1.1</a></li>
</ul>
</li>
<li><a href='#'>Nav 5</a></li>


Step 4 After finding it Replace # with your URLs and change the category name

Step 5 Save the template Now.

RECENT POSTS WITH LABEL CUSTOMIZATION

You would get 2 recent posts container. Just write there label name then it will display posts.


widget container

Step 1 Log in to your Blogger Account and Go to your Blogger Dashboard

Step 2 Now click on -> Layout -> Edit 

Write label name like below after Edit each label.


widget

Step 3 Save the template Now.

SET UP NEWS TICKER

Step 1 Log in to your Blogger Account and Go to your Blogger Dashboard

Step 2 Now click on -> Template -> Edit HTML

Step 3 Now Find this code like below by pressing Ctrl + F

&quot;http://foorti-bsdesign.blogspot.com/feeds/posts/default&quot;)

Step 4 After finding it Replace foorti-bsdesign.blogspot.com with your Blog URLs and change the category name.

SET UP PAGE NAVIGATION

Step 1 Log in to your Blogger Account and Go to your Blogger Dashboard

Step 2 Now click on -> Template -> Edit HTML

Step 3 Now Find this code like below by pressing Ctrl + F

<script type='text/javascript'>
varpageNaviConf = {
perPage: 4,numPages: 3,firstText: &quot;First&quot;,
lastText: &quot;Last&quot;,
nextText: &quot;&#187;&quot;,
prevText: &quot;&#171;&quot;
}
</script>


Step 4 After finding it alter perPage: 4,numPages: 3, digit only.

License

This free Blogger template is licensed under the Creative Commons Attribution 3.0 License, which permits both personal and commercial use.
However, to satisfy the 'attribution' clause of the license, you are required to keep the footer links intact which provides due credit to its authors. For more specific details about the license, you may visit the URL below:

  • http://creativecommons.org/licenses/by/3.0/

Credits

  • Auto read-more` hack for Blogger by Taufik Nurrohman modified by Blogger Spice
  • Menu and Social Icon by MKR modified by Blogger Spice

Raja Premium Blogger Template Download

templates

Raja blogger template can be used for any purpose. This template has some unique features with elite color combination. This is 2 Column box style blogger template which is attractive in design. In addition this Raza blogger template based on neat and clean design.

Template Name: Raja
Platform: Blogger / Blogspot
Release date : 25th November 2013
Author : Mohammad Fazle Rabbi
Website: www.bloggerspice.com
License : Creative Commons Attribution 3.0

I am explaining some key features that I have incorporated in this fashionable blogger template that might be helpful for potential users. The main features of this blogger template are as follows-

Flexible  Dropdown menu

Raja contain flexible 2 sets drop-down menu which will help your visitor to navigate to different categories.

News Ticker

Raja contain news ticker which will display your recent posts nicely.

Label Base Recent Post

You would able to display 4 Lables base recent posts which will appear at the bottom of the home page above footer.

SEO friendly Colorful Breadcrumb

I have added very attractive and SEO friendly wide style Breadcrumb which will love Visitors and Search Engine. The breadcrumbs will display parent categories of the contents thus visitors can easily navigate your site in depth.

Related Posts

Wide related posts has included which will perfect to display landscape type post image.

Page Navigation

Through page navigation made this template more user friendly. Your visitors can navigate so easily and flexibly.

Social Media Icon

A set of social media icon has added at the top of the template. Which will help your visitors to connect with your social media profile.

Other features

Ads ready space, 2 column blogger template, 3 column Footer section, Customized Label, Threaded comment, Royal color combination. Fast loading.

Social Networking Customization

Step 1 Log in to your Blogger Account and Go to your Blogger Dashboard

Step 2 Now click on -> Template -> Edit HTML

Step 3 Now Find this code like below by pressing Ctrl + F

<li><a class='fbiconx' href='https://www.facebook.com/BloggerSpice'>Facebook</a></li>
<li><a class='twiconx' href='https://twitter.com/BloggerSpice'>Twitter</a></li>
<li><a class='goiconx' href='https://plus.google.com/102331886274459115104/posts'>Google+</a></li>
<li><a class='piniconx' href='http://pinterest.com/BloggerSpice'>Pinterest</a></li>
<li><a class='liniconx' href='#'>Linkedin</a></li>
<li><a class='rssiconx' href='http://feeds.feedburner.com/BloggerSpice'>RSS</a></li>

Step 4 After finding it Replace BloggerSpice & 102331886274459115104 with your URLs and ID.

Step 5 Save the template Now.

Top Menu 1st Menu Set Customization

Step 1 Log in to your Blogger Account and Go to your Blogger Dashboard

Step 2 Now click on -> Template -> Edit HTML

Step 3 Now Find this code like below by pressing Ctrl + F

<li><a href='#'>Menu 1</a></li>
<li><a href='#'>Menu 2</a></li>
<li><a href='#'>Menu 3</a></li>
<li><a href='#'>Menu 4</a></li>
<li><a href='#'>Menu 5</a></li>
<li><a href='#'>Drop Down Menu</a></li>
<li class='dgnsub'><a href='#'>BS Tools</a>
<ul class='submenu hidden'>
<li><a href='#'>Drop Down Menu 1</a></li>
<li><a href='#'>Drop Down Menu 2</a></li>
<li><a href='#'>Drop Down Menu 3</a></li>
<li><a href='#'>Drop Down Menu 4</a></li>
<li><a href='#'>Drop Down Menu 5</a></li>
<li><a href='#'>Drop Down Menu 6</a></li>
<li><a href='#'>Drop Down Menu 7</a></li>

Step 4 After finding it Replace # with your URLs and change the category name

Step 5 Save the template Now.

Main Menu 2nd Menu Set Customization

Step 1 Log in to your Blogger Account and Go to your Blogger Dashboard

Step 2 Now click on -> Template -> Edit HTML

Step 3 Now Find this code like below by pressing Ctrl + F

<li><a class='home' href='http://www.bloggerspice.com/'>Home</a></li>
<li><a href='#'>Nav 1</a></li>
<li><a href='#'>Nav 2</a></li>
<li><a href='#'>Nav 3</a></li>
<li><a href='#'>Nav With Sub Menu</a>
<ul>
<li><a href='#'>Sub Menu</a></li>
<li><a href='#'>Sub Sub Menu</a>
<ul>
<li><a href='#'>Sub Menu 1</a></li>
<li><a href='#'>Sub Menu 2</a></li>
<li><a href='#'>Sub Menu 3</a></li>
<li><a href='#'>Sub Menu 4</a></li>
</ul>
</li>
<li><a href='#'>Nav 4</a></li>
<li><a href='#'>Nav 5</a></li>
</ul>
</li>
<li><a href='#'>Nav 6</a></li>

Step 4 After finding it Replace # with your URLs and change the category name

Step 5 Save the template Now.

Recent Posts With Label Customization

You would get 4 recent posts container. Just write there label name then it will display posts.


labels

Step 1 Log in to your Blogger Account and Go to your Blogger Dashboard

Step 2 Now click on -> Layout -> Edit 

Write label name like below after Edit each label.

blogger

Step 3 Save the template Now.

Set Up News Ticker

Step 1 Log in to your Blogger Account and Go to your Blogger Dashboard

Step 2 Now click on -> Template -> Edit HTML

Step 3 Now Find this code like below by pressing Ctrl + F

&quot;http://raja-bsdesign.blogspot.com/feeds/posts/default&quot;)

Step 4 After finding it Replace raja-bsdesign.blogspot.com with your Blog URLs and change the category name.


Set Up Page Navigation 

Step 1 Log in to your Blogger Account and Go to your Blogger Dashboard

Step 2 Now click on -> Template -> Edit HTML

Step 3 Now Find this code like below by pressing Ctrl + F

<script type='text/javascript'>
varpageNaviConf = {
perPage: 3,numPages: 3,firstText: &quot;First&quot;,
lastText: &quot;Last&quot;,
nextText: &quot;&#187;&quot;,
prevText: &quot;&#171;&quot;
}
</script>

Step 4 After finding it alter perPage: 3,numPages: 3, digit only.

License 

This free Blogger template is licensed under the Creative Commons Attribution 3.0 License, which permits both personal and commercial use.

However, to satisfy the 'attribution' clause of the license, you are required to keep the footer links intact which provides due credit to its authors. For more specific details about the license, you may visit the URL below:

  • http://creativecommons.org/licenses/by/3.0/

Credits

  • Auto read-more` hack for Blogger by Taufik Nurrohman modified by Blogger Spice
  • Menu and Social Icon by MKR modified by Blogger Spice
  • Scroll To Top by MBT


Thanks to them for their creative resources. 

Kategori

Kategori