How To Use Google Adwords To Increase Blogger Blog Traffic

how-to-use-google-adwords-in-blogger-101helper

As far as I am concerned with blogging, Google Adwords is the only ad network which I prefer best to advertise a blogger blog. Although I get my whole traffic from search engines but in the beginning I used Google Adwords to promote my blog. You can also use Google Adwords to promote your blog and help it to start running. 


Why Google Adwords?

Only few of us know how to use Google adwords and its good for blogger because of its policy which is to pay only when you get clicks. It means you don't have to pay a fixed amount to advertise your blog but you choose your own budget and also pay per click amount. Moreover if you don't get clicks and your site is against Google Adword's policy you will get your money back. It has tremendous features which makes it better than other advertising networks.


Payment Methods:


- Credit Or Debit card.

- Bank Account.

Mobile App:


Stay up to date about your ad campaign clicks and impressions via smart phone app(Andoid/iphone). Just go to your phone's app store and download Google adwords app. Login by using your blogger account and stay updated about your campaign as well as keep full control over your account from your phone.

How To Use Google Adwords For Blogger Blog?


Well it seems that using Google Adwords is very difficult to understand but it isn't so. Even a beginner can start promoting his blog with it, all you need is a way to pay and follow this tutorial. So lets begin, follow below steps to start promoting your blog through Google Adwords.


Step 1: Go to blogger dashboard and navigate to Campaigns.


how-to-use-google-adwords-in-blogger-101helper

Step 2: Click on Start Now.


Advertise-blogger-blog-101helper

Step 3: Wait for the page to load and refresh it if its not showing anything.


Step 4: Type your Email, Select your country, Select your time zone and your currency(in which you will pay for advertising).


advertise-blogger-blog

After selecting desired options click on save and continue to proceed away. Congratulations! your adwords account has been created.


How To Create My First Ad Campaign In Google Adwords?

Read and follow below steps to create your first campaign and start promoting your blog/website.


Step 1: Click on Create Your First Campaign.


Step 2: Give a title to your campaign, Select the type of ads either Standard or All features, Choose networks and devices(on which ads will show up e.g computer, tablets, mobile etc).


Step 3: Scroll down the page and move to Locations, here you have to choose the countries in which you would like to show your ads. Choose All the countries or your own country or if you want to target specific country then choose Let me select. If you choose Let me select then type the name of the country in the search box below and select it.


After location you have another option below "Languages" so check the languages in which you would like to show your ads. Be sure that the languages you select aren't only languages but these languages will decide that on which Google domain your ads will appear. 


Say that you choose English, now your ads will be shown on the Google domains which have English language e.g Google.co.uk, Google.com, Google.pk. 


It doesn't mean that your ads will not be shown in the countries you choose. 


how-to-use-google-adwords-blogger-tutorial

Step 4: In step 4 there are three things that you have to deal with, one is to choose a bid strategy, budget for your ads and other is to ad extension to your ads.


Choose Basic options in bid strategy because Advanced options are difficult to understand.


- In bid strategy area you have two options:

  1. Adwords will set my bids to help maximize clicks within my target budget.
  2. I'll manually set my bids for clicks.
Choose I'll manually set my bids for clicks because if you let Google to choose bids for you then you will get more and more traffic but have to pay high rates.

how-to-set-bid-in-google-adwords-101helper
How to set bids in Google Adwords?

After choosing I'll manually set my bids for clicks you will have two options:

  1. Default bid.
  2. Budget.
In the default bid type the rate which you will pay for each click(PPC).

Tip: For a quick boost in traffic while spending lowest amount set $0.02 as default bid.

In budget area type $1 or $2 no matter what you type but it is just a limit in which you will pay Google Adwords. For example if you set a budget of $1 and default bid $0.02 then you will get 20 clicks for 1 dollar and after that your ad will stop running because your daily budget is consumed. If you don't get 20 clicks in a day then your remaining budget will be used next.

What Is Ad Extension And How To Use It?


ad-extension-google-adwords-blogger-101helper

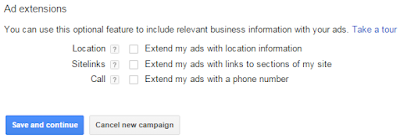
Ad extension is an optional feature to include relevant business info with your ads e.g location, sitelinks, call info.


So if you want to use this feature just check any of the given option and follow instructions to proceed away. 


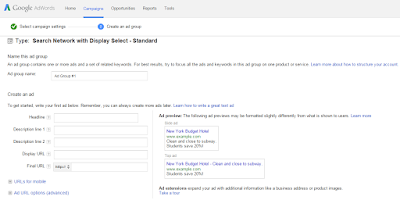
Step 5: Click on Save and continue and you have successfully created your first campaign now its time to create an ad group which will include you ads so follow next step.


Step 6: Give a name to your ad group and below it design your ad look. You can see a preview of your ad on the page.


how-to-create-ad-in-google-adwords

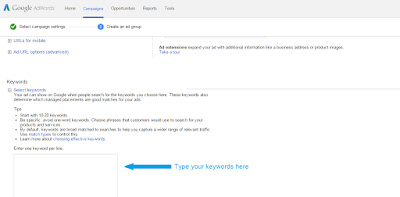
Step 7: Scroll down and write your keywords in the given text area as shown in below photo. Write 10-20 keywords on after other.


how-t-add-keywords-in-google-adwords-101helper

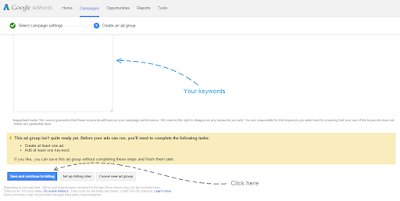
Step 8: After writing keywords click on Save and continue to billing as shown in below image:


how-to-set-keywords-in-blogger

Setting Up Billing Settings In Google Adwords:


Step 9: Select your country and click on Continue.


set-payment-settings-in-google-adwords-blogger-101helper

Step 10: Select account type as individual and fill up your info. E.g your name, address, phone number etc and scroll down the page.


billing-settings-in-blogger-google-adwords

Step 11: Select Automatic payments in How you pay option and the payment method is chosen in step 9(you can pay with either credit or debit card or by bank account depending on your country).


Fill up all your info carefully and choose your billing language also.


Step 12: Check the Yes, I agree the above terms and conditions and click on complete sign up.


how-to-signup-google-adwords

Congratulations! you are done successfully. You can read more about Google adwords below e.g how to create more campaigns or edit the existing one, how to change billing info and account info and also how to cancel your account any time.


How To Make Changes In Settings?


Although payment settings and other settings are configured and saved at the time of setting up account but later you can change your payment as well as account settings. To change your account settings just click on the settings button on the top-right-corner of the page.


To create more ads and ad-groups just navigate to campaigns and click on  +CAMPAIGN 

I hope you like this post if you have any question ask me in comments or contact me. Follow through social networks and subscribe to Newsletter for E-mail notifications about new posts. Share this post with others and help me spread my blog. 

Search Tags: How to Use Google Adwords, Google adwords help, Google adwords for blogger, Step by step tutorial Google adwords, Increase traffic Google adwords,Get Google Adword's tips,Advertise blog low rates,101Helper blogging tutorials


How to find the URL for a picture in Google Photos

This article describes how to get the URL or internet address of a picture in Google Photos, and the difference between Google's shareable links and URLs.


Google Photos is a tool that help bloggers (and everyone else) to manage their picture collections. It replaces Google+ Photos, and works alongside Picasa-web-albums.   You can read more about it here.

In Google Photos, there are two different types of web-address for a photo.
  • One is the URL, and this can be used to refer to pictures from Blogger, or from other tools that want a link that just shows the photo, eg Twitter, Google Maps.  This is the traditional style of internet-address for a photo.
  • The other is the shareable link.   This is what Google Photos provides from the Share function.   Shareable links can be used in Facebook, and other places where the photo that is being shared is displayed within a web-display, rather than just as a picture.   (Ref:  How to make and manage shareable links in Google Photos.)

Unfortunately shareable links cannot be used in many applications.  This is because they don't just show the picture.   Instead they load a display showing the picture-date, the name and picture of the person who is logged in to Google at the time, and any other pictures that you have included in the same shareable link.

If you want to use an image from Google Photos in a tool which cannot use shareable links, you need to find it's URL, instead.   At the moment, Google Photos doesn't have a way to get this - but luckily it's easy enough to find.


How to get the URL or web-address of a photo in Google Photos, using your computer

Log in to Google Photos

Navigate to the picture that you want to get the link for.  

Click on the picture, so you see it in full screen mode.


Right click on the body of the photo and choose the "copy link" command from the menu that pops up where you clicked.  

The exact wording of this command varies between browsers on operating system.   For example in Chrome / Windows 8, it is simply "Copy Image URL"


In Internet Explorer 11 / Windows 8, you need to choose Properties from the pop-up menu, and then copy the value from the URL-field in the window that opens


Job done! The URL for the photo which you were looking at is now in your computer's memory, and you can paste it (with ctrl/v or Edit > Paste) into any other place that wants it - for example Blogger's photo-insert wizard, or an email message or discussion forum or chat window.


The URL from your address bar doesn't work

You may be tempted to just copy and paste the URL from the address-bar in your browser. And this will work for you.

But if someone else (or you, when you are not logged in to the same Google account) tries to use it, they will get either:
  • A 404 error (if you are logged in to a different Google account), or
  • Invited to log in to your Google account - followed by a 404 error if the Google account you log in to is not the one that owns the picture.


How to get the URL or web-address of a photo in Google Photos, using your phone (Android or iOS)

Unfortunately I have not managed to find a way to get photogrpah URL (rather than the shareable link) from my smartphone as yet.

If you can suggest any ways to do this, please leave a comment below.


Where to find more information

Introducing Google Photos:  how does it compare to Google Plus Photos and Picasa-web-albums

How to change the date of a picture in Google Photos

How to get the shareable link for one or more pictures in Google Photos

Putting pictures and text side-by-side in blog-posts

How to share pictures from Google Photos, using shareable-links

This article describes how to get a link to one ore more photos from your Google Photos collection, using the Shareable Link controls.   It also explains how to delete shareable links that you have made in the past


Google Photos is a tool for managing picture collections. It replaces Google+ Photos, and works alongside Picasa-web-albums.   You can read more about it here.

Shareable Links are a new type of linking introduced in Google Photos, which let you easily share one or more pictures at the same time.   You can email them, or use them in tools like Facebook.

When someone opens a shareable link, they see a display with the date, the name and picture of the person who is logged in to Google at the time, and all the pictures that are included in the same shareable link.

If you want to use an image from Google Photos in a tool which cannot use shareable links, you need to find the URL for the photo, instead.


How to get the shareable link for one photo in Google Photos


Log in to Google Photos

Navigate to the picture that you want to get the link for.  

Click on the picture, so you see it in full screen mode.

Hover your mouse towards the top-right of the screen, and you will see some control show up: these are quite small, and are white (so may be harder to see against some backgrounds).

One of the controls is the Share icon:  it looks like a side-ways triangle with one bar missing.     Click it.


In the Share pop-up that opens, click "Get shareable link"


Wait while Photos generates a link.

When it is finished, copy the link text.  
(Ctrl/c on the keyboard is the easiest way to do this, since the text is automatically selected).


Job done! The display address for the photo which you were looking at is in your computer's memory, and you can paste it (with ctrl/v or Edit > Paste) into any other place that wants it (eg Facebook, in an email message, or something that will accept an address which displays the photo inside a "wrapper" of some sort.  s photo-insert wizard, or an email message or discussion forum or chat window).


How to get the shareable link for more than one picture


You can share several (or lots) of photos with someone by just giving them one web-address, which opens up a screen with all the photos.

 To do this:

Click the small selection icon (tick) at the top left hand side of each picture that you want to include.
(Once a photo is selected, the icon shows as blue, and there is a border around the picture).


Hover your mouse towards the top-right of the screen, and you will see some control show up: these are quite small, and are white (so may be harder to see against some backgrounds).


Click the Share control icon:  it is the one that the arrow is pointing to in the picture just above this.

Continue in the same way as for getting a shareable link to an individual photo (ie the section above)


What does the Delete link do

You may have noticed that there is a delete function on the Shareable link screen.


If you click it, then you are given the chance to delete any existing links to the currently selected group of photos.


This doesn't seem to make any sense at the time when you are first making the link.

But it also works later on:  if you have the same photos selected and choose to get the shareable link again, you will get the same link - and you may delete it instead.

This does not delete the photos themselves, just the previous link to the currently-selected group of photos.   If anyone (or anything, eg Facebook) tries to use that link again, they will get an error message instead.

Another way to delete links is from the left-side menu in Photos:  Choosing  More > Shared links shows you al list of all shareable links you have ever made, and then for each one you can either copy the link or delete it.


Where to find more information

Introduction to Google Photos

How to put a picture into a post in Blogger

How To Add Smart Search Box In Blogger

swiftype-smart-search-blogger-tutorials
Swiftype smart search box for blogger blogs

Search box could be called the fuel of a blog because it runs your blog. People find their desired content through search box. As it is a very useful widget so it is available in many styles in different blogs because everybody is trying to make his blog unique from other. Although blogger has a built-in search box in the navbar as well as in widgets list but most of the blogger prefer to use customized search boxes because they look good.


Most of the search boxes are customized by CSS and some are designed by using some javascript also to enable some great features like auto-complete. 

But its not easy to use the search boxes having auto-complete feature because it needs alot of work and you have to add each suggestion manually. So advance bloggers are using advance search box like Google custom search engine. Because it has suggestion feature but it slows down your blog as well as need manual work for auto-complete suggestions. 


So this time I brought you a smart search box which has some great features. You can read these features below:


(1). It is free of cost and floats on the bottom corner of your blog.

(2). It is easily customizable.
(3). It crawls your blog automatically and show suggestions based on keywords.
(4). Easy to setup.
(5). You can use a single account for a single blog with free account. But you can upgrade to a premium account.

Don't Miss:

Demo:


smart-search-box-blogger-101helper

You can see a live version of this search box at http://trickme1.blogspot.com

How To Install Smart Search Box In Blogger:


Step 1: Go to https://swiftype.com/users/sign_up and register a free account by typing your full name, E-mail, Password and Phone number.


smart-search-box-blogger-101helper-gadgets

Step 2: Now log-in to your account here.


Step 3: Click on Create A Search Engine And 


how-to-add-smart-search-box-in-blogger

Step 4: Enter your blog address and click on verify.


how-to-add-smart-search-box-in-blogger-tutorial

Step 5: Enter name of your search engine and click on Create Engine to proceed away.


blogger-help-tutorials-101helper

Swiftype will start crawling and indexing your posts immediately.


Step 6: Scroll down the page and click on Install Search Engine.


install-search-engine-for-blogger

Step 7: Click on Start Installation


widgets-for-blogger

Step 8: Customize your search engine's appearance e.g search results, number of search results etc and then click on next.


autocomplete-search-box-blogger

Step 9: Customize auto-complete appearance and click on next.


search-box-for-blogger-101helper.blogspot.com

If you want to disable auto-complete check the Disable auto-complete option.


Step 10: Make color Customizations e.g Primary Links color and Text Highlighting color and click on save and preview. 


color-picker-for-blogger-101helper

You can use color picker but if you want to choose a specific color and get its code then use 101Helper color picker.


Step 11: See preview of your search box and click on save.


Step 12: Its almost done now just scroll down the page and click on Activate Swiftype.


color-picker-for-blogger-101helper

Step 13: Copy the code of your Swiftype search engine.


blogger-widgets-codes-101helper

Step 14: Go to blogger dashboard and navigate to template > edit html.


Step 15: Click inside the code and hit Ctrl+F.


Step 16: Type </head> and hit enter.


how-to-edit-blogger-template

Step 17: Just above it paste the copied code as shown in above image.

Step 18: Click on save template and finally you are done!


How is this post? Is this gadget working in your blog properly? Please give me your feedback by leaving a comment below. If you have any problem in above steps feel free to ask me. 


Follow and subscribe to our news letter for latest updates. Share this post with others and help us spread our voice.


Search Tags: How To Add Smart Search Box In Blogger, Aut-complete search box, Smart blogger gadgets and widgets, 101Helper blogger gadgets tutorials, Smart search box blogger.

[FIX] CD / DVD ROM Access Denied - Permission - Tutorial

So, your access denied to DVD Drive. In many cases, you face such a kind of problem, when you want to access your CD-ROM but the administrator has not been allowed you to use the disk drive. Or may some software banned permission to deny the use of CD-ROM. The issue of access denied to CD Rom occurred probably by 'No permissions set' or the corrupted reg files - so in that case, the CD/DVD drive is not accessible & your access denied. Another possibility is that the Group Policy setting are not being removed on Windows by a particular user to the group and you get the message "access denied" when accessing the CD drive, although for USB too. Stop searching for windows xp CD-Drive access denied or the CD-Drive not accessible access denied and learn how to grant read / write access to USB or CD-Drive in Windows & fix access denied to DVD Drive & how to get out of this issue.
CD ROM Access Denied - Permission [SOLVED]
Last time we have seen Turn PC into wireless hotspot to share an Internet in Windows [FREE]
in the subject of Computer Tutorials. But today we are going to see new tutorial about changing and allowing user to access the CD/DVD ROM fully with read/write permission.

Also check: 5 Ways How Wearable Technology Will Improve Our Daily Life

CD DVD ROM Access Denied - Permission [SOLVED]

Its not that much hard to edit registry.  Just follow the instructions as shown below;

1. Run regedit.

2. Navigate to Hkey_local_machine\SYSTEM\CurrentControlSet\Control\Class{4D36E965-E325-11CE-BFC1-08002BE10318}

3. Right clicked, then on right panel click new, then create two new key D-word.
Then rename it to Properties. In Properties create two new dwords

a. Name: DeviceType 
    Type: reg_dword
    Hex Value: 00000002
b. Name: DeviceCharacteristics
    Type: reg_dword
    Hex Value: 00000100

4. Most important: Quickly uninstall the driver of cd/dvd from Device manager.

5. Restart. Scan for New Hardware.

6. Boom!! Problem Solved.

Let me know what you get...

How to tell Google about problems with activity on your AdSense account

This article describes a way to tell Google about problems with activity on your AdSense account.


I noticed a link to an Invalid Clicks Contact form in a recent blog-post from Google.

You can find the form here.

Basically, this is a way to tell Google if you think that something has gone wrong with your AdSense account, for example if you are being click-bombed or similarly targeted by malicious people or activity.

This caught my attention because exactly that happened recently here on Blogger-hints-and-tops: from reading the AdSense help forums, it seems that bots (or something) were attacking Link Units, and suddenly lots of people were getting huge increases in both click-through rates and revenue-per-click. At the time, I followed the advice given there:

But it still felt wrong not to take a more active step to tell Google about the specific problem with my account..


What does the form do

The Invalid Clicks report form has fields that let you give
  • Your name, email address and AdSense publisher ID
  • The URL where ad code appears
  • Topic (select one of: reporting unusual activity, or predicting a significant change in account activity)
  • A paragraph describing what led you to believe that the click activity was invalid
"Data from your site, mobile app and/or YouTube channel traffic logs or reports that indicate suspicious IP addresses, referrers or requests which could explain invalid activity." 
 Note that you only have 1000 characters for the description - but I'm sure that links to documents in your Google Drive (set to be avaialble to anyone with the link, of course) would be very acceptable.

They do say "Please note that we may not respond to your message unless we find a significant issue with your account." - and I would not be in the least surprised to not hear anything back.


Mention expected traffic increases, too

Sometimes, you may know that your blog is likely to get a a large traffic increase. For example, you may publish a controversial post, or release a resource which is extensively publicised via social media or your email list.

You can also use this form to tell Google AdSense about this, and that you expect a sudden increase in page impressions and revenue.

There are no guarantees, of course, but this may help them to distinguish between genuine and invalid sudden changesincreases, in cases where these are manually reviewed.


When not to use the form

Google know that even the most careful publisher will occasionally click on an ad themselves, especially on sites which are about personal hobbies or interests.

My guess is that we should not waste time reporting these invidiual clicks. They are very easy for Google to identify and disqualify - and doing to would make it a lot harder form them to identify real problems vs noise from issues reported via the form.


Where to get more information

How to approve a site to show AdSense ads from your account

AdSense help forum

Stop your AdSense from showing types of ads that aren't allowed on Blogger

Using a custom domain for something other than your Blogger blog

This article is about how you can use a custom domain that was purchased through Google / Blogger for something other than a Blogger blog.


Blogger makes it very easy for you to buy a "custom" domain name (ie URL) for your blog.   Instead of being www.fred-fish.blogspot.com, you can easily be www.fred-fish.com - which is more appealing for all sorts of reasons.

Blogger tells you which domain registrar they're going to use and lets you change to the other one if you want to.  Apart from this, Google hides most of the "technical" domain registration details from you:  you are invited to set up a domain administrator account (in Google Apps), but even this is optional.  

But there may come a time when you want to use your domain for more than just a blog:  eg, Fred may want to use www.fred-fish.com to sell fishing trips or as the public gateway to a massive database of fishing achievements, neither of which are functions that Blogger (easily) provides.

To use a Google-Blogger purchased domain for something other than a Blogspot blig, you need to:
  • Move your blog away from the domain
    (you might move it use a subdomain or virtual host off the domain later on - but the first step is just to free up the domain for other use.
  • Change the domain-name-server settings for the domain to point to the right place for the "something else" that you want to use it for.

Even though you purchased the domain using Blogger, your access to it is through the Google Apps control panel: from there you get the login details for the domain registrar (currently either goDaddy or eNom that Google used to buy the domain).


How to re-use your domain

Unlink the domain from your blog:

Log in to Blogger with the account that owns the domain.

2  From the Dashboard, choose   Settings > Basic > Publishing and click the cross on the right of the Edit link beside your blog name.


This changes your blog back to www.YOUR-BLOG-NAME.blogspot.com, and removes the DNS records that pointed your blog to your custom-URL.

It may take a few hours (I've heard 72) for these changes to apply to computers all around the world, so people who go to your custom domain may still get re-directed to your blog for a day or two.

Also, Google (and other search engines) will still have indexed links to your blog contents at your custom domain.  These will gradually be replaced when
  • you put new content at your custom domain and 
  • it gets indexed by the search engines and 
  • the new content-indexing replaces data in the cached Google results in various computers around the world.
This can take some weeks, though, so your blog may miss out one some search traffic, and people who search for your new site may see odd results in their search list.


Next - link the domain to what you want it to show

3  Find, or create, the domain administrator login details for your domain:

I've previously described how to set up the domain administrator for your domain.
  • If you haven't done this already, you need to find the relevant email and set up the account now.   
  • If you have done it, you need to remember the administrator login and password that you created.
  • If you cannot remember the administrator details, then go to  https://www.google.com/a/cpanel/YOUR-DOMAIN-NAME/ForgotAdminAccountInfo - put in the right value for your domain name, without www.  or http:// at the start.    Enter the captcha details, and if you have set up an administrator account the details will be emailed to your backup secondary address. 
  • If you never created an administrator account and cannot find the email to do it now, use this help-process.  Choose:
    - I never created an administrator account, then
    - I signed up at Google.com/a and purchased a domain name at the same time

    You can only use the help-process after you have un-linked your blog from the domain (ie steps 1-2 above plus left time for the change to be applied to Google's servers - somewhere between a few minutes and a few hours seems to work).  If you try to use it while your blog is still using the domain, you end up being directed back to Blogger.
Note:   if none of these processes help you get control of your domain administrator, check the resources in this article from Nitecruzr about the topic.
    4  Go to https://www.google.com/a/YOUR-DOMAIN-NAME/

    5  Log in with the admin account and password from Step 3.

    6  Go to the Domain Settings tab

    7  Go to the Domain Names sub-tab

    8  Choose the Advanced DNS settings link.

    This opens a screen that shows you how to get into the DNS console for your domain.   It typically has
    • Your domain-registrar sign-in name and password,  
    • Your domain-registrar customer service PIN - in case you need to contact the registrar's customer services, 
    • Contact details for the domain registrar's customer service department  
    • A link that you can use to get to the to DNS console
    9  Log in to the DNS Console, using the details from step 9.

    10  Follow the directions there to make the domain changes.

    The steps required depend totally on what you are using the domain for:  for help with this, contact the the technical support forum (or whatever) for the product that's being used to build the new contents of your domain.


    If you need more help, check out the Google Apps help forum.


    Where to find more information

    Automatically renewing your custom domain

    Transferring ownership of your blog to another Google account

    Blogger and other Google products - an overview

    Recovering control of your custom domain (external link)

    Kategori

    Kategori