How to set Up a Shop on your Facebook Page for selling Products?

How to set Up a Shop on your Facebook Page for selling Products?

Are you thinking to sell product through online? But you may unable to create an eCommerce site because of budget problem. In this case you can create a Facebook shop for selling your product. Facebook is now giving opportunity to create online shop in their page. And it will take less than 10 minutes to create an online shop in Facebook page. As a result customer can buy your product directly from Facebook.

The main feature of Facebook Shop is there is greater possibility to view your product by large audience. And you don�t need to promote your product separately. If you have previously purchased from Shopify or Bigcommerce then you have knowledge about shopping on Facebook shop.  

If you are interested to create a Shop on your Facebook page then it you have to note that this feature is only available to Facebook Business page. And still this feature is appearing randomly on Facebook pages. If you see Add Shop section in your Facebook page then you consider it that you are eligible to create a shop in facebook. If you have the �+Add Shop section� link on your Facebook page then please follow the below steps to create a shop and start selling products on your Facebook page.

Step #1: Visit your Facebook page and locate �+Add Shop section� URL and click on it.

How to set Up a Shop on your Facebook Page for selling Products?

Step #2: It will brings up a prompt and from there click �Add Shop Section� button. In case of non-supported Asian countries currency selection option will appear first. You can select any local currency for your Facebook Page Shop.

How to set Up a Shop on your Facebook Page for selling Products?

Step #3: Now you may required to agree to �Merchant Terms and Policies� on Facebook. Just put tick on it and click �Continue� button.

How to set Up a Shop on your Facebook Page for selling Products?

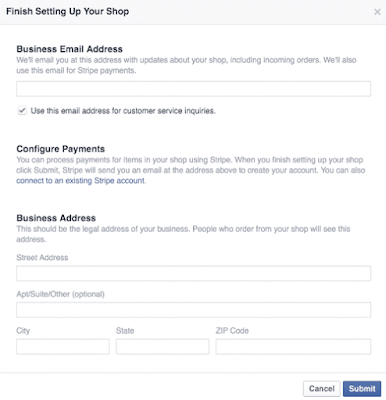
Step #4: Once you have agreed with Merchant terms and policies then you have to enter your Business email address. If you already have a Strip account then locate �Configure Payments� click �connect to an existing Strip account� link. If not then visit https://stripe.com/and create a stripe account and after that configure your payments. After that your Facebook page�s Call-to-action button will change to �Shop Now� button.

How to set Up a Shop on your Facebook Page for selling Products?

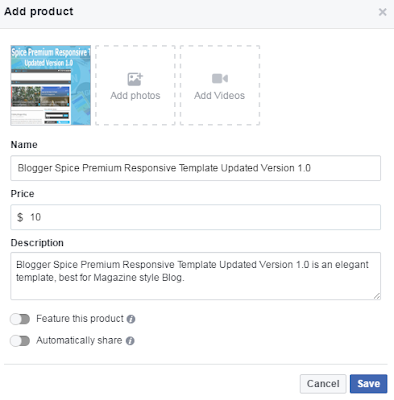
Step #5: Now simply describe your Business in your Facebook shop page within 200 characters. And after that start adding �Product image� (Image dimension should be 1024px X 1024px), �Product video�, �Product Price� and �Product Description� by click �Add Product� button under �Add Product to Your Shop� section. Finally click �Save� button.

How to set Up a Shop on your Facebook Page for selling Products?

You can add unlimited product in your Facebook Shop. You can sell either physical or Digital products through Facebook but restricted to illegal product selling. And this feature will help your business to grow steadily.

How Blogger can become benefited?

As a Blogger you can use Facebook Shop for selling your digital product. You can sell through Facebook shop all kinds of digital products, such as �
  • eBook
  • eCourse
  • Web Design
I think this feature has opened a new door for web designer and small business. If you are not making decent amount of money from your affiliate advertisement then you can start selling digital product through Facebook Shop.

sell product in Facebook
How to set Up a Shop on your Facebook Page for selling Products?
Do you think Facebook Shop feature will beat eCommerce website or help us to grow home Business steadily? Are you planning to add a shop to your Facebook page then let me know about your experience in the comments!

Home Based Data Entry Jobs at Lionbridge Smart Crowd (Virtual Bee)

work from home

Lionbridge Smart Crowd is an online company who offers Data Entry jobs for those who wants to work and earn money from their home. You may familiar with �Virtual Bee� online company for Data Entry job and now it been changed to Lionbridge Smart Crowd. And all people have equal opportunity to work with them, no matter where you are living.  Currently they are working with many popular companies around the world such as- Adobe, Canon, Caterpillar, CBS Interactive, Cisco, Dell, Eli Lilly, EMC, Expedia, Golden Living, Google, HP, LRN, Microsoft, Motorola, Nokia, Pearson, Pfizer, Philips, Porsche, PTC, RIM, Rolls Royce, Samsung, Skillsoft, Studec, and the US Department of Justice.

What kind of work to do at Lionbridge Smart Crowd?

Typing job in nature and often you have to enter data collected from scanned images. The data can be different, such as people�s names to addresses, dates, numbers and symbols. And sometimes you will get tasks in Data research, data entry, language, testing and more. However for these kinds of tasks only you need to know composing. If you have more typing speed with accuracy then you will able to complete your task soon and go for next task.

Important Facts you should know before Signup at Lionbridge Smart Crowd?

There is not any special requirement to become eligible to work with Lionbridge Smart Crowd. But there are few technical requirements are as follows-
  1. A Faster Computer
  2. A High Speed Internet
  3. A Solid Keyboard
In addition for better user experience you should use latest version of Google Chrome Web Browser.
Some point I just sort out and you should consider those before apply to work from home doing data entry tasks for Lionbridge Smart Crowd -
  • Applicant must be 18 years old.
  • There are not any registration fees to work with Lionbridge Smart Crow.
  • U.S and Non-U.S citizen can work at Smart Crowd.
  • There is no limitation for working hour.
  • Lionbridge Smart Crowd makes payment after completion of each task.
Sounds great, you can work with Lionbridge Smart Crowd without any bindings and limitations. So if you are interested then you can visit the below URL and Go ahead.
  • https://thesmartcrowd.lionbridge.com/Home/NewSignup
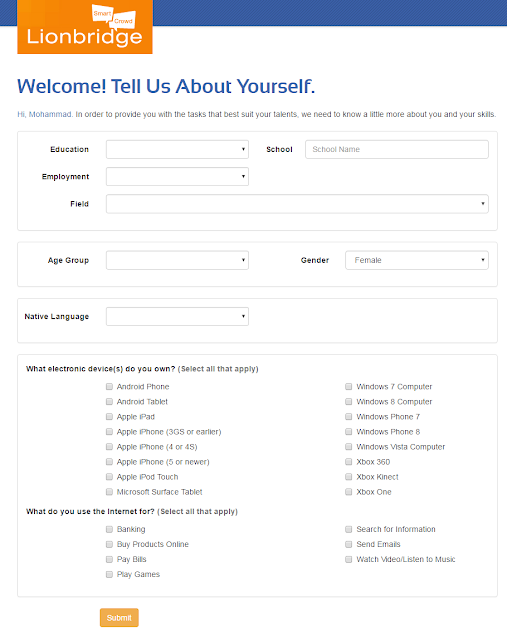
After Sign Up they will ask you to comply with their agreement and answer some questions such as about your demographics, education, areas of expertise and language skills. After answering them your signup process will complete.

Home Based Data Entry Jobs at Lionbridge

It doesn�t mean that after Sign Up you can start work, because you have to complete at least one placement evaluation to show them your real talents and skill level and this will enable you to get work there.

How much you can earn from Lionbridge Smart Crowd?

This is a most important question of any potential worker that how much they will able to earn from Lionbridge Smart Crowd? It is clearly said that all price are set according to the task. And Lionbridge Smart Crowd will pay you for each task. But payment amount will vary according to the task volume. For data Entry task price start from $0.20 to $0.60 cents for per 1000 keystrokes. That means you can earn few dollar per day. Yes! This is very lower payment but for extra money you can try to complete tasks sometimes. But don�t choose this job for living.

However you can earn $1 - $5 by completing their survey tasks. This is really interesting, because under survey you can test products for free and just you have to share your opinion.

How to receive payment from Smart Crowd?

This is also an important factor that how you will receive payment after completing tasks. The Smart Crowd makes payment through �PayPal� and �Dwolla� account. You should register with �Dwolla� if your county is not support PayPal. And try to avail a debit card from �Dwolla� so you can easily transfer your fund from Smart Crowd.

They have set $10 Payment threshold and you must apply to Smart Crowd using your PayPal email id to receive your payments on time.

Verdicts

Though, you are looking for a suitable job from your home for living but Smart Crowd pay very less amount. So if you are only interested to earn extra bucks then you can go with The Smart Crowd, but if you want to work online for living then Smart Crowd is not appropriate for you.

Home Based Data Entry Jobs at Lionbridge Smart Crowd (Virtual Bee)
However for earning extra money Smart Crowd could be a good source and you can do your work in fun way. However many old member complain about them that they are scam but in real they are legitimate company but pay very less amount. So choice is yours. Thank you. 

[Fix] Duplicate Meta Description Error in Search Console | HTML Improvements

Hey, you too stuck and searching about this issue encountered in Google Webmaster Tool [it's called as a Search Console now!]. If you are not aware of this problem, then you need to check your search console dashboard, go to 'search appearance' >> 'HTML improvements'. If your search console showing "Duplicate meta descriptions" error, then you need to go through this page. And improved search engine design detect every and critical error from each of your web page. WARNING: Don't duplicate your meta descriptions and try to immediately fix this Error in Blogger / WordPress / Website - I have checked most of the web optimization tools & used Google web tools, but this Search Console is the best in all and its free for better & quick indexing your web pages in search engines. Moreover, if you have not seen this 'Duplicate meta descriptions' issue derived from Google search architecture, then I recommended to follow these steps described below. It may help your site's visitors for the better experience, website performance and SEO website ranking. This tutorial is all about how to fix duplicate meta descriptions? How to remove duplicate meta descriptions? Just keep reading and follow all the steps shown below.
Fix Duplicate Meta Description Error in Webmaster tool HTML Improvements - Search Console
Last time we saw Top 7 On-Page SEO Basics To Consider Before You Build an SEO Optimized Web Page, and today we are going to learn how to fix and remove one of the critical SEO error from Search Console.

Also check: 15 Quick-Tips to Improve SEO Ranking That'll Generate Huge Traffic To Your Site

Fix Duplicate Meta Description Error Showing Search Console

No need to go into details about how does google search work and how Google search architecture detects these errors. There is simple solution to get rid of this error. Your google webmaster tools find duplicate meta descriptions in your blogger or Wordpress website. You just need to fix pages with duplicate meta descriptions.

Step 1: Edit Custom robots.txt

  1. Check your ROBOT.TXT file. Go to http://www.yoursite.com/robot.txt
  2. Edit robots.txt in blogger: Go to My Blogs >> Search preferences >> Crawlers and indexing >> You will find the option for 'Custom robots.txt'
  3. Click on edit and paste the following text into it.
  4. User-agent: Mediapartners-Google*
    Allow: /

    User-agent: Googlebot-Image
    Allow: /

    User-agent: Adsbot-Google
    Allow: /

    User-agent: Googlebot-Mobile
    Allow: /

    User-agent: Twitterbot
    Allow: /

    User-agent: *
    Disallow: /search
    Disallow: /cgi-bin/
    Allow: /

    User-agent: *
    Disallow: /*.html
    Allow: /*.html$

    Sitemap: http://www.yoursite.com/atom.xml?redirect=false&start-index=1&max-results=500
    [Change http://www.yoursite.com/ with your own domain]
    Here you can also add your sitemap as http://www.yoursite.com/sitemap.xml
  5. Now save changes and check & verify robots.txt again.

Step 2: Edit Custom robots header tags

Just below the 'Custom robots.txt' option there is option for 'Custom robots header tags'
Click on edit and make the changes as shown in below pic.

Edit Custom robots header tags

Step 3: Edit each post description from blogger HTML

  1. Go to HTML of your website.
  2. Find
    <meta expr:content='data:blog.metaDescription' name='description'/>
  3. And replace it with following code:
    <!-- Fix Duplicate Meta Description Error from Webmaster tool Search Console -->
    <b:if cond='data:blog.pageType != &quot;index&quot;'>
    <b:if cond='data:blog.pageType != &quot;item&quot; and data:blog.pageType != &quot;static_page&quot;'>
    <b:if cond='data:blog.metaDescription != &quot;&quot;'>
    <b:if cond='data:blog.url != data:blog.homepageUrl'>
    <meta expr:content='data:blog.metaDescription' name='description'/>
    </b:if>
    </b:if>
    </b:if>
    </b:if>
    <!-- Fix Duplicate Meta Description Error from Webmaster tool Search Console -->
That's all...

All above steps help you to remove duplicate meta description warnings and it will be fixed after your pages get re-indexed again on Google Webmaster tool. Check your search console after few days and let me know your website results via comment section shown below.

Amazon Mechanical Turk to Make Money While Doing Simple Online Tasks

Amazon Mechanical Turk

Do you want to earn extra cash online by doing simple tasks then you can work with Amazon Mechanical Turk. This is very simple to find work at Amazon Mechanical Turk and earn money from home. Amazon Mechanical Turk is a marketplace where you can find a wide variety of human intelligence tasks to do. Most of their tasks are short in nature where you need short time to complete. There are thousands of tasks available, so you can work in your convenient time. 

What is Amazon Mechanical Turk?

This is a service from Amazon where you can get access to thousands of human intelligence tasks available to complete. Just you have to sign up there as a worker and start earning money for doing short tasks. However small tasks are very simple and you can earn extra money from your home. Even you don�t need any previous experience to work with them. Currently over 500,000 Turkers are working for Amazon Mechanical Turk from 190 countries. You can visit below URL to know more about them. 
  • https://www.mturk.com/mturk/welcome

What types of tasks you have to do at Amazon Mechanical Turk?

Because of small tasks you have to do task in shortest period of time. And it won�t take much time to do. There are thousands of tasks available on Amazon Mechanical Turk but some common work you may find there to do, like-
  • Data Entry Job
  • Search engine evaluation
  • Writing Work
  • Identifying a specific color in a photo or video
  • Product categorization
  • Researching data details
  • Transcribing audio recordings
Among those you will find varieties of tasks which are really pretty simple. But People who need small tasks done requiring human and not computer intelligence. You will find some jobs are very interesting and some are boring.

How to Find Work on Amazon Mechanical Turk?

For finding tasks as worker on the Amazon Mechanical Turk you have to register first by visiting below  URL-
  • https://www.mturk.com/mturk/welcome
and after completing registration process you will get approval from the requester. And to find the work search or browse through Human Intelligence Tasks (HIT) and select the one that you find interesting. After accepting the task you can start work on it. After completing the work just submit the work to requester.

Requester will take note of your task quality and they can reject your work that isn�t up to their standards. So you should done job carefully and don�t compromise with quality otherwise your quality score will decrease. Finally if requester approves your work then you will get paid.

work from home

How much does Amazon Mechanical Turk pay?

This is absolutely true that you will earn small amount for each task. Because of small tasks payment will be small. But the payment is totally depends of task size. Shorter tasks tend to pay the least while the tougher tasks with more involvement pay the most. But on average most of the people can make $4 - $7 per hour doing anything on this site, and on average my rate of pay is probably usually closer to $3 or $4 per hour.

Suppose, if you do product categorization task in Amazon Mechanical Turk, you might get only one or two cents for each product you categorize. If the volume of task is large then you should do your task fast to make more money.

How and when do you get paid with Amazon Mechanical Turk?

After getting approval of your submitted task from requester on the Amazon Mechanical Turk your payment will be deposited in your Amazon Mechanical Turk account. And for payout you have two options-
  1. Bank Account Transfer
  2. Amazin.com Gift Card
Payment is depending on your location. But there has some small provision to get payment that you must have been active on Amazon Mechanical Turk for 10 days from starting days. You will be count as new worker until account balance is transfer to your account.

US worker can transfer earnings to their Amazon payments account as well as into an Amazon gift card.  But outside of USA worker can receive direct deposit into their Bank account in their local currencies.

Final Verdict

Amazon Mechanical Turk is not for living job, but you can earn some extra money. Hidden truth is their payment pattern is seriously low; even you may get paid below average rate.

Amazon Mechanical Turk to Make Money While Doing Simple Online Tasks

Another significant problem is that sometimes some dishonest requester will reject your work without a clarification even you did everything right. As a result you don�t get paid for those works.

Apart from this everything is OK and you can make extra money from your home. For finding legit requester you can read Turk Nation forum where worker share about requester information that are they good or dishonest.

12 Things You Must Know Before Buying A New Laptop

Those days where ugly computers with complicated parts & bulky accessories comes with heavy HDD in MBs and are much expensive have been gone and today we are on the edge where these computers or now laptops come with light-weight HDD in TBs. Now not only the design but all the configuration & parts have changed significantly over the past years. These new generation and high tech computer machines are more times better than those old ones not only in size but also in performance. When is the best time to buy a new laptop? What you can expect from your new laptop? The varieties of small screens, enough compact sizes, light weight, versatile, faster and advanced operating systems for doing hard work and furthermore to play PC games at home or on the go - these are the current configurations improving laptop processing speed significantly. And these are the exact things we need to study more intelligently before buying a new but perfect machine for all our requirements. So if you have decided to buy a new laptop or computer immediately? Then here is the list of things you need to follow just before purchasing a new computer system for all your needs. There are many users interested in buying a new laptop, but they don't know which laptop is best for their work.
It's then become a challenging task to choose the best computer as there are many options available in the market from wide variation including the variety of screen sizes, latest innovations, to the so many various brands, their configurations & their prices. And these are the exact reasons which make you confused for a moment after going to the shops or malls. But no worries, we are here to provide you some essential but quick tips about new high-tech PCs and laptops, and I am sure these things help you in buying a proper configuration and most suitable laptop for all your needs.

Things To Consider Before Buying A Laptop
Last time we have seen; Top 15 Must-Have Apps You Should Install Right After Buying A New Smartphone and today we are going to see a checklist of what to look for in a Laptop & quick tips on buying a best, suitable and perfect computer.

Also, read, How to Play HD Video on Slow Computer

Things To Consider Before Buying A Right Laptop/PC

Even if you don't have computer or laptop, then also, I recommend you to get familiar with these terms so that it will help you to choose the best machine that'll suit you for your future requirements. But how to Buy a Laptop? And what we need to look into it? You should use this laptop buying guide to make sure you get the best value while buying a laptop. Just remember following factors that must be considered while buying a perfect laptop.

1. Current Innovations & Updates

In every three months, there are somethings new has come up in the market. But we need to focus on what we want and what we need actually. Currently, there is a trend of detachable laptop screens; these most compact laptops are selling well in the market which has some kind of interchangeable & convertible parts, I mean they include a detachable and rotating screen by using which you can rotate the screen in any direction.

Normally these laptops are called as a hybrid convertible notebook as because we can use it as a computer, laptop, and tablet too. Dell, HP these are the recommended best laptop business brands to choose from these sleek ultrabook for your light-weight needs since these laptops have the less power consumption capability.

2. Touchscreen laptops

After the launching of touch-friendly Microsoft Windows 8 or 10, the plenty of laptops with touchscreens has raised the demand for them in online shopping sites and at Electronics Store. These touchscreen laptops offer a hybrid technology of freedom, to use easily & with the superior flexibility that normal notebooks or ultrabooks can't meet.

These convertible touchscreen notebooks are very easy, anybody can use the touchscreen just like we use the smartphone with various features like you can scroll down/up the web pages easily, you can see the documents, images and files at a larger size by zoom-in or zoom-out with double click on the touchscreen.

3. Screen Size Ratio and its effect on battery

The laptop with higher screen size and high resolutions are often able to display smaller size of menus on the screen because the operating system tries to render that much dimensions in pixel size. If you have more number of pixel ratio on the screen then it will reduce the size of all the items shown on the screen which includes pics, icons, fonts and various items & characters on the visible display screen. This causes the more brighter backlight to render all the pixels burn on the screen, ultimately it affects negatively on the battery consumption.

Based on the laptop size comparison, the smaller screen size laptops give you better battery life, but if you travel a lot, then I recommend you to go with purchasing a light weight 14" Inch laptops. And if you work from home or office, and carrying your laptop once for a while then, 15.6" Inch laptop would be the best suit to your need. But in case you're a photographer or works in media like video editor then you need a big span of a screen for all your media manipulation & better viewing experience then you can prefer to go with 17" Inch or more as per your requirements.

4. CD/DVD-ROM & USB Flash Drives

These days, modern laptops are coming WITHOUT CD-ROM, DVD or Blu-ray drives especially with those super sleek Ultrabooks, MacBook Air or MackBook Pro. It is just because of those the optical drives are so heavy & most of the online stores like Netflix, Amazon or iTumes provides us all our media stuff online. But still if you want to use CD-drive then you need to buy an external CD/DVD Drive, and they're portable & cheap. The use of flash drives is the perfect option to share all your media with your friends, where you can keep more movie files along with songs, photos plus you can use it as a bootable device if you need ever. These Flash storage drives have more prices, but those are smaller & able to give you better speed. As compared with CDs, these USB flash drive performs a much better & the reliable job of storing data and that is why it's worth spending a few bucks for these USB drives.

So I recommend you to keep low priority for this CD-drive option while buying a new laptop and focus on USB drives since further you can connect those directly to your smart TVs.

5. Storage Disks - HDD or SSD?

The storage is a most necessary thing; there was a time storage was expensive, rare to available & hard to buy, absolutely not the case now. The new generation laptop comes with inbuilt 500GB HDD to store all your data which is enough for watching movies, files, documents, videos, images, etc. Moreover, after HDD there is a new concept of SSD - a solid state drive, these SSDs gives the best performance while windows booting & better read/write operations to support whole computer processes that need advanced multitasking ability. And because of speed and performance SSDs are much costly than HDDs.

HDDs are the best cost effective, and SSDs are best for performance, speed and has the low impact on battery life. I would recommend going with SSDs if you want better computing operations and if you want to store all your data including movies, photos, etc. then HDDs are best as the SSDs are costly. But the point should be noted that the external drive is the another way for storage and backups.

6. No. of Ports and Connectivity

Everybody have plenty of various peripherals like USB pen drive, Camera, USB data cable, etc, so you need a sufficient number of USB ports, or else you'll need to purchase an extra hub. Old laptops had 2 USB ports, and now they are providing 4+ ports including USB 3.0. The improved USB standard is 2.0, although USB 3.0 is getting more popular because it enables the faster communication with external hard drives. The transfer rate with USB 2.0 is 30MB-40MB per sec. whereas for USB 3.0 the transfer rate is 80MB-90MB per sec. There are several ports like - VGA, multiple audio jacks, S-video, Firewire, multiple USB ports and HDMI ports, etc, along with these ports some laptops come with memory card readers. I recommend you to check at least USB 3.0 and HDMI port that you can use it with most of the digital devices.

WI-FI - everyone knows the Wi-Fi is a good connectivity option, with the help of Wi-Fi you can join by various types of networks. You connect a plenty networks of plenty places through a Wi-Fi system. In latest laptops have already built in a Wi-Fi receiver. You need to check the range of Wifi you are going to buy. The new laptops with Intel WiDi technology give you wireless stream video from your laptop to your HDTV.

Bluetooth- It is also an important part of the laptop; with the help of Bluetooth you can share your files to other laptop or mobile, sending songs, pictures, etc. Look for Bluetooth 4.0. It is also connecting Hi-fi system wirelessly. You can use the Bluetooth for playing the music through a stereo system from your laptop.

7. Battery life

While working on the laptop those many types of functions that affect your battery life like screen brightness, screen resolution, computing tasks that you are working on, growing trend of watching online videos on online websites or transferring data, documents or media files through the wireless network. Laptops now come with smaller and lighter package having the weight less than 2 kg. You need to keep an eye on those lithium-ion batteries that are much lighter and compact and are build with the energy efficient hardware component that they provide you 5-6 hours of battery life.

I suggest you see the battery ratings shown in Wat-hours [Wh] or milliamp-hours (mAh) that will give you an idea of how much you will get the battery performance for your laptop.

8. RAM - Random Access Memory

RAM is used in every computing operations to store all the processes temporarily that will help you work faster as possible. If you want a faster machine, adding more RAM may help. Note that; More RAM = Faster Computer. More RAM supports you to open more programs, run more applications and work simultaneously without slowing down your laptop speed. If you want to boost & improve your laptop speed & overall performance; then the simplest & the standard way is to increase the RAM of your laptop.

But the question is; how much memory does my computer need? I recommend you to look for 4GB RAM minimum for most of the home users that will help you to get better performance while watching HD movies or playing PC games. If you belong to video or graphic design field and always uses various graphics software then you need to go for 8GB RAM that not only assist you playing high graphics games but also in working on data processing software like Adobe Photoshop CC, Sony Vegas Pro or Adobe After Effect.

9. CPU - Central Processing Unit

It is the brain of the computer that handles all central processes you working with the laptop. If you are purchasing a brand new laptop and looking to use it for long life-span of time, then you need to think about Core i3, Core i5, and Core i7. These are standard CPUs gives you better than best performance. The core i5 is better than i3 and obvious i7 is much better than i3 & i5.

  • Intel Core i3/i5 - I recommend this if you want a laptop with the good combination of cost and functioning.
  • Intel Core i7 - If you want an excellent performance with smart technology from your machine then you have to choose the core i7 based laptop.
  • Intel Pentium/Celeron or AMD E-Series - These kinds of CPU are mostly used for office use, they give you better performance for basic tasks like editing of documents, internet surfing, watching videos, etc. Moreover, Intel Atom gives you a more battery life than Pentium/Celeron, but it provides you with a basic performance.

The point should be noted that you require giving a careful attention at the processor speed; a Core i7 is an Extreme Edition CPU, you will get up to 12 physical cores functionality which gives you the turbo boost, extraordinary performance in multitasking but it is much costly as compared with i-core 5 laptop and i-core 3 processors. Based on business laptops reviews the CPUs i7 & i5 have better cache size, hyper-threading technology, the ability to handles high graphics processing tasks, and balanced power efficiency with performance.

10. GPU - Graphic Processing Unit & Graphic Cards

Those youngsters mostly like to play games on PCs or laptops, and current innovations in games especially high graphic games like Assassins Creed Syndicate or Call Of Duty - Modern Warfare required special graphics processing unit and intensive dedicated graphic RAM called graphic card. If you want excellent gaming performance, the only reasonable choice is to buy a new laptop with a greater graphic card. The brands like Nvidia and AMD are much popular graphic card providers in the market, these cards not only help you for gaming but also in high-resolution video editing, making 3D objects. This graphic card memory or video card is more prominent than the RAM & the processor for graphic designers. Moreover, many integrated graphic cards provide versatile functions like accelerated rendering of 2D graphics and 3D scenes, TV output, connect multiple monitors, MPEG-2/MPEG-4 decoding and are used as the best laptop for video streaming operation.

I recommend that if you are looking for average and not that special gamer PC then go with 2GB graphic-card laptop and if you are amongst those gamers then go with a video graphics card up to 4GB minimum inbuilt with the machine.

Bottom Line

Laptops are now available and much convenient than a few years ago, they were just a heavy computer peripherals. Along with the prices, the technology, and regular innovations keep growing & developing, this allows us to go with a small, sleek, lighter & faster computer machine by just spending a few bucks. These laptops now become thinner, much compact, and can able to control nearly any difficult task. Smart technology with longer battery life are the fundamental features of these super computers that deliver an optimized performance. The price or the cost is also an important factor to consider, I knew, but the incorrect laptop is never a good deal, no matter how attractive the price it has.

Buying a laptop is a complicated job, but here, I would like to recommend you that you must focus your budget while buying the desirable processor [CPU+GPU], the most intense RAM or graphics card you can afford and the most important storage [HDD or SSD] options. Moreover, with the help of online laptop builder [from dell], you can even buy a customized laptop order online right from your home as well. These are the best quick tips and buying recommendations to choose bestlaptop from my side when you shopping for a new laptop. If you know, something is missing or want to add something new then you can share it with me via the comment section below. I would like to add it directly into this page.

Setup CloudFlare Free CDN Service in WordPres/Blogger | Speed Up Site Loading

The Page loading is one of the major factors in case if you want to improve PageRank. Yeah, off-course, the content is also important for any page, but what if? when it is taking too much time to load to display, the reader will not wait and eventually will switch to another site. This affects your page-views and so the PageRank. There are lots of ways to improve page loading of a website, but one of the best is by using CDN [Content Delivery Network]. CDN improves your page load speed, bounce rate, and security [HTTPS]. That will cause your visitor to love your site and to convert from visitor to regular reader of your pages. You can use CloudFlare with any custom Wordpress or Blogger domain you just have the full control over managing it's DNS settings. So stop searching how do I set up CloudFlare�s free CDN for WordPress or BlogSpot sites? Learn more about CDN service & get to know how to use CDN for blogger blog or any website to improve the user experience. Moreover, you can speeding up your WordPress with PageSpeed Service by this Free CloudFlare CDN plugins.
How To Setup Free CloudFlare CDN | Speed up Blogger Site
Last time we have seen 5 Advanced Tips For Making Blogger Blog To Load Faster to make fast page load time, that will increase your overall page views, cause lower bounce rate. And today we are going to see something advanced of the best Blogging Tips but most productive way to improve and optimize the site performance with 24/7 network & website monitoring by CDN servers.

Also, read: 5 Tips To Make Your Blog Load 10x Faster

Effect of CloudFlare CDN On Page Loading

Below chart shows the output result by the site performance especially the page load time calculated over a week. Before applying CDN, the blog loading time was around 15sec. but later after applying CDN effectively, it goes around 3sec and now it is around 1.84sec. Data is measured by one of the best free website performance monitoring tool called - Pingdom Pagespeed tool.
CDN Effect mesured by Pingdom tools

About CDN - What Is CDN & How It Works?

Your visitors expect your site to load immediately. And moreover, Google already officially declare that "page speed is one of the factors to consider for search engine ranking". And CDN is highly recommended the technique to speed up to loading time. Instead of going into details about CDN, I would like to explain you in short. CDN - Content Delivery Network - which is located globally across the Internet that will help to serve your web page and content of your site based on the geo-location of the visitor. It makes your site to load fast as it caches your site content and stores it on global servers, so if any user wants to access your page from any location, then instead of going to the primary hosted server which is far away from user, the user request is then served by his nearest CDN server. This makes fast loading of your site and also improve page views and user engagement. CDN not only caches your content to serve your readers but also optimizes your site entities like JavaScript�s, CSS & HTML. The overall effect will decrease the load on your server and gradually improves the performance of the site.

Install CDN in Blogger Blog - CloudFlare

CloudFlare is one of the best CDN service providers which grants FREE bandwidth for CDN and work with any type of static as well as dynamic content websites, Control Management Services [CMS], blog including Blogger, WordPress, Drupal, Tumbler and much more. CloudFlare is really easy to setup and provides DNS, DDos protection including FREE global CDN. They have their own custom-built system that is specially designed to run every website fast on the Internet globally. There are pro features also available to highly customize your site contents and entities that include Session Optimization, Prioritized Requests, Business and Enterprise features like Railgun and Automatic IPv6.

Step by Step Guide to Install CDN - CloudFlare

You may have heard that there are too many professional bloggers are using CDN to make their site to load faster, but for your blogger site, you need to have your own domain like www.yoursite.com. As it uses DNS of your site, so then only you can use CDN service for your blogger blog. You can check your current DNS on http://www.hypestat.com/. If you don�t have, then you need to purchase URL domain name for your blog or in addition, if you want web hosting as per your requirement get it from top dedicated web hosting companies listed as HostGator, BlueHost, GoDaddy and so on. So here I am assuming that you have your own domain name and you are aware of DNS settings.

Read: Top 10 Websites To Check Page Load Time & Performance

Follow the steps as it written:

  1. Go to CloudFlare site and sign up on https://www.cloudflare.com/
    Add your website and click on 'Scan DNS Records'. This will take 60sec. to scan DNS records.


  2. Next window will show the DNS Records for yoursite.com. Here you need to check and verify all DNS settings & nameservers are same as per your domain provider, if not, then you can easily add here A, AAAA, and CNAME records. Then click on Continue.


  3. Select a CloudFlare Plan as a FREE WEBSITE. If you want you may go with Pro, Business or Enterprise Website plan to get more advanced features of CDN. Click on Continue.


  4. In next window, you need to change your nameservers on your domain name provider site. Copy nameservers from CloudFlare and paste as they suggested on your domain provider website. This process can take up to 24 hours to fully functional. Note that, your website will not experience any downtime when you change your nameservers. After that click on continue.


  5. Now you will get the status of your site getting added into CloudFlare. It requires 24hours to be processed. Your site will remain available throughout the switch.
    [I would like to suggest you to recheck nameservers after 20 to 30 min, it will get active if you did all above steps correctly].


  6. You are now activated CloudFlare.

Now CloudFlare CDN server started to cache all your site data and contents including JavaScript�s, CSS, & HTML for better serving to all of your visitors from all over the globe. From then, you will see improvements not only in website loading but also in page views, bounce rate along with security protection against traffic surges.

Bottom Line

On my point of view, to use a CDN is very useful to make a website much faster than ever, more secure and even SEO optimized. Personally, I'd definitely recommend CloudFlare CDN services for serious bloggers or websites owners. This CDN network is one of the leaders of the CDN industry and even more than 2 million sites including the big names like Cisco, BainCapital has chosen them. Though for a regular website they are also ready to offer their FREE services and the website surely will work as fast as possible. And also, your site will be secured and well-optimized like a brand.

Let me know what you thought on this? Which plan you have chosen and how CloudFlare worked with your site.

12 Tips To Save, Improve, Boost & Extend Mobile Battery Life

If you are looking for; increase battery life android root/unroot, increase battery life android root xda, increase battery life android xda, increase battery life android app, increase battery life android lollipop, how to check battery health Android, how to make your android battery last longer, save battery android app; then you're on right page. Have you ever faced the situation where you are in a hurry, and suddenly your battery goes down? I think everybody has experienced such a kind of situation. So it's the time to think about what can you do to not to stuck in such a situations? How to get rid of this problem? How to increase the performance of your gadget battery? Is there any special app to extend battery life? Extending Android or iPhone Android battery life is one of the prime goal to be archived while using any smartphones. So stop searching especially about how to extend battery life on Android phone and quickly learn 12 quick tips to boost and get known completely on how to extend and improve the smartphone battery life.
12 Most Essential Tips To Save, Improve & Extend Battery Life
12 Most Essential Tips To Save, Improve & Extend Battery Life 
In last posts under the topics of Android, we have seen how to track lost mobile phone and how to solve display flickering error, but today we are going to focus on battery issues, so stop looking for, extend battery life android root, how to extend battery life of android tablet, how to extend battery life of android phone, how to check battery health Android, how to make your android battery last longer, what is draining my android battery; because as long as our device is running smoothly we are gonna work smoothly. Not only proper charging is essential for preserving the health of battery but taking care of battery does more work to save it much longer than we thought. As we know, today we have devices which come with Li-ion and lithium polymer batteries but as time goes these rechargeable batteries loses their capacity.

Also check: 5 Ways How Wearable Technology Will Improve Our Daily Life

Tips & Tricks to Boost Your Android Phone's Battery Life

Here we go, we've got the ultimate guide on how to extend and improve battery life. Try these tips to extend your battery capacity. See what's sucking the most juice. And try to get out of battery problems. Not only tips but also we are here to provide you the instruction to change the settings for improving battery life.

Just follow these tips as shown below...

1. Proper charging:

First and most important thing, try to avoid using your device till the battery falls down below 10% and prevent it from going fully discharge.

2. Change the screen brightness:

The brightness of the screen is the next most affecting factor for battery drain. As long as the screen is ON and with higher brightness; the faster your battery goes down. So change the screen brightness as low as you can stand it and still read a text. Moreover, set the locking period as quick as possible. As quick as it gets shut down, the more power you save.

3. Avoid overcharging of phone when it got fully charged:

First, don�t use the phone while charging and don�t keep your device charging once it got fully charged. Moreover don�t forget to plug-in your device to charge, when the battery falls bellow 10%.

4. Don�t use fake charger:

The Bogus charger will be harm to the battery. Only use the genuine charger for keeping a healthier life of the battery. Highly value capacitor charger does not only charge battery quick but also quickly damage your battery health. Don�t use the wrong adapter because it will destruct power delivering capacity.

5. Avoid charging all night:

Don�t leave mobile on charging throughout the night which is not essential. Once your battery got fully charged to 100%, the power supply causes heat in your device, and it will damage battery health.

6. Use battery saving mode and Switch OFF unwanted signals:

Try to keep your mobile on battery saving mode. This is the best way to improve your battery life. Bluetooth and Wi-Fi signals are known as phones battery drainer. It drains a more power from the battery. Some of you always keep features like Wi-Fi, Bluetooth, GPS, auto email sync, auto updates and much more; it will squeeze too much juice from your battery, shut down those features when not in use and that will support to improve battery life. Suggestion is to use auto off apps from store.

7. Force-stop unwanted apps:

Mostly there are lots of apps in mobile, and people are generally not using them on the same time but still those are running in the background. The suggestion is to kill those apps or forcefully stop them from apps manager this will prevent extra usage of your battery. Try to use Greenify App.

Suggestion to read:  Greenify - Best Auto Android Phone Booster And Battery Saver App [Must Try]

8. Don't Use Vibrate mode:

Some people keep their mobile on vibrate mode. Vibrate and ringtone used to indicate incoming calls. Vibrating is draining the battery more than ringtones; because vibrating is nothing but shaking your phone by swing a small weight which takes lots of power from your battery. Try to avoid vibrating mode. Use Sound Forge to increase the volume of ringtone.

Suggestion to read: Make Ringtone Louder

9. Wi-Fi and DATA Switch combination:

Try to use one signal at the same time, while on data turn off your Wi-Fi signal whereas while on Wi-Fi turn off DATA connection. If you're connected to a Wi-Fi network, but want to keep your mobile data then turned off to save battery life.

10. Avoid using dynamic backgrounds:

It was a new feature introduced in smartphone called animated wallpapers that those are placed underneath of icons. Even this feature looks nice causes more consumption of battery more than simple static background wallpaper. Keep simple background just to minimize the use of processor by means of battery.

11. Keep device temperature appropriate:

It�s observed that battery would fall down very fast when the device gets hot. So suggestion is to avoid the exposure of your device under direct sunlight or at the place where temperature is warm.

12. Turn Off Unnecessary Notifications & Push

Bonus Tip! Don�t forget to turn off unnecessary notifications and their push-alerts, which all cause too much battery consumption activity on your device and that can lead to a reduction in the health of battery.
Go to Settings >> Notifications >> go through each unnecessary app and choose �None�
Repeat this one as necessary, and in the future when new app downloads ask to allow Push Notifications, consider choosing �Don�t Allow� instead.

Quick Suggestions:

Not keeping animated wallpapers as they tend to suck up more battery than fixed ones. While not always, I suggest you, in a week do fully discharge your battery to nearly 0% and then recharge it again completely without disturbing even once. And I highly recommend you the best app to extend battery life: GREENIFY App that surprisingly and significantly improve your battery use caused by unwanted apps. It ensures a good battery life. Instead of listening to music at night and falling asleep, try to use a mp3 player with the auto shutdown for that purpose! You won't ever run on phone battery; you never know tomorrow might be an emergency, and you don't enough time to charge!


[FIX] Laptop Display Screen Flickering, Blinking Error in Windows

After installing the Microsoft Windows developer updates, my windows getting screen flickering problems with the display. Do you have an idea about this screen flickering issue with the monitor of a laptop in windows PC? Why this LCD screen flickering and how to stop an LCD monitor from Flickering or flashing? To answer this we just need to know about the troubleshooting Refresh Rate. Laptop Screen Flickering/Blinking - Don't worry, I know how to troubleshoot screen flickering in Windows. It's has been clear that � it is not a problem neither with your updated operating system nor your CRT or LCD monitor hardware. After troubleshooting the laptop screen keeps flickering issue, it's seen that � outdated display drivers, incorrect display settings for monitor refresh rate & incompatible apps are the basic reasons for screen flickering in windows. Not only in Windows, but Macbook Pro screen flicker problem also exists in some cases. Learn how to reduce, eliminate & fix laptop screen flickering, flashing, shaking error in simple steps.
Fix Display Screen Flickering Error in Windows
In the previous article, we have seen the same tutorial about How to fix display flickering error for Android phones and today we are going to see the same issue but in windows so the solution is also somewhat different than that of Android. One of the readers commented that "how to fix dell laptop screen flicker? My PC display flickering and blinking, it's very irritating". Learn how to get rid of this on screen display flickering error in windows.

Also read: How to Play HD Video on Slow Computer | Fix Video Lagging

Why laptop screen keeps flickering and why it should be fixed

And this error extends to Windows laptop screen � affecting to our eyes terribly. There are three prominent reasons behind why laptop screen keeps flickering that � 1. display drivers, 2. incompatible apps & 3. monitor refresh rate. We really need to focus on how to fix laptop screen flashing and repeatedly blinking, since it becomes difficult for the eyes to see & focus on the screen and that points to get eye strain & headaches; furthermore, this consistent blinking will cause the pupil to tighten and constrict, which results in a bigger eye range to focus [Vision Disorder] as you are spending lots of time in-front of computer.

[Solved] Laptop Screen Keeps Flickering

The issue is got to related to the resolution, we need to change the frequency. Basically horizontal flickering lines when the screen flickers caused by vibrations on the screen and people started to belive that their computer system becomes OLD or elcecticity signal is not proper or graphic drivers are not updated. And I think, that might be true upto some extend, but those are not the practicle reasons. Here we are not only remove screen flickering but also going to reduce backgroud vibrations called as screen shaking. Before starting to fix screen flickering error, make sure you are using the latest driver for graphics card for your LCD monitor.

Luckily, there are few steps you need to follow to stop the screen flickering and to avoid these problems.

Step 1. Click on Start

Step 2. Go to Control Panel >> Appearance and Personalization

Step 3. Open Display and click "Change display settings"

Step 4. You will get "Screen Resolution" Window which showing 'Change the appearance of your display'

Step 5. Click on "Advanced settings" and small window pop out.

Step 6. Go to "Monitor" tab

Step 7. Now change "Screen refresh rate" to higher value. Set it as per your monitor settings to remove screen flicker.

Step 8. Close all opened windows and check screen behavior, this should fix laptop screen keeps flickering error ever.

Hope this solution has applied to fix your screen flickering error. If you know any better way to solve screen flickering, then you may share it via the comment section shown below. I would glad to add it directly to this page.

How to Build Responsive Blogger Template CSS : Advanced Tutorial

In previous tutorial we have seen some new ways in responsive web development & what does the mean of Responsive template for blogger and how to start with of. In short; One Design for Multiple Screen: the responsive theme means the design which automatically adjust itself with the width of screen-view or device resolution like for mobile, tablet, etc. It is rarely used in case of bloggers since blogger already comes with default templates for mobile visitors. But it's not that much smooth, flexible, fast & responsive blogger templates. That's why we are here to show you step by step guide to design mobile friendly blogger templates. Make your blog Mobile Responsive and Improve your Mobile Traffic. Learn how to develop & design responsive blogger templates with CSS to convert theme into mobile-friendly HTML for BlogSpot blogs or blogger themes. So stop searching for FREE RESPONSIVE BLOGGER TEMPLATES and start making your own template more responsive that may help you improve your mobile search traffic and get higher CTR with a mobile-friendly user interface.

How to Build Responsive Blogger Template CSS Advanced Tutorial - ProBlogBooster
Last time we saw; responsive web design in HTML5 - Making Blogger Responsive Mobile-friendly Template Design | Responsive Web Development. And today we are going to see, building responsive website by the help of CSS. We know, designing web sites is a hard job, and here I am trying to make mobile web site design with simplistic CSS for your site. Also check: 5 Ways How Wearable Technology Will Improve Our Daily Life

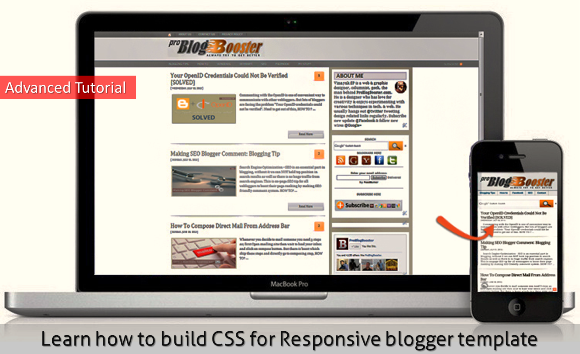
Learn how to build CSS for Responsive blogger template

We have seen how to start to build the CSS in first part; if you are new reader then you really need to read it first to go further. Today we are going to build FULL CSS for our blogger template.

Here we are going to use following CSS and conditional HTML tags
  • @media screen tag used for applying user defined CSS for recognized screen resolution
  • .mobile tag used for deriving CSS for all mobile users
  • <b:if cond="data:blog.isMobile"><b:else/></b:if> tag this tag is specially used for avoiding some HTML <div> for some <body> part for displaying in mobile view.
I'm going to directly give the full CSS for your blogger template. Yeah, offcourse it may vaired with your template, but it may help you to build the same for you. I have made this after trial and error method, varied attempts until I get success. But after lots of work I reached to my goal. You may see how it looks this template in your mobile or if you want to see on desktop you can see it by adding /?m=1 tag after the link.

Full CSS for Responsive blogger template

/*-------------------------------------------------------------------*/
/* Full CSS for Responsive blogger template */
/*-------------------------------------------------------------------*/

/*---------CSS for small screen start---------*/
@media screen and (max-width:300px) {
#sidebar-wrapper {
display: none
}
#container {
width: 100%;
background:none;
padding-top: 0px;
}
#content-wrapper {
width: auto;
padding: 0 5px 0 5px;
}
#mainout-wrapper {
width: 100%;
margin-top: 2px;
}
#main-wrapper {
width: 100%;
padding:0px;
}
#navigation {
display:none;
}
.jump-link, .comment-link, .breadcrumbs {
display:none;
}
}
/*---------CSS for small screen end-------------*/

/*-----------CSS for all Smartphones------------*/
.mobile #header {
text-align: left;
color:#fafafa;
margin: auto;
padding: 10px;
float: left;
width: auto;
height: auto;
margin-top: 10px;
}
.mobile #container {
width: 100%;
background:none;
padding-top: 0px;
}
.mobile #content-wrapper {
width: auto;
padding: 0 5px 0 5px;
font:13x Droid Serif;
}
.mobile #mainout-wrapper {
width: 100%;
margin-top: 2px;
}
.mobile #main-wrapper {
width: 100%;
padding:0px;
}
.mobile #navigation {
display:none;
}
.mobile #outer-wrapper {
width: 100%;
margin:0 auto;
text-align:$startSide;
font:15px Droid Serif;
}
.mobile h2.post-title, .mobile .comments h4 {
font: normal 1.6em/120% Georgia, Times, serif;
margin: .75em 0 0;
}
.mobile .post {
padding-bottom: 10px;
}
.mobile .post-body {
width: 100%;
font-size: 110%;
line-height: 1.4;
position: relative;
font: 95%/120% Georgia, "Times New Roman", Times, serif;
color: #666;
padding-bottom: 25px;
}
.mobile .post-header {
margin: 0 0 1.5em;
line-height: 1.6;
font-size: 90%;
}
.mobile .post-body .tr-caption-container, .mobile .Profile img, .mobile .Image img,
.mobile .BlogList .item-thumbnail img {
padding: 5px;
background: #ffffff;
color: #666666;
}
.mobile .post-body img {
width: auto;
height: auto;
}
.mobile .post-body .tr-caption-container img {
padding: 0;
background: transparent;
border: none;
-moz-box-shadow: 0 0 0 rgba(0, 0, 0, .1);
-webkit-box-shadow: 0 0 0 rgba(0, 0, 0, .1);
box-shadow: 0 0 0 rgba(0, 0, 0, .1);
width: 100%;
height:100%;
}
.mobile .post-footer {
line-height: 1.6;
font-size: 90%;
}
.mobile .jump-link {
display:none;
}
.mobile .comment-link {
display:none;
}
.mobile .breadcrumbs {
display:none;
}
.mobile #sidebar-wrapper {
float: $endSide;
padding: 0 10px 0 10px;
margin: 10px 0 0 10px;
width: 100%;
}
.mobile .sidebar {
margin-left:5px;
padding: 0 10px 0 10px;
}
.mobile #comment-zone, .mobile .comments, .mobile #gcontainer, .mobile .Cba, .mobile comment-form {
width: 100%;
max-width: 99%;
margin-right: 20px;
}
.mobile .footer {
width: 100%;
}
.mobile #footer-wrapper, .mobile #footer, .mobile .footer, .mobile .footer .widget {
width: auto;
padding-right: 10px
}
.mobile #credit {
padding-left:10px;
}
/*-------------------------------------------------------------------*/
/* Full CSS for Responsive blogger template */
/*-------------------------------------------------------------------*/

If you can NOT able to read it clearly then
you can download CSS file : DOWNLOAD CSS


We always think that blog theme is not such professionals theme but today you had realized that blogger theme is also more attractive like WordPress we just need HTML, CSS, jQuery, JS, Ajax like few designing languages including PHP, which are enough for designing an attractive theme and those languages are compatible with Blogger. We have made small changes in making it more adaptive for most of the blogger templates. Use this CSS for your template and if you want re-arrange all tags according to your design code.
Also for making your design more flexible don't forget to use conditional HTML tag. Go through this way and share your CSS for all of us so all user may get an idea for this Responsive Blogger Template. If you have any suggestion regards to make blogger site responsive and mobile friendly, then please let us know via comments. And to get more updates about blogger and also mobile-friendly and responsive design keeps visiting.

Social Tags: #Blogger #Template #CSS #Howto #BloggingTis #Blogging

How to Make Money from �Gengo� as a Translator and Work from Home?

How to Make Money from �Gengo� as a Translator and Work from Home?

When you start work online then you may not find any good guideline specific guideline to do a suitable job. There are many paths where we can go through for making money online. One of the good sources of online income is online translation job. This is really a big industry but most of us don�t know how to make a full income working from home from translation industry.

If you have good knowledge about multiple languages or you have love about foreign language then you can become a translator and work from home for earning money.  This job is not required any higher degree on language. There are many multinational also working as an online translator even they didn�t think about this job before. You can make some cash by doing translation job from �Gengo� beside of your current job.

What is Gengo?

�Gengo� is a Tokyo based translation business organization founded in 2008 but now they have office around the world. The word Gengo derives from Japanese word. Gengo provides online translation service where people get translate service from various translator from around the world. In their network over 10,000 translators currently working and all of them are working from Home.

How to become eligible for Gengo as a Translator?

In Gengo you have to do usually small jobs which mean you don�t have to translate a lot of words at once. But their work deadline is very short. So you have to work quickly. If you want to work from home for Gengo then you have to register with their website first. But you have to pass through their language skill test to become eligible for Gengo as a translator.

Step #1: You can simply go through below URL and go through their signup process.
  • https://gengo.com/auth/form/signup/
Step #2: After completing the signing up process you will need to complete the �Gengo Test�, this is for testing your translation capability and your test will review by a Senior Translator.

gengo test for become a translator

After passing on �Gengo Test� you will able to begin translation jobs right away.

Brief Concept of �Gengo Test�.

You might become nervous about the test but this is not so tough for you if you have good knowledge about foreign language. I am sharing a brief about �Gengo Style Guide�.
  • You have to give test on Gengo through online and it uses concept of Major and Minor errors. So it will count your each minor and major error while they check your answers.
  • You can apply for Standard Translator but this is bit tough for you until you have good command in foreign language. Under Standard Translator test you make only 3 minor mistakes. But if you have any technical difficulties during test then you should raise a support ticker to redo the test.
  • Test result will be process within 7 days after submission. However you can give test 3 times to pass the test.
So this is brief concept about Gengo test. Wish you best of luck for the test. After passing the test you can star work right away.

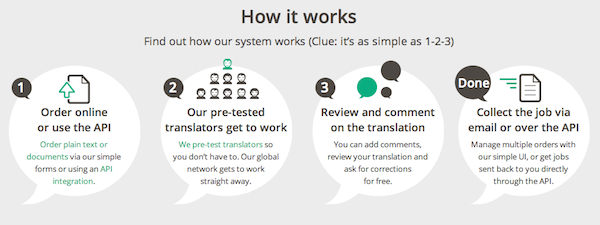
how gengo works?

How to Get Paid from Gengo?

Gengo will make payment for translator job twice in a month. And you can receive payment from PayPal.

For better earnings you should become a Standard translator to Pro translator and for this test you have to go through a pro test in Gengo. Their minimum payment for translator job is $0.03 per word, so more words means more income, but if you can become a Pro translator then you can earn more.

Final Verdict

Gengo has great reputation in online translation industry. There are more than 10,000 translators working worldwide and numbers of contributors are increasing day by day. If you are looking for a good job from your home which can be done in your leisure time then translation job in Gengo Is ideal for you. 


How to Make Money from �Gengo� as a Translator and Work from Home?
Much translator state that, �Gengo�s payment is very poor but for earning more money you should become a pro translator, otherwise you won�t able to earn much. However senior translators are benefited from Gengo from a monthly allowance.

Kategori

Kategori