How To Add "on-hover" Share Buttons To Blogger Images

image share buttons for blogger

Socializing a blog is the most efficient way to get a reach of people instantly so making a blog social media friendly is very important which lets people engaged with your blog to share your articles with others. Making a site social media friendly needs addition of social media buttons so its really important to install social media buttons in sites especially sites which have content that is readable.
Although social media buttons are installed in every site/blog below articles or above articles but advanced sharing tools aren't common. Advanced sharing tools means sharing buttons in each and every thing such as images.

Images not only put interest in boring articles but also play a major role in bringing traffic from search engines and social networks. So installing social media share buttons in images to make them shareable is very effective to get more traffic from search engines and social networks as most of people follow images to reach its source.

So i brought you "on-hover share buttons" which appear when mouse is hovered on an image. It is very similar to Pinterest on hover "pin it" button. But that is just a single button so i brought you more buttons which show on hovering an image. It will make your images shareable as well as make your blog design impressive and will increase your traffic too as people will reach your articles by following images, these buttons will not share only images but also source link of images so you will get more reach to your articles.

These sharing buttons are powered by addthis. So credits goes to addthis.

How To Add On-Hover Share Buttons To Images In Blogger?

Follow below steps to add share buttons to your blog images:

Step 1: Go to Addthis and login to your account, if you don't have account register an account.

Step 2: Click on Tools and navigate to Share buttons.


Step 3: Activate Image sharing buttons.


Step 4: Make changes according to your needs, you can make following changes(customizations):

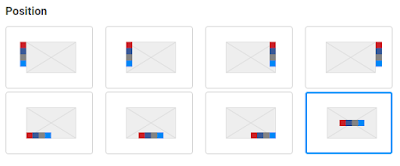
  • Position: You can choose position of your share buttons on your images.

how to change position of share buttons in images addthis
  • Shape: You can change shape of your buttons, 3 shapes are available.

how to change shape of share buttons in images addthis
  • Services and number of buttons: You can choose which buttons should appear on hovering an image and also how many buttons should appear. Max allowed buttons are 4.

how to add share buttons in images addthis
Step 5: After customizing your buttons, click on activate button and you are done!

Follow Below Steps Only If You Haven't Inserted Addthis Code In Your Blog !

  For New Addthis Users Only!  

Step 6: Click on  GET THE CODE  in the menu on the top.

how to add image share buttons in blogger

Step 7: Copy the Addthis code as shown in below image.

how to add image share buttons in blogger posts

Step 8: Go to blogger dashboard, navigate to template and click on Edit Html.

Step 9: Search for <head> and just below it paste the copied code.

Step 10: Click on save template.

Wait for 3-5 min and hover an image. You will be able to see share buttons, you can change position of your buttons and their shape by logging in to your Addthis account and by clicking on setup image share buttons as shown in step 4 earlier.

I hope you like this post. Check out more Addthis tools and read tutorials about them by searching 101Helper.

Thanks for reading this post, if you have any difficulty please let me know!

Search Tags: how to add share buttons to images in blogger,wordpress,website,blogs, on-hover share buttons in images in blogger,share buttons on hover in images,social media buttons blogger,how to use addthis in blogger.

Adsense Alternatives AdsOptimal Signup and Get $15 Signup Money

AdsOptimal best AdSense alternative

Are you become tired after applying for Google AdSense so many times? Now a day�s Google AdSense approval is really tough for usual website. AdSense gives approval to only quality websites. Even they have shrinking their revenue sharing percentage. Now a day this is really tough to make money from AdSense for living. So from my point of view we should consider the best Google AdSense alternatives advertising company for monetizing our website and Blog. Previously I have shared with you many alternatives advertising company. Today I am going to share about another legit and popular advertising company which is called AdsOptimal.

I know you have tried many other advertisers and become frustrated, also done so many different things to get Google AdSense account but failed for whatever reasons, it�s time for you to explore different ad solutions.

Sign Up and Get $15 Now

However, at the present, they no longer work well for various reasons (security bug, payment issue, or don�t work well with international websites). But don�t be worried, because I�ve found a solution. And it works even better. And that�s AdsOptimal.

What is AdsOptimal?

AdsOptimal is an ad network, built in 2012. It�s headquarter is in San Francisco, California, USA. They are a partner of many well-known ad networks, including Google AdSense, DoubleClick (by Google), Criteo� So, you can be assured of quality of their advertisements.

adsoptimal partners

Why AdsOptimal?

The reasons I recommend using AdsOptimal as Google AdSense alternatives are:
  • Their ad sources are trustworthy. You will often see campaigns from well-known providers. You will not find malicious ads here.
  • Easier registration process. You will hear from them in 1 to 2 business days.
  • Accept both US and international websites.
  • Once your account is approved, you will receive $5 bonus credit. If you are given a premium account, you will receive an additional $5. Namely, you will be rewarded $10-$15 in total after placing ad code.
  • Minimum payment is $50. (Google AdSense is $100). Accept payment via Paypal (Google doesn�t support Paypal.)
  • Commission is calculated based on ad impressions. That is if your site has a higher number of page views, the more money you will make.
  • Support multiple ad sizes, optimize for both mobile devices and desktop. Plugins are also available.
  • A competitive referral program.10% commission for a whole year if your friends successfully become AdsOptimal�s publishers.

How to register and make money with AdsOptimal?

For the newbie I am showing how to register with AdsOptimal step by step. This is little bit different. However this is not like other ads networks that after instant register you would able to use it. You need to get approval from AdsOptimal team.

Step 1 First, you need to create an AdsOptimal account. Click on the Sign Up Now. A registration form will appear, and then fill out the form.

signup with adsoptimal
After typing email, password, full name, accept agreement terms, then click Submit.

Step 2 You will land on a welcome page, as shown below. Click on Go to Get Code to continue.

 success signup

Step 3 On your dashboard, enter your blog/website under Add sites to your account, hit Search and wait. AdsOptimal will crawl for your site�s Alexa Rank and Google Page Rank. Once it�s done, an Add button will appear.

add sites on adsoptimal

Step 4 Your will hear from AdsOptimal in 1-3 business days. If your site meets their requirement, you will receive a notification email similar to this:

 adsoptimal email

Please click on the link "invitation link here" and fill in the necessary information to complete the registration. The invitation form is translated into local language so you should be able to fill it easily.

Step 5 Continue to wait until you receive a confirmation email and the access to the ad code.

adsoptimal approval

Step 6 Get your ad code on dashboard. Click on the Get Code.
 get ads code

Step 7 The Get Code page looks like this:

maximize revenue

You select one from the available ad units, copy ad code and paste it in your page�s HTML source code.

Step 8 You will receive an email notification confirming the ad implementation and credited a $5 bonus to your account. But if you are running a premium website with good Alexa Rank then there is a chance to receive $15 from AdsOptimal.

instant $5

Step 9 The bonus amount will be under Pending status, and you can also see it in the Insights sectionor Payout.

total earn $15
  • Here is payment evidence from AdsOptimal through Paypal-

paypal payment

AdsOptimal has similar violation policy as that of Google AdSense. Also, AdsOptimal does not accept adult, illegal, and vulgar content websites.

That�s all about AdsOptimal advertisement network. I hope you would able to make good money by using this amazing advertisement platform. For selecting an advertising network you must consider that is it legit or not? And obviously AdsOptimal is a legit advertising network and people are already earning money from this. However this is a best solution for those who are not getting approval from Google Adsense. But remember don�t violate their terms and conditions. Thank you. Happy Blogging. 

AllTechBuzz Style Eleven40 SEO Optimized Blogger Template Free Download

Eleven40 template is really so awesome and cool & SEO Friendly. I think every New or Pro Blogger must have this template which was made by the Popular Blog named All Tech Buzz author Imran Uddin. So I'm sharing you this template for free to Download, Because Eleven40 has also a very good template like other blog's template.If you are going to use this free Eleven40  Cloned Template, Please put a All Tech Buzz  author Imran Uddin credit link on the footer.


Live Demo                                                       Download Now


You May Also Like:    Free Download BloggerYard v 1.0 Blogger Template

You May Also Like:    Free Download MyBloggerLab Blogger Template

You May Also Like:    Free Download MyBloggerTricks Blogger Template

Eleven40 free Template Features:.

  • Most advanced SEO Optimized.
  • Responsive Template.
  • Easy To Use Navigation Menu.
  • Conditionally Loading Social Share Plugins.
  • Three Column Footer.
  • Many More Features

Eleven40 Template Customization:


Code For Navigation Menu Beside Header:


Use the below codes to customize the template.

<div class='header' id='header'>
<ul class='menu' id='menu'>
<li class='menu' id='menu'><a href='#'>home</a></li>
<li class='menu' id='menu'><a href='#'>about</a></li>
<li class='menu' id='menu'><a href='#'>contact</a></li>
<li class='menu' id='menu'><a href='#'>learn blogging/making money online</a></li>
</ul>
</div>


Replace the url�s in the above code with your own blog url�s and paste in in the widget next set that widget to the header in your blog layout.


Adding Navigation Links in Footer:

<ul>
<li><a href="#" target="_blank">About Us</a></li>
<li><a href="#" target="_blank">Contact Us</a></li>
<li><a href="#" target="_blank">Advertise on this Blog</a></li>
<li><a href="#" target="_blank">Privacy Policy</a></li>
<li><a href="#" target="_blank">Disclaimer</a></li>
<li><a href="#" target="_blank">All India Youth</a></li>
</ul>

Replace the url�s in the above code with your own blog url�s and paste in in the widget named �quick navigation� which is in footer in your blog layout.


Adding Featured Links in Footer


<ul>
<li><a href="#" target="_blank">Learn Blogging/SEO</a></li>
<li><a href="#" target="_blank">Learn How to Make Money Online</a></li>
<li><a href="#" target="_blank">Increase/Boost Alexa Rank</a></li>
<li>Free WordPress Installation Service</li>
</ul>


Adding Search Box:


<form method="get" class="searchform search-form" action="/search" role="search">
<input type="text" value="Search this website�" name="q" class="s search-input" onfocus="if (&#39;Search this website�&#39; === this.value) {this.value = &#39;&#39;;}" onblur="if (&#39;&#39; === this.value) {this.value = &#39;Search this website�&#39;;}" />
<input type="submit" class="searchsubmit search-submit" value="Search" />
</form>

CONS:

  • This Eleven40  template is really hard to customized if you are talking about bloggers that does not have great knowledge about HTML and CSS. What we are talking about is the footer layout, Because it's really hard to customized and you should understand the simple coding inside it first.

Final Words:


  1. Please put a All Tech Buzz credit link on the footer.
  2. We are not responsible if something happens bad on your blog if you change the credit link.
  3. Because we have told you that put some credit links in the footer. Thanks for the Download and please make some comments below if you have any problems or suggestions.

Tags : 
Eleven40 Template, Free Download Eleven40 Template, Eleven40 Clone Template, Eleven40 SEO Friendly Template, Eleven40 Premium Template. Free Download Eleven40 Template, SEO Friendly Eleven40 Template, Eleven40 Clone Template.AllTechBuzz Template, Free Download AllTechBuzz Template, AllTechBuzz Clone Template, AllTechBuzz SEO Friendly Template, AllTechBuzz Premium Template. Free Download AllTechBuzz Template, SEO Friendly AllTechBuzz Template, AllTechBuzz Clone Template.

How To Index Blogger Posts Faster

How To Index Blogger Posts Faster

Every new blogger want to increase blog traffic fast, for this you need to index your blog fast.Indexing a new blog can take two weeks or more normally but we can fasten this process by simple tricks.Actually this process include two steps.In first step google bot collect information of your posts and add it in search index box.Once your posts will index google bot start crawling your blog.

Google bot is very busy because billions of people update their blog daily and even hourly and it can not index all of them simultaneously but today i will show you how to speed up this process.

How Google And Other search engines finds your blog?

You have to submit your blog or site's sitemap to webmaster tools to tell search engines that you have a site or blog and you want it to index your blog and its content. So after submitting sitemap to search engines, they crawl your blog or site and index its pages which are allowed to be indexed


Submit sitemap:


Sitemap is very important thing, it provide more information to Google and other search engine site crawlers that are bots to crawl and index your blog. It is a kind of notification to search engines about already publish post on your blog. When a sitemap is submitted to search engine it starts showing only submitted posts.


Posts You Might Need To Read:
  1. How To Submit Blogger Sitemap To Google
  2. How To Submit Blogger Sitemap To Yandex
  3. How To Submit Blogger Sitemap To Bing
Ping your blog:

Actually many newbies do not know about blogger seo and how search engine works and hence fails to get traffic. Pinging your blog tell search engine that your blog is updated and it helps to index your blog fast. You can ping your blog daily there is no limit but it is recommended to ping when you update your blog with fresh content.


You can ping your blog at https://pingomatic.com/

Fetch as google:


Use "Fetch As Google" in Google webmaster tools and Bing webmaster tools
 to submit your new posts and exclude those which you don't want to be indexed. You can find this tool in Google webmasters tools and Bing webmaster tools, I am not sure about Yandex. It will help to index your posts quickly.

Share your content:


Also share your new posts on social media. It also helps you to get targeted traffic, pining posts tp pinterest or making a video related to post and give related link in the description will bring you targeted traffic as well as boost indexing process. A blog which have all posts shared more on social media is considered as an active blog and crawling of new posts is faster than other blogs.


Submit blog to directories:


Submitting your blog to directories is very beneficial in indexing a new blog. There are paid as well as free directories available online. Dmoz is one of the very popular, human edited directory and its free, you can submit your blog to it and find other directories on Google!


Try out these tips, once your blog is indexed you will see the difference in your traffic. Do not rush and keep patience.


Search tags: how to index blog posts fast,how to submit blog to google, bing, yandex, how to boost traffic website,how to submit posts to search engines fast,101 helper blogger tutorials,seo tips 101helper

How to Compose Direct Mail from Address Bar - Gmail

May I ask you something, How many daily emails do you write? Want to know how to compose mail really fast? Whenever you decide to mail someone you need 3 steps; first Open mailing site then waits to load your inbox and click on compose button. But there is a much better way which skips these steps and directly goes to composing step. If you looking for, how to hack google chrome to compose an email directly from the address bar or how you can compose new emails straight from chrome's address bar then you arrived at the right page. The Google chrome browser is one of the best and a favorite browser with lots of innovation in chrome addon. Especially for the Chrome users & with the Gmail accounts, opening and sending emails becomes easy process. Here, you just need to type your shortcut into the address bar shown below and for sending, you need to click on send, that's all. Learn how to quickly compose a new email message directly from address bar.
How to Compose Direct Mail from Address Bar mailto:

In previous article we have seen how to Remove Large Size Emails from Gmail for More Space and today we are going one step ahead. This article is important to follow for those who want to compose mail as quick as possible.

Also check: 5 Ways How Wearable Technology Will Improve Our Daily Life

How to Compose Direct Mail from Address Bar

  1. Go to address bar in your browser
  2. Type "mailto:"
  3. Hit enter

Or drag this button    Direct Mail    to your bookmark bar, hit it whenever you need to compose a massage to send.

Troubleshoot

By default this trick opens your default mail sending program. So you need to set your default mail sending program to Gmail; How to?
  1. Go to: start >> All programs >> Default Programs >>
  2. Set program access and computer defaults >>
  3. Choose Custom & then set it as per your requirement.

If there is no option for Chrome, then How to?
  1. Download Gmail Notifier >> Right click on its icon in system tray >> Option >>
  2. Choose Use Gmail for Internet mailto: links >> Hit OK.

Allow site handler request to open mailto: links directly into your mail, How to?
  1. Chrome setting >> Show advanced setting >> Privacy >> Content Setting >>
  2. Handlers >> Manage Handlers >> Remove mailto if its not working for chrome.

Now set handler for chrome; How to?
  1. In chrome when you go to Gmail, a protocol handler icon Protocol Handler ProBlogBooster appeared in the address bar.
  2. It only appeared only if you removed related handlers from Chrome.
  3. Click on it >> Choose Use Gmail.

And then onwards your all Internet mailto: links will open in Gmail program by default.

Mailchimp is the Best Email Marketing Solution

mailchimp for blogger

Whatever you do Blogging, managing online business no matter you must build a mailing list. Because your email list helps to grow your Blog or online business website rapidly. Every day we visit many website and even after few hours or days we forget about that website. But if your website visitors join in your email list then they will get notification through email and tend to visit your site again.

You will understand how important list building from a simple example is. We visit many website and check it once or twice in a day. But we check our personal email 10 to 20 times in a day. So when subscribers receive an email then they prompt to visit your site again for any interesting topics. So email list building should give more priority for your Blog and online business.

Best Practices for Building a List is to do so slowly and organically, because when subscriber subscribe to your email list then they will engage with your website or business closely. And for this you must keep sending awesome and relevant content weekly basis.

And for sending email with relevant content you must use any newsletter service. Among various email marketing solution Mailchimp is the best for your Blog and Business.

Why to choose Mailchimp?

Mailchimp is most popular and widely using as email marketing solution. It has many distinctive features and incredibly sophisticated options, which convince you instantly.

Easy to use

Mailchimp is very easy to use even a new user will able to operate it proficiently. It contains many options which help you to deliver your digital assets to your subscriber. Mailchimp has multiple Signup form for list building and you can also customize according to your requirement. In email form users able to add logo, image groups, buttons, boxed text and much more.

Readymade template for Email

Mailchimp included many readymade email templates which can be use either directly or by customizing. Even you can create your own template by using their drag and drop features.

Autoresponsder

This is necessary for modern email marketing world. Autorespnder is Mailchimp�s powerful segment and scheduling tools. I think its bit complex for new users. Autoresponder works automation- An email or series of emails sent to a subscriber based on a trigger or event. For example- you can build a series of campaigns to send over a period of time. And after subscription Mailchimp will send the series of your campaign time to time- hours, days or weekly basis. However this is a paid service and to avail this service you must subscribe to their paid plan. But this is price competitive because you can either pay as you go, monthly and in a high volume plans.

Integration with Website

Mailchimp can be integrating with ease in almost all Blogging platforms. Mailchimp support wide ranges of third party sites, if your site don�t support they you can easily add your opt-in form page URL and your site visitors can easily opt-in with it. You may think only WordPress and other major CMS site can use it, but trust me you can use it with your Google Blogger site also. Even in my site I am using this.

Transferring mailing lists

Mailchimp support to transfer email list from your old newsletter service provider. If you are Google Feedburner user then you can also transfer all active subscribers to Mailchimp with few clicks. First you have to Export the CSV file from Feedburner. Please visit the below URL and learn how to transfer subscriber from Feedburner.


After exporting the current subscriber please follow the below steps to import your mailing list to Mailchimp.

Step 1 Log in to your Mailchimp account and click on Lists from top menu.

list building

Step 2 Now click Create List button from top right corner of the screen. An option will expend below and from there click Create List button again.

Step 3 At this time you have to fill up a List detailsform. Here you can give a name on your list, and Default �from� email which email your subscriber receive. In addition little bit about your Company. Finally click on Save button from the bottom of the page. A success message will display Excellent! You have a brand new list.

manage subscription

Step 4 Now you will instantly head to your new list page. From there click Manage subscribers link and from below click Import subscribers link.

CSV or tab-deliminated text file

Step 5 Now you will see 3 options from there select CSV or tab-delimited text file and click Nextbutton form bottom right corner of the screen.

import CSV file

Step 6 And in Import from CSF file page click Browse button and select CSV file which you have export from Google Feedburner account. And put tick to Mailchimp�s terms and services. Click Next button from bottom right corner of the screen to proceed to the next level.

Step 7 Now import subscribers page will appear. From there under Column name select Email Address by using Dropdown option and click Save button. After that click Skip all text link and click Next button to finish.

import email from feedburner

Step 8 You are all set to import your subscriber from Google feedburner. Finally click Import button from bottom right corner of the screen. Instantly you will see a success message that Your import is complete! To see the imported subscriber list please refresh the page.

Please do not import any inactive subscriber from feedburner. You can import subscriber who hasn�t activate the subscription in feedburner but when you try to send them email form Mailchimp then they will block your account.

That�s all about transferring subscriber form Google feedburner to Mailchimp. I hope this tutorial will help you to understand the total transferring procedure.

Support from Mailchimp

Mailchimp have different subscription plan. But for free subscriber they don�t have much support. But Mailchimp offer direct chat and email support to paid users. Free plan users will receive latest subscriber information. And weekly tutorial email for operating the Mailchimp.

Acceptable use policy

Mailchimp has some accepatable use policy where they have implemented some restriction about delivering content. Any kinds of illegal goods and services you can�t deliver through Mailchimp. Even affiliate marketing also prohibited by Mailchimp.

Support A/B Testing Campaigns

If you are running multiple campaigns under your Mailchimp account then you can compare the performance of two different campaigns. This is called A/B testing, in Mailchimp you can choose to test subject line or content and compare results to find out what exactly works and what doesn�t.

Cost for using Mailchimp

Mailchamp has 3 subscription plans such as Starting Up, Growing Business and Pro Marketer. As a beginner you can use their Starting Up plan which is free forever. By Free plan you can collect 2,000 subscribers and 12,000 emails can deliver per month. If you required more then you must switch to Growing Business or Pro Marketer Plan.

How to Register with Mailchimp?

This is the initial process to use Mailchimp services. Without registration you won�t able to use their services. To register with Mailchimp please visit the below steps-

Step 1 Please visit http://mailchimp.com/ and click Sign Up Free button from top right corner of the screen.

signup with mailchimp


Step 2 Now Write your Email address Username and Password, after that click Create My Account button from below.

free mailchimp account

Step 3 Your signup confirmation you must proof that you are a human. So solve the reCAPTCHA and click Confirm Signup button.

Step 4 Instantly a verification email will go into your email inbox. Just open the email and click on verification link.

That�s it your Mailchimp account is now ready to use. From my point of view first use their free plan and after collecting 2000 email subscriber then you can think to switch to their Paid Plan.

And my suggestion to Blogger platform users, believe me you can use Mailchimp easily with your Blogger site and this is not very complex to operate. If you need any further help to use Mailchimp then feel free to write me. Thank you.

12 Ways LeadPages help to Grow A Blog And Online Business

leadpages

Recently you may hear about LeadPages which is a rocking online tools to help a Webmaster or online business in different ways. This is completely new concept and sounds like hybrid system of email marketing software. But we should know first what is it?

What is LeadPages?

LeadPages is a dynanamic software company which creates software and web apps to grow website and Online Business. We can say LeadPages is a combination of List building, Email marketing, landing page creating platform etc. In addition it helps a lot to grow your site�s subscriber robustly and you can start driving Leads with this simplest Lead Generating platform.
  • Visit: http://www.leadpages.net
Now we will see how exactly it works to grow a website or Blog or Online Business?

What can we do with LeadPages for Grow our Website and Online Business?

LeadPages is not just like as email marketing software or just list building tool. If you think it�s just another version of Mailchimp, Infusionsoft or ConvertKit then you are absolutely wrong. Rather LeadPages contains all the features of Mailchimp, Infusionsoft and ConvertKit. It can help to grow your email list by 200% more than before.

1. Building Unique landing page

There are many Professional website and Blog as well as Online business site prefer to add landing page. Because landing page help to give different impression on viewers mind. In this case LeadPages helps to create beautiful landing page for your site. Even you don�t need to know any basic coding. LeadPages made many landing page template for you.

leadpages template

2. To Build sales Pages for Online Business

For creating sales pages via LeadPages is really awesome. LeadPages contains many sales page templates which can be use for your online business. Suppose you have written an eBook and want to sale it through online. Then simply you can use LeadPages sales template and potential buyer tend to buy by making online payment. After receiving payment from buyer LeadPages will send the digital copy of your Book to your buyer automatically. As a result online Business can grow without any extra effort.

However for new business it is not always affordable to hire a designer to design sales page. So LeadPages helping a lot for professional sales page designing.

3. Building Opt-in forms with separate landing page

For building email subscription or opt-in we add a subscription form in our Website or place it at the end of the Blog post. This is not looking beautiful and professional. But by using LeadPages we can build separate Opt-in landing page. Don�t think you have to do manual coding rather you can using LeadPages readymade template for opt-in landing page. There are zillions of different templates available in LeadPages which can customize easily to use it for your opt-in page.

4. Create opt-in boxes within Blog Posts

Webmaster writes ebook, workbook, and worksheet for Blog readers. And they deliver this online recourse after subscribing on their email list. In this case through LeadPages we can add an opt-in box at the end of Blog post and when a subscriber signup for the online resources then they will automatically receive the resources after signup. So here is not any manual process.

5. Hosting Webinars

LeadPages has many webinar templates which can be use for your live webinar. The positive side of LeadPages webinar template is it allow attendees to communicate and ask questions. If you are arrange webinar then you will see how much pricy, but through LeadPages its mostly free. Just you have to register with a fixed subscription plan. And you will able to use many other features of LeadPages.

live training

6. LeadPages helps to collect email subscribers through text messaging

This feature is really unique and mostly helpful for conference speakers. Suppose you are speaking on a conference then you are trying to collect subscribers for your website. Then this is not possible for your audience to sign up by using laptop or Smartphone. In this case, you can show specific word or digit on conference and audience need to send a text message on that word or number with their email address, and automatically your audience will able to subscriber with your website.

7. Hosting videos on LeadPages

Generally we host videos on YouTube, Vemo and Dailymoyion. But those videos become public everybody can watch them. But LeadPages users are able to host their videos and make available for their Blog readers only. This if effecting for branding your videos such as Product review, online free courses, or any upcoming Business product.


video hosting on leadpage

8. LeadPages help to create viral �Thank You� pages.  

After subscription to our newsletter service it just display a small message that thanks for subscription, this is not looking professional. But by using LeadPages you can create a Thank You page with customization. And your Blog and Business subscriber will happy to see it. Even you can add your photo, Social media URL and your latest updates. This is really awesome.

9. Get More Sales with Your 404 Error Pages

Generally we use Error 404 page for our personal website and Business website. But you can�t imagine how many potential customers you are losing for error 404 message. Because after viewing error 404 page visitors may skip your site to another. But through LeadPages you can create an attractive page with your latest and related products. As a result your potential buyer may tuned into real buyer.

10. Earn money with LeadPages

This is bit interesting, because for using LeadPages you must subscribe to their subscription plan. But you can also earn money from LeadPages by becoming affiliate. But only pro customers are eligible for it. This feature is really simple. If any customer subscribe to LeadPages with your referral URL then you get paid for it.

11. Integrate landing page on your Facebook page

All LeadPages templates are compatible with Facebook. You can easily integrate your landing page with Facebook page by few clicks and you will able to build your email list from Facebook page.

12. View the conversion states for further Analyzing

After receiving subscriber into your Business or Blog you want to see conversion rate. LeadPages has analytic features which help you to see the performance of your landing pages and opt-in rates. It helps track historical data for your website.

So guys I hope the concept of LeadPages is now clear to your and this little introduction with LeadPages help you to grow your Blog and Business. LeadPages is really powerful tool that can bale to generate more leads for your Blog and online Business. 

How To Transfer Feedburner Subscriber By Exporting CSV File?

export CSV file

If you have planned to move away from Feedburner then you must transfer your existing subscriber to your new feed or newsletter service provider. This is not possible to call everyone or by announcing that you have switch your feedburner or newsletter service. But you must inform them that you have moved. The solution is collecting CSV file for feedburner subscriber lists. I think this you are not clear about CSV file.

What is CSV file?

The explanation of CSV is comma separated values and this is an extension which is widely used in Microsoft Excel. Whenever you save a file in PC then it save with .csv extension.

And this types of files with .csv extension uses in all major email services. If you want to transfer your contracts form one email to another then you have to download the records. And the records file download with .csv extension which can be open in Microsoft Excel application.

Similarly in Google feedburner when a subscriber subscribe in your email list then they create email list on a CSV file. And we need that CSV file to transfer our total subscriber list to new feed or newsletter services.


In this tutorial I will show you how to get CSV file for Feedburner subscription list from Google Feedburner site.

Step 1 Please visit http://feedburner.google.com/fb/a/myfeedsand sign in with your Blogger account.

Step 2 Now enter in your Blog feed incase of multiple feed select desired feed for export CSV file.

publicize feed

Step 3 From Feedburner page select Publicize tab and from left vertical menu click Email Subscriptions and choose Subscription Management.

Step 4 And scroll down on that page and locate View Subscriber Details link. And a hidden option will expend.

export feed subscriber

Step 5 Finally click on CSV link and instantly your Feedburner subscriber list will download in a Excel file with .csv extension.

That�s it you have successfully exported your Feedburner email subscriber list. And this file will help you to transfer all subscriber data from Google Feedburner to any other Feed and newsletter service provider site. In feedburner your have export option and in other site you have to use CSV file import option.

How to find specific subscriber email in Feedburner account?

If you wish to find and select specific subdcriber email rather exporting whole email list then you can use Search Addresses option.

Step 1 Under Feedburner Subscriber Management click Search Addresses

Step 2 And now write your desired subscriber email address and click Search button.

search subscriber

Step 3 If email address match with any subscribers then you will see the email details with status.

For transferring that subscriber email address just manually write the email address in your new newsletter subscriber service provider page. There are different newsletter service providers over the net and all are not same in importing subscriber from Feedburner. But I hope this tutorial will help you to export and transfer your existing Feedburner subscriber to another service provider.

Kategori

Kategori