How to remove the numbers in blogger post URL's

This article looks at the numbers that are in web-page addresses created by Blogger, what they mean and how you can influence them.


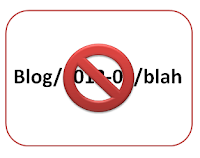
no symbol over digits section of blog-post website address
When you first publish a post, Blogger assigns a permanent web-address (aka an URL or a permalink) to the post.  I've previously explained how you can control the words used in this hyperlink.

A common question from people who are researching SEO for their blog is "how do I get rid of the numbers in the post-URL?".

Unfortunately the answer is not as straighforward as most people hope for.


Numbers near the start of Blogger URLS

As described in setting the content of your post's permalink, the URL given to posts published in Blogger shows the year and month of the original publication date for the post. I think this is because Blogger was originally set up as an on-line diary, with a lot of the features organised around the post-date.


numbers in the website address of a blog post, as show in Internet Explorer


Today, there are ways of giving your blog a home page, showing your posts in pages, and changing the order of the posts, which let your blog be a lot more than a date-ordered web-log.

Some blogging software (eg Wordpress) lets you choose the structure of the URLs which are used, eg leaving the date out totally, or puting it after the words.

However Blogger does not currently have any way to remove the date-part of the post URLs. And I could be wrong, but my best guess is that this will not change anytime soon.

So what options are available to remove the year and month numbers?

If you just don't want people to know the correct month and year of the post, then you can change the date before you publish the post for the the first time. Maybe make it something non-sensical (eg 1/1/1990). (However do remember that your RSS feed will show the actual date of publication, not the assigned date).

If you have some content where any month-and-year are particularly irrelevant, put it into a Page instead of a Post - because Page URLs don't contain a date.  But remember that you need to give users a way to get to these Pages, and that remember that they are not sent out in your RSS feed, so subscribers won't see the content.

The third - and least attractive - option: is to accept that this is how Blogger works and that you need to live with it or switch to another blogging tool.


Numbers near the end of Blogger URLS

Blogger puts digits at the end of post-URLs in order to make sure that each post ever published has a unique address.

Notice that I said "ever published": if you publish a post, then delete it, and then publish a second post with the same year, month and either title or customized-URL-words, then the second post's URL will have some digits put on the end, to stop it being the same as the first one.

Once a post is published, you cannot remove the digits and keep the same words and month/year.  The only way to avoid them is to make sure that your post-URLs are unique. So if you publish a post and notice that it has digits on the end of the URL, one option is to delete that post, and replace it with one which has a different publication date or customized-URL-words(don't forget to copy the post contents before you delete it!)   Or you could just set it back to draft status, and then publish it again with different and this time unique customized-URL-words.

For example, if you publish and find that you get
www.all-about-cats.com/2012-07/vegetarian-cat-food-recipes01.html
you may want to delete the post, and republish the content in a post with a different date like
www.all-about-cats.com/2012-06/vegetarian-cat-food-recipes.html


Does it really matter?

Crystal 128 karmPersonally I'm not convinced that having numbers in Blogger URL's is a problem.

If the content is so weak, and poorly linked to by other sites and social media that the presence of numbers in the URL is affecting visitor numbers, then it seems to me that there are more important things for you to be worrying about.

On the other hand, if your blog is already popular and well-optimized, and you're looking to get the last possible bit of SEO benefit - you'd be better off using your time to write even more good quanlity, unique, content so that your exisiting subscribers visit more often, instead of fussing over something that you cannot control.

Or am I mistaken?


Related Articles

Setting the custom-URL for a blog post

Giving your blog a home page

Putting Blogger posts into pages

How to set the date for a post

The difference between Posts and Pages

What is RSS and why it matters for bloggers

Removing a post from your blog

Copy the contents between blog posts - and keep all the formatting.
How To Earn Money With Revenue Hits In Blogger

how to earn money from revenue hits in blogger

Revenue hits is a newly introduced ad network and it is best alternative of Google Adsense after Infolinks. It is not better as Adsense but it is not less in any way. If you have only 100 views per day you can earn good with Revenue Hits. It has all types of banners and mobile ads too. CPM as well as CPC rates are also high. Apart from it you have opportunity to refer people using your link. Revenue hits says that you can earn upto $100 per referral. It have all types of referral banners too. After personally reviewing it I recommend it for publishers. This post is a review of revenue hits and a tutorial about how to use revenue hits to earn money via blogger blogs.

Features(Review):
  1. High CPM rates.
  2. All size banners are available.
  3. High CPC rates.
  4. Pop-up and bounce ads.
  5. Earn $10 to $100 for referrals.
  6. Slide out and shadow ads available.
  7. No minimum traffic required.
  8. Perfect traffic and click tracking analytics.
  9. Worldwide coverage.
  10. Fast account activation.
  11. Easy to setup ads.
Payment Methods And Minimum Payout Threshold:

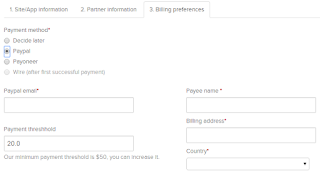
You can payout with Paypal, Payoneer and Wire. Minimum payout threshold is $20 for Payoneer and Paypal while $100 for wire transfer.

How To Sign Up?

Step 1: Go to Revenue Hits.

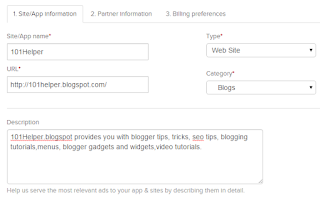
Step 2(Site/App Information):

Type your site name, url, description, select type as website and select category of your site.

how to sign up for revenue hits account

After filling up all the info click on Continue.

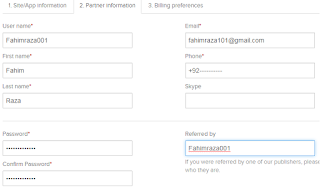
Step 3(Partner Information): 

On the second page type your username, first and last name, your email and password. You can also enter your skype name but it is not required.

You can also type a referral name, as I told you about revenue hits type fahimraza001. It won't affect your blog's revenue and I will get a bonus from revenue hits.

how to sign up for revenue hits account step 3

Step 4: Set your Payment type as decide later or if you want to set your paypal account or payoneer account select it and fill out details.

how to earn money online from home blogger blog

Step 5: Scroll down and click on "I agree to these terms and conditions".

how to earn money online

Step 6: Finally confirm your account by going to your Email > Inbox > Revenuehits Team. Click on the link in the email you just received and open it to activate your account.

earn money online fast

How to add revenue hits ads in blogger?

Step 1: Go to Revenue hits and login to your account.

Step 2: Click on "New Placement" on the right side of the page and choose the "Desktop Placement".

how to place ads in blogger blog blogspot

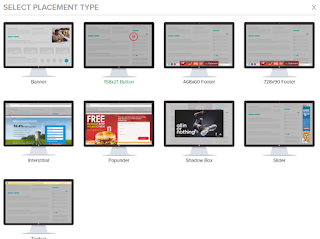
Step 3: Select your placement type from the given options e.g banner, shadow ad, slider, top bar, pop-under etc.

how to earn money blogspot

Step 4: Customize your ad and click on save.

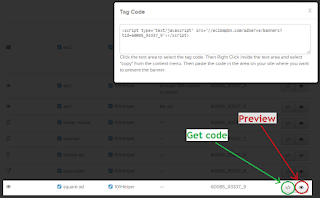
Step 5: Preview your ad by clicking on an eye's icon to see your ad. Just beside it click on </> to get your ad's code.

how to get ad codes to earn money

Step 6: Copy the code and go to blogger dashboard.

Step 7: Navigate to "Layout" and click on "add a gadget".

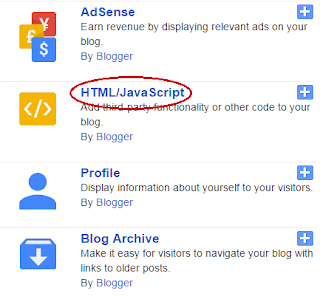
Step 8: Click on Html/Javascript and paste your ad code.

how to add gadgets and ads in blogger

Step 9: Click on save and you are done. Open your blog to see your ads.

You can also create ad campaigns for your mobile site. Just choose mobile placemen in the step 2 and follow other steps as they are.


How To Disable Revenuehits POP-UP & Bounce Ads?

As you know that pop-up ads affect your site performance and user experience so most of publishers prefer to disable pop-up ads. In revenue hits there are two types of extra ads which boosts your revenue but affect the user experience too. One of these ads are pop-up ads and everybody knows what is a pop-up ad but the second one is bounce ads which is a new thing. Bounce ads are the ads which show up you go back to a page. It also affects users experience to some extent but not as much as pop-up ads. So here I'll show you how to disable pop-up and bounce ads in revenue hits.

Note: Disabling pop-up and bounce ads may reduce your revenue but it improves user experience!

Step 1: Go to Revenue hits and log-in to your account.

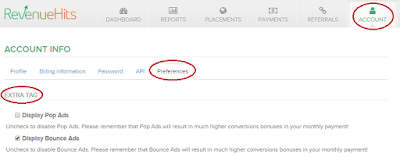
Step 2: Navigate to Account > Preference > Extra tag.

how to disable pop-ups and bounce ads in revenue hits

Step 3: Uncheck the ads which you want to disable

I hope this post helped you and you have setup your ads successfully. If you found this post helpful please let me know by leaving a comment below and also share it with others. If you have any suggestion you can tell me by contacting me. Thanks for visiting 101Helper.

Search Tags: How to add ads in blogger,how to place ads in blogspot,how to earn money online from home by blogging,create a free website to earn money,how to use revenuue hits,boost your blog's earnings

How To Create A Post In Blogger Using Android Or IOS Blogger App

how to create a post in blogger

Blogger is the best platform for blogging because of its great features. Its easy interface and alot of features makes it better than others. Currently blogger has millions of users because of its best service. One of the greatest features of blogger is its smart phone app which is introduced to let users write posts from their smartphones anywhere anytime. Unfortunately blogger smartphone app is available only for Android and IOS so if you are using Microsoft phones or other phones which don't support Andoid apps then you can't use this app.

Features:

? Create, save, delete and publish  your post from your smartphone.

? Add images, links and bold or italic your text. More tools aren't available yet.

? View your blog as well as draft posts.

In this post i will tell you how to use Blogger app in your smartphone to create a post. First we have to download the blogger app so follow below steps to download your app.

Step 1: Open App Store or Play Store in your phone.

how to download blogger app in samsung or iphone

Step 2: Search for blogger app and install it.


Step 3: Open your app and sign in using your blogger account or if you are already logged in then choose your account.

how to use blogger app

Step 4: Choose your blog in which you want to write post as shown in below image:

how to use blogger app 101helper

Step 5: On the top of the app click on a "PENCIL" icon.

how to write post in blogger

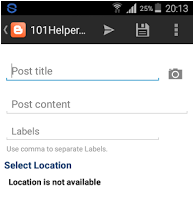
Step 6: Type your post's title, type labels to see predictions of your existing labels, select location from where you are writing post or deny location by clicking on a close icon beside it and finally click on the post content to start writing your post.

how to create a post in blogger using android app

That's it. You have successfully learnt "how to write posts in blogger using blogger smartphone app".

You may have following questions:

�How to make some text bold or italic?

Well its very easy to bold or make some test italic. Just click on the "B" icon or "I" on top of the editor to bold or make text italic.

how to make text bold or italic in blogger

�How to add images in posts?

You can see a camera icon beside your post title, tap it to put images inside your post. You can directly take images or upload them from gallery.

How to add images in blogger app

You may see an error while uploading an image and in that case try another trick to put images in your post. Whats the trick? Well its simple collect images which you want to add in your post and upload them before writing content. Didn't get me? Follow below steps:

Step 1: Go to your gallery and select the images which you want to add in your post.

how to add images in blogger posts

Step 2: Click on share and choose blogger.

how to use blogger app android or ios


That's it. Now write your post and manage the uploaded images.

�How to add links in posts?

Just like bolding text or making text italic you can add a link in your post. Just select the text which is to be link. Now click on link icon beside italic text icon on the top of the app. For instance see below image.

how to add links in blogger post or blogger app

�How to save or delete a post or edit a post?

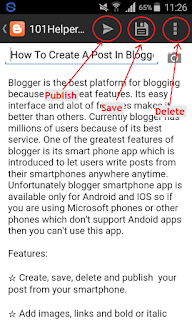
Saving a post is much easier than writing it. First write your post and click on Done.
Now click on save icon beside an arrow(publish button) on the top right side of the app.

how to save publish or delete a post in blogger

Similarly to delete a post click on three vertical dots beside the save button.

To edit a post select it and click on the Pencil icon to edit it.

I hope you like this post and you found it helpful. If it was helpful to you leave a feedback below and must share it with others. Follow and subscribe to get latest blogger tips, tricks and mobile blogging tutorials in your inbox.

Search tags: How To Create A Post In Blogger Using Android Or IOS Blogger App,blogger ios and androind app,how to add images in blogger app without errors,mobile blogging tutorials 101helper.blogspot

How To Store Blogger Codes On GitHub To Speed Up Blog

how to speed up your blog

Site loading speed is a very important part of On-Page Seo and it is also important because it improves user experience. Fast sites are liked by everyone and slow sites aren't because slow sites make people frustrated. There are several ways to speed up a site as mentioned in "How To Speed Up Your Blogger Blog" But one thing is on the top that is storing extra codes on external sources. It is recommended because when extra and long srcipts or CSS codes are stored on an external sources it reduces the page size and hence speeds up your site. I personally use this trick to speed up my blog and thats the reason why my site is fast even after having ads, gadgets, smart search box, follow model box etc. So I also recommend to store codes on external sources like GitHub.

So this tutorial is about speeding up blogger blog by storing codes on Github.

How To Store Blogger Codes On GitHub?

Step 1: Sign-up a free account at GitHub.

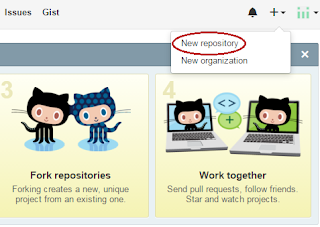
Step 2: Now login to your GitHub account and click on Plus(+) sign on the top right side of the page and choose New Repository.

how to use github

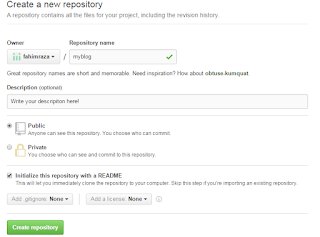
Step 3: Give a title to your repository, write its description and choose Public because if you choose private you have to pay $7.00 per month to upgrade your account. So make it Public and select "Initialize this repository with a README".


hw to create repository in github

Step 4: Click on Creat Repository.

Step 5: Now click on New File beside New pull request to create your first file. For instance see below image:

how to speed up blogger blog

Step 6: Give a title to your file. Remember to include .css or .js after your file name because it will decide your file format. If you do it wrong it won't work.

As an example I am using .css because I want to store a css code.

how to speed up website blogger site

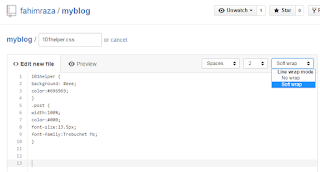
Step 7: Paste or write your code inside the editor and choose soft wrap mode as shown in below image:

how to store codes on github to make blog fast

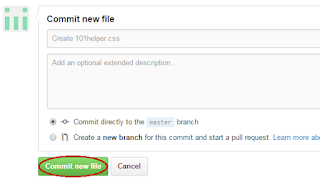
Step 8: Scroll down the page and leave the two options of naming or adding description to file and choose " Commit directly to the master branch".

Step 9: Click on Commit new file.

how to create file in github to speed up blogger

Step 10: Click on the file you just created.

Step 11: Click on Raw beside Blame on the right side of the page.

how to embed github codes in blogger

Step 12: Copy the link of the Raw page and remove the dot(.) between "raw.githubusercontent.com" and https//

For instance this is my link now I have to remove the dot between raw and githubusercontent and https://:

https://raw.githubusercontent.com/fahimraza/myblog/master/101helper.css

My link will now be rawgithubusercontent.com/fahimraza/myblog/master/101helper.css

Step 13: Now visit your link e.g: rawgithubusercontent.com/fahimraza/myblog/master/101helper.css

After visiting this link I will get a very different link which is all I need. Here is my link now I can use it in my blog:

https://rawgit.com/fahimraza/myblog/master/101helper.css

Step 14: Go to blogger dashboard and navigate to Template.

Step 15: Search for below piece of code by using Ctrl+F.

<head>

Step 16: Copy one of the below code with respect to your file format and paste it below <head>.

For CSS: <link rel="stylesheet" type="text/css" href="http://yourcode.css"/>

For Javascript: <script src="http://yourscriptlink.js"></script>

Step 17: Replace the link with the link of your Raw file which you stored on GitHub. I will use the CSS caller and replace http://yourcode.css with my GitHub link like this:

<link rel="stylesheet" type="text/css" href="https://rawgit.com/fahimraza/myblog/master/101helper.css"/>

Similar to it for Javascript I will use the Javascript caller.

Step 18: Click on save template and you are done!

You can store as many files as you want on your repository. You don't need to create a new repository for each file you can start storing new files by following step 5 to 18.

I hope you like this post. Read more tips to boost your blog speed here.

Follow and subscribe to get latest blogging tips and tricks in your Email inbox. Share this post with others and help my blog grow.

Share your views about this article by leaving a comment below. If you have any question about this post ask me or contact me.

Search Tags: Improve blog speed, How to Speed up blogger blog, store code on GitHub, How to use Github,page loading speed tips for blogger,on page seo,101helper tips and tricks,free storage for blogger,how to use GitHub as external source.

Using Labels to categorize your Blogger Posts

This article explains how to use Labels to categorise the Posts in your Blog, and how you can get around some of the limitations in Blogger's categorising tools.

Why categorise your Posts

watermelon salad recipe can be labelled / tagged as  fruit, salad, dessert and pink
Grouping your blog's contents makes it easier for people who have reached your blog via Search to find other posts that they may be interested in - provided you add tools to your blog that let them navigate using labels.

It's essential if you want to make it look like you have put your Posts into Pages.

And it helps you to find posts yourself.


Blogger's tools for working with categories

The only tool that Blogger provides for categorising or grouping Posts is Labels.

In short, Labels are tags that you apply to posts.

Each post can have as many Labels as you want (there is an upper limit of 5000 labels-per-blog, but most people don't get near it).

And you can use labels for different purposes.  For example, a post titled "Photographing Long-haired Black Cats" could have three different labels
  • Cats - the the animal it's about
  • Photography - for the functional category
  • Jane Smith - for the author
The Labels gadget lets readers choose which groups of posts to see:  when a visitor clicks an item on the labels gadget, they are shown a list of posts that have the selected label applied to them.

You can add the Labels gadget as many times as you like, selecting which specific label values to show each time.   In the example above, you might add it three times, once for ainmals (showing Cats, Dogs and Rabbits), once for function (showing feeding, grooming and photography), and once for author (showing Jane Smith and Joe Bloggs).

There are three steps that you need to follow to make effective use of Labels in Blogger.


How to add Labels to your blog

Step 1:    Label your Posts

For each post, add one or more labels.  You can add labels either:
  • In the post-editor, in the Labels section at the right side of the post-editor o
  • From the Posts tab, tick the posts you want to put the labels on, and then use the drop down arrow from the top icon that looks like a small luggage-tag:   choose the label or "New label ...").

Step 2:    Add the labels gadget

Add the Labels gadget to your blog - the same way you would add any other gadget .   You can add it as many times as you need, choosing which labels to show each time.
 
Warning:  If you choose to show only a certain selection of Labels in a gadget, then this is all that it will show even if you add new labels to your posts later on.  However if you don't restrict which labels are shown, then new ones are automatically shown in the gadget if they are associated with published posts.

Drag-and-drop the labels gadget to wherever you want it:  some people put it just underneath their header, to make readers think they've looking at a more traditional web-page.

Step 3:   Add Labels navigation

Another way for your readers access labels is from the display in the post header or footer of the list of labels assigned to each post.

This is turned on by default in most templates:  you can change the setting and move it around using post-templete settings found under  Layout > Blog Posts (edit).


What your visitors see


A List of Posts:

If a visitor to your blog clicks on an item in the labels gadget or in the labels-list that is show for apost, then the "labels-view screen" is used to show them the posts that have the selected label.

This screen is like the main screen: is only shows a certain number of posts and visitors need to use the newer-posts and older-posts links to move back through the list.

Like the main screen, if you have used jump-breaks in your posts, then the list only shows the first part of each post.  If you haven't used jump-breaks, then the whole posts are shown.


A summary message:

Unlike the main screen, in most templates there is a message at the top of the page saying:
"Showing newest posts with label WHAT-EVER-YOU-CHOSE. Show older posts"

Or if there are no published posts with the selected Label, the message is slightly different.  Some people change their template to customise or remove this message:  Chuck in The Real Blogger Status has written an excellent description of  how to do this.


What Labels aren't - but appear to be

Many people think that Labels are a way of actually putting Posts into pages.  However the Posts aren't actually moved around.  The labels-screen is just a way of viewing a smaller-than-usual group of Posts, and can make it look like you have put your posts into sub-pages.


Making multi-level categories

Currently, Blogger only supports one level of grouping.  The only way you can make sub-groups of Labels is to add two categories to each post - one for the "major" category, and one for the "minor" category

For example you might use labels like these
Major category:  Minor categories:
Recipes: Sweet, Savory, Wheat-free
Party-games: ice-breaker, run-around, silent, outdoor
Music: lively, soft & gentle, traditional, instrumental
Each post would need to have at least one label from the major category, and one from the minor categories.

If you do this, you need to be clever about adding two levels of gadget, with only a selected group of labels shown in each gadget.   You might even need to edit your template, to only show certain gadgets in certain situations.


Related Articles

Posts, Pages and Navigation

Setting what goes on the Home Page

Editing your blog's template:  advantages and disadvantages

Making it look like you have put your posts into pages.

Copying all the posts from one blog to another

This article is about how to copy all the posts from one blog to another, using Blogger.  There is a separate article about copying individual posts, or pages, from one blog to another.


New Holland tractor with NH 850TL front loader
To copy all the Posts from one blog to another, you need to export them from the first blog, and import the file that was created into the second file.

Any Pages (see The Difference between Posts and Pages) in the first blog, need to be moved individually, because pages aren't currently included in the export file.
If you want to totally replace the contents of the destination blog with the contents of the source blog, then you should delete the existing posts from the destination blog before you import the file.  (NB   Delete posts by going to the Posting / Edit Posts screen, and pressing the Delete button that is beside the post.   Don't delete the entire blog, or you will lose access to the URL).


Follow these steps to copy all posts from one blog to another


1  Log in to Blogger.

2  Go to the export tab from the  Settings / Other tab.

3  Click on Export Blog.

Export-blog window on the old Blogger interface:
the new interface looks a little different, but has the same links

3a  If you are using the new interface, click Download Blog on the confirmation message window:


4  Your computer will download a file.   For Windows users, it will probably be put in the My Documents / Downloads file.  Or you system may use another place, or it may ask you where to put it.   Whatever happens, you will need to know where this file is saved to.
5  Open the blog that you want to move the posts to
(You may need to log out and in again, or perhaps just switch to different browser or tab)

Delete (using Posting / Edit Posts) any Posts that are already there, but which you don't want in the refreshed blog.

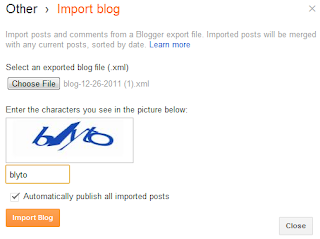
6  Go to Settings > Other and click Import Blog.  When the box opens, choose the exported file that you made earlier, and enter the security-text.
Import file selection screen in the new interface:
the old version of Blogger is very similar.

7  Choose whether or not to automatically publish all imported posts.  
Only tick the box if you DO want the posts automatically imported.   If you don't tick it, the posts will be loaded, but with have status of Draft, so won't be visible by readers until you publish them.

8  Click Import Blog.

Check that the import worked successfully, by looking at the blog, and also at the list of posts under Edit Posts:  are the right number of posts there, do they have the right labels etc.


Results

IMG redCowRoadworks4586All the posts from the source blog will be copied to the destination blog.

Many of the post characteristics will be the same as in the original blog.  This includes:
  • title
  • post contents
  • published-date and time
  • label(s)
  • post-author.


Any comments from the source blog will also be copied over - sometimes it takes a few hours for the links for them to be re-establshed properly.

The URL for each post will be based on the URL of the blog you have imported them into and the publication-date that the posts had in the source blog - for example:
www.YourNewBlogName.blogspot.com /2009/05/name-based-on-post-title.html

Any internal links in the blog will still point to the post in the old blog
For example this link points to a popular article in Blogger-HAT.  
If I export-and-imported this post into a new blog, the link would still point to the same place, ie the post in Blogger-HAT - not to the post in the new blog.

Any pictures, videos etc in the old blog will still be in the same place that they were in (Picasa-web-albums, YouTube, Google Videos etc).

If you have imported more than the number of posts that Blogger allows per day (currently 50 I think) then to make any more posts today you will need to complete the captcha-test (ie entering the letters in the funny-shaped word).   This will go away approximately 24 hours after you last enter more that the maximum-posts-per-day.


Importing to the same blog

If you try to import posts into the same blog that you exported them from, Blogger will not import any posts, and give you an error message.

If you do want to do this (eg to create a duplicate set of posts), then do the export, change some small detail of the original posts title or date/time, and then do the import.


Related Articles

The Difference between Posts and Pages

Moving individual posts, or pages, from one blog to another

Converting Posts into Pages

Moving some posts form one blog to another 

Deleting blogs and blog-posts

Kategori

Kategori