How To Add Fanciest Author Box Below Posts In Blogger

Fanciest-author-box-for-blogger

Author box is among the trending widgets now a days because people who have blogs or websites want to get more followers and stay in touch with their fans. My recent post was also about "Author boxes with different styles for blogger" and once again I am about to share a new author box which will be added below every post in your blog. It is called fancy author box. It is designed with javascript and css and doesn't effect your blog's load time.


fanciest-author-box-blogger-101helper

See a live demo at http://trickme1.blogspot.com/2015/06/all-changes-that-you-can-make-in-this.html


If you liked this gadget and want to add it in your blog below every post then follow below mentioned steps:


Step 1: Go to blogger dashboard and navigate to template.


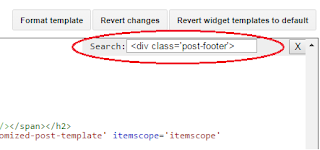
Step 2: Click inside the code and search for below code by using Ctrl+F on your keyboard:


<div class='post-footer'>

how-to-find-code-in-blogger-template

Step 3: You will find the above code two times if you are using simple template but if you are using a custom or other template then you will find it many times. Now copy the below code and paste it after the second code in simple template and in other template paste it after third code.

<b:if cond='data:blog.pageType == &quot;item&quot;'>

<link href='//maxcdn.bootstrapcdn.com/font-awesome/4.3.0/css/font-awesome.min.css' rel='stylesheet'/> <link href='https://googledrive.com/host/0B-3SIKm-BBF_R3JrV2RQbEFnYm8' rel='stylesheet'/>   <script src='//code.jquery.com/jquery-1.10.2.js'/>   <script src='//code.jquery.com/ui/1.11.4/jquery-ui.js'/> <br/> <div id='tabs'> <ul> <li><a href='#fragment-1'><i class='fa fa-user'/> Bio</a></li> <li><a href='#fragment-2'><i class='fa fa-facebook-square'/> Facebook</a></li> <li><a href='#fragment-3'><i class='fa fa-twitter-square'/> Twitter</a></li> <li><a href='#fragment-4'><i class='fa fa-instagram'/> Instagram</a></li> <li><a href='#fragment-5'><i class='fa fa-google-plus-square'/> Google+</a></li> </ul> <div id='fragment-1'> <img src='https://lh3.googleusercontent.com/-p4_CJcGp4AM/AAAAAAAAAAI/AAAAAAAAABM/vdNgm0VFg70/s120-c/photo.jpg' style='width: 90px;'/><h4>Fahim Raza</h4> <p>I am fahim Raza and this fancy author box is designed by me. Its free for blogger. Do not copy!! </p></div> <div id='fragment-2'> <img src='https://lh3.googleusercontent.com/-p4_CJcGp4AM/AAAAAAAAAAI/AAAAAAAAABM/vdNgm0VFg70/s120-c/photo.jpg' style='width: 90px;'/><h4>Fahim Raza</h4><p style='position: absolute;bottom: 50px;width: 80%;left: 19%;'>Follow me on Facebook!</p> <div class='fb-follow' data-colorscheme='light' data-href='https://www.facebook.com/zuck' data-layout='button_count' data-show-faces='false'/>   </div> <div id='fragment-3'> <img src='https://lh3.googleusercontent.com/-p4_CJcGp4AM/AAAAAAAAAAI/AAAAAAAAABM/vdNgm0VFg70/s120-c/photo.jpg' style='width: 90px;'/><h4>@Fahim Raza</h4> <div class='twitter'><a class='twitter-follow-button' href='https://twitter.com/TwitterDev'> Follow @TwitterDev</a></div><p style='position: absolute;    bottom: 45px;width: 80%;left: 19%;'>Follow me on twitter</p>   </div> <div id='fragment-4'> <img src='https://lh3.googleusercontent.com/-p4_CJcGp4AM/AAAAAAAAAAI/AAAAAAAAABM/vdNgm0VFg70/s120-c/photo.jpg' style='width: 90px;'/><h4>Fahim Raza</h4> <p style='position: absolute;    bottom: 40px;width: 80%;left: 19%;'>Follow me on Instagram!</p> <div class='instagram'><span class='ig-follow' data-count='true' data-handle='igfbdotcom' data-id='5479dee' data-size='medium' data-username='false'/></div></div> <div id='fragment-5'> <img src='https://lh3.googleusercontent.com/-p4_CJcGp4AM/AAAAAAAAAAI/AAAAAAAAABM/vdNgm0VFg70/s120-c/photo.jpg' style='width: 90px;'/><h3 style='position: absolute;top: 39px;left: 17%;font-size: 22px;color: #5B96DD;'>+Fahim Raza</h3> <p style='position: absolute;    bottom: 50px;width: 80%;left: 18%;'>Follow me on Google+</p> <script src='https://apis.google.com/js/platform.js'/> <div class='g-follow' data-annotation='bubble' data-height='20' data-href='//plus.google.com/u/0/115567523686578759435' data-rel='author'/>   </div> <script src='https://googledrive.com/host/0B-3SIKm-BBF_TE1qbnR4VGpwR3c'/> <script>(function(d,t){var g=d.createElement(t),s=d.getElementsByTagName(t)[0];g.src=&quot;//x.instagramfollowbutton.com/follow.js&quot;;s.parentNode.insertBefore(g,s);}(document,&quot;script&quot;));</script> <div id='fb-root'/> <script src='http://googledrive.com/host/0B-3SIKm-BBF_U0E1ZHM2OFZ3Vzg'/>   <script src='http://googledrive.com/host/0B-3SIKm-BBF_UnoyMXJVUnJLMWs'/></div>
</b:if>


how-to-add-fancy-author-box-in-blogger

Step 4: Make changes in the above code according to your choices. I have highlighted my name and links all you have to do is to replace them with your name and social profile links.


Step 5: Click on save template and you are done.


how-to-save-template-in-blogger

I hope you like this gadget and its working in your blog, if not please let me know by leaving a comment below. 

Try more blogger gadgets and widgets here.

Follow and subscribe below to get latest blogger gadgets news.

Share this post with other bloggers around you!


Search tags: How To Add Fanciest Author Box Below Posts In Blogger, Fancy author box for blogger, Fancy author box blogger, Author boxes for blogger with different styles, all in one author box blogger,101Helper gadgets for blogger.

How To Add Youtube And Dailymotion Videos In Blogger Posts

add-video-dailymotion-youtube-in-blogger

Video tutorials are the best way to help users how to do something. For instance a blog about doing something like blogging or a tutorial blog becomes best one when it has step by step text tutorials as well as video tutorials. Now a days tutorial blogs are trending so every blogger is trying his best to make his blog better than other by improving its user experience. User experience improves when users are satisfied and video tutorials are the best tutorials to help and satisfy users because users can see how to do something. So if you have a blog and you have already setup a Youtube or Dailymotion channel and you want to embedded your videos in your blogger blog posts in order to get more views or to improve your visitors experience then you have reached to right place. In this post I will show you how to embedded videos in blogger posts. In the end of this post you can watch video tutorial also. Hope you like it.

How To Add Youtube Videos In Blogger Posts:

Step 1: Create a video and upload it.

Step 2: Open your video and below it click on share, make sure to allow embedding while uploading your video.


how-to-share-yoututbe-video-in-blogger

Step 3: Click on Embed and copy the code shown, The default code is for 560X315 size but if you want to change the size of the video and make other customizations then click on Show more.


youtube-videos-blogger

Choose desired size for your video or click on custom size to set your own size


how-to-share-yoututbe-video-in-blogger-101helper

After size make other changes like show suggested videos, show player settings etc.  


Step 4: Copy the final code and go to blogger and edit post in which you want to add video.


Step 5: Switch to Html compose box and paste the code where you want the video to show up.


how-to-add-code-in-Html-composer-in-blogger

Step 6: Now click on publish and you are done.

If you want to add a video to your blog from a link(youtube) or computer then follow below steps:

Step 1: Go to blogger and edit your post or create a new one.

Step 2: Click on the video icon beside image adding tool.


add-a-video-in-blogger-post

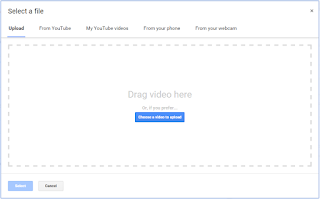
Step 3: Now if you want to add video from your computer then just click on "Choose a video to upload" select the video and wait for upload.


upload-video-blogger

but if you want to add video from a youtube link then click on from youtube and paste the link of the video.

Step 4: Click on "select" and you are done. 

How To Add Dailymotion Videos In Blogger:

Step 1: Open the video which you want to add in your blog post.

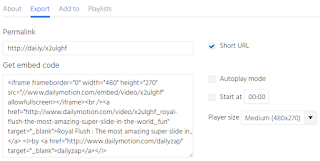
Step 2: Click on "Export" below the video.

Step 3: Customize your video.


add-dailymotion-video-in-blogger

You can re-size your video and turn on "auto-play". A preview of your video player is shown below the code. 

Step 4: Copy the code of your video and go to your blog.

Step 5: Edit or create a post and switch to Html compose box.

Step 6: Paste the copied code and you are done.

I hope you like this post and you found it helpful.

Try more posts if you liked this post. Follow and subscribe for more blogging tutorials.


Search tags: Dailymotion videos blogger,Youtube videos in blogger,How to add videos in blogger posts,Increase youtube views,Video tutorials blogger,101helper blogging tutorials.

Infolinks - The Best Ad Network For Bloggers

How-to-Add-infolinks-to-your-Blogger-blog

Most of the blogs are created to monetize them by ads and earn money but it is a confusing step to choose a good ad network for a blog. Everybody wish to monetize his blog with a network which pays the highest rates. But most of the ad networks becomes a reason of disappointment because even if you have a high traffic and unique visitors they don't pay enough rates. Now a days the most popular and highest paying ad network is Google Adsense but Google Adsense is not approved easily so you can use alternative ad network of Google Adsense which is Infolinks. Infolinks could also be called all in one and the best ad network for bloggers because it has following features:

(1). In-Text Ads:

In-text ads for blogger

If you are desired to monetize your blog by in-text ads then infolinks is the best ad network for you because it lets you to enable in-text ads for your content, you can choose colors for your ads as well as choose a custom color for them, moreover you can choose whether the ads should be of double border style of dotted and also quantity of in text ads. 


(2). Infold Ads:

Infold ads are the slide-up ads which slides up when the page is loaded. You can choose the color for your infold ad.

Infold  ads for blogger

(3). Intag Ads:

Infolinks provides two types of intag ads. 
  • Ads below posts.
  • Revenue booster.
(1). Ads below posts:

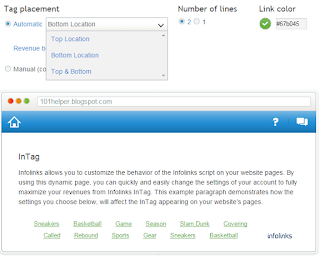
These are the text ads below posts you can change their color, location as well as number of rows.

Intag  ads for blogger

You can also position ads by pasting the provided code where ever you want to display the codes on your blog. 

(2). Revenue Booster:

This option is allowed for those users only who enable the intag ads by choosing automatic option. If manual option is chosen then revenue booster can not be enabled. How revenue booster looks? see it in below image:


revenue booster ads for blogger

Revenue booster is like sponsored content, it displays the content from other websites which are very interesting. Revenue booster is displayed below every page.


(4). InFrame Ads:

inframe ads for blogger

Inframe ads are the ads which slides out from left and right sides of blog/webpage. But it works only in those blogs which have small width as well as there is no rendering javascript code in the blog.

(5). Inscreen Ads:


in-screen ads for blogger

In-screen ads are those ads which appear as a pop-up but in light box. Infolinks in-screen ads have some special qualities like it appears only once to a user in a day and also you can add triggers for these ads which are added in links so whenever a user clicks on links or some text the in-screen ad will open. It doesn't affects your blog's navigation and your users won't be troubled of these ads because it opens only once.


(6). Inarticle Ads:


This is a new ad type introduced by infolinks. It is a smart ad. You are given a code which is to be paste it an article. Once the code is pasted, the users will see an ad when they scroll down your page to the position where you have pasted the given code. If you want to see a live example play the above video!

(7). Referral Program:

Infolinks has now started a referral program so now you can double your earnings through your referrals. You can use banners as well as direct links to referral others. 


Hope you like this post and it helped you in taking decision to choose a good ad network for monetizing your blog. Please use my referral link to sign-up. It won't affect your earnings but it would be a reward for me by infolinks for becoming a referral.

Follow and subscribe for more blogging reviews and blogging tutorial. 

Search tags: Infolinks - The Best Ad Network For Bloggers,Revenue booster,Increase website earnings,Earn money by blog,best ad networks for blogger.

Grabable Responsive Promotion Bubble Gadget For Blogger

Promotion Bubble Gadget For Blogger - 101helper

After creating a blog the most important thing is to promote it. A blog can be promoted by two means one is promotion though social networks while other is to promote it by making efforts in right way. By right way I mean to use some gadgets and internal linking. Everybody is aware of off-page seo so if you read about it then you must know the importance of internal linking and gadgets like related posts, popular post etc. Internal linking is also beneficial in promoting a specific post because it helps your visitors to reach to that post. Similarly now you can promote a specific post or page of your blog is an advance way by using "Promotion bubble gadget" you can see a live demo of this gadget on this page(Seo tools bubble).

Features:
  • Its free!
  • Easy to install.
  • Good look!
  • Visitors can grab and move this bubble.
  • It grabs the interest of visitors so it increases your chances to get more traffic to that post or page. 
  • Clean coding, it isn't made to slow down your blog.
  • It doesn't effect your blog's navigation.

How to add "promotion bubble gadget" in blogger:

You can add this gadget in your blog by following some simple steps mentioned below:

Step 1: Go to your blog and navigate to template.

Step 2: Click inside the code and search </header> by using Ctrl+F.

Step 3: Just below the </header> paste the below code.


If you don't paste the code below </header> then it will not be grabable.


Step 4: Click on save template and you are done.


Customization:


You can change the icon(bubble) as I used seo tools bubble because I wanted to tell visitors that they can use seo tools in my blog similarly you can use other bubbles but try to use transparent images only. To change the icon replace the highlighted image link in the above code.


https://blogger.googleusercontent.com/img/b/R29vZ2xl/AVvXsEiVR2OJHL2oHQwm-Efv6cA8AxYvq0uy8vBMVVw0fgiSPq_0Ator8sC2nA24mnFs_mMZZvhhesbUbQXjtygUu1sMiG5P21TcdJ3vHxmPxFJOtgkL-x2ocDHwtCA9xTPt1QNFUIweGooLcl0/s320/seo-icon-101helper.png


Further you can change the position of your bubble Just make changes in the below line of code:


<div class='flip-container' ontouchstart='this.classList.toggle(&apos;hover&apos;);' style='position: fixed; top: 80%; left: 57%;'>


To add link in the text(click here) replace it with my page link:


<a href='http://101helper.blogspot.com/p/seo-tools-for-blogger.html' rel='dofollow' target='_blank'>Click Here</a>


You can also change the text(click here) with your own text, just type your text and save it. You can also replace To Use Seo Tools with your own text.


<a style="position: absolute;top: 37px;left: 0px;text-align: center;color: #444;font-size: 14px;">To Use Seo Tools</a>

I have designed the above text as a link because if you are using infolinks it will grab the bubble text and change it to ad.


You can Use below icons:


I have brought you some icons you can see them at below links:


(1). https://blogger.googleusercontent.com/img/b/R29vZ2xl/AVvXsEjBg0PNtXn4Z12KiMAaplcQ-PybpDdfwJ2LBAUaZY-ceApwE48Bwn7ukuojJI3GhJkyXwxplUBafkbNXQnn-On5HlvOzSetLyOuL5i0CWytOnpInOERlYAIKHM7Y_cK1gnvwBrOlXkz8XQ/s1600/0B-3SIKm-BBF_bGZzNkFGV09BazQ.png
 

(2). https://blogger.googleusercontent.com/img/b/R29vZ2xl/AVvXsEjLJMWgVXC8K328ow5l6Y4sj5weSoqh38-W6-F3WsAJ823kXHYKN1K0jzzBc6Xuc0xHX-rqWKOALcGAaBc2aIym-UUIKQJYOk-FGLhrd7xxRMDJgPpWPmZo_WY-KfQRw02CPSRkbQDcbCI/s1600/0B-3SIKm-BBF_M0xheUVjOFRUZVU.png


(3). https://blogger.googleusercontent.com/img/b/R29vZ2xl/AVvXsEg8_jBgBEIMP7vEBRWCXDTHb6zNmm88ep-dt1pr5GB7n-2jN4SqkVwpt6s72YbhpBHI9trJPfIStBXeMufQpUkJDd6wMfpwqXzffpj95EgULlRFrmD2p_mrAXY-UKWSsTBXyQLLardGhP0/s1600/0B-3SIKm-BBF_NHgyQkZMMk9UcVU.png


(4). https://blogger.googleusercontent.com/img/b/R29vZ2xl/AVvXsEh0YOSvd0kcjsf4-Sxusxz5igtFDTjpOpSWkY49I2V8wKLi60GwzQqxfF8IddCW4ClhWt2jSHOb_svshcKRNHMAhYqq09B6B4pEkLo4ebNlIQ9BzejWjkchC7Eti5O_Tx6XdWG6ovwttfY/s1600/0B-3SIKm-BBF_RWRGYzY2WXVRQzg.png


(5). https://blogger.googleusercontent.com/img/b/R29vZ2xl/AVvXsEhQdHgfZSwjnloSlU4nnkUfpmuQDwWsX8MPdCf0ELUDDf2E5JMKC4C-vCH2w6dzVyIfJRsX7U751bskellE86i2uBSo_wCSqVMwSzRonRc3rMPR6EslNGhP3NqJovo9_VDdDL1mXUkjCSI/s1600/analytics_img_a.png

Hope you like this post and this gadget is working properly in your blog. Follow and subscribe for more blogger gadgets. If this gadget is not working in your blog or you need any help please help me know by leaving a comment below.


videostutorials

Search tags: How to promote blogger blog,How to promote blog articles,How to increase blog page-views,How to Promote blog posts,Blog promotion gadget for blogger,Promotion Bubble Gadget For Blogger

Related Posts Widget For Blogger Mobile

related posts widget for blogger mobile 101helper

A very important factor of off page seo is internal linking, it means to inter link other posts with the post you write. Internal linking is good for seo as well as it increases your page views because it is the way by which visitors reach to your posts. Internal linking is of two types one is to mention links of older posts in new post and the second is to add a related, recentrecommendation or featured posts widget in your blog. It helps visitors to reach to more posts and read them. Related post widget is most popular in desktop sites but now you can add related posts widget in your blogger mobile site to engage your mobile visitors to your blog. So in this post I will show you how to add related posts widget in blogger mobile site


You can see a live demo of this widget in my blog either in your smartphone or on desktop. Just visit my blog's mobile site by this link 101helper.blogspot.com/?m=1 

Before we start, first optimize your blog's mobile site by reading this post. After optimizing your blog for mobiles just follow below steps to add related posts widget in your blog(mobile site).


Also Read: Text Only/Links Only Related Posts Widget For Blogger Mobile Site.

Step 1: Go to blogger dashboard and navigate to layout > add a gadget > Html/javascript.


Step 2: Copy code of mobile related posts widget from below link.


https://googledrive.com/host/0B-3SIKm-BBF_T1ZaR05QampqV3c


Tip: Use Ctrl+A to select the full code and use Ctrl+c to copy it.


Step 3: Paste the copied code into Html/javascript and click on save.


Step 4: Grab the newly added gadget(related post mobile widget) and drop it at the bottom in the layout page. As shown in below image.


related posts widget for mobile

Widget Not Appearing In Mobile Site?

If the related post widget fails to show in your blog's mobile site then follow below steps.

Step 1: Go to blogger dashboard, navigate to template and click on Edit Html.


Step 2: Jump to the widget(related posts mobile) by its id or find it by using Ctrl+F


how-to-jump-to-a-gadget-in-blogger

Step 3: Search for a line similar to this:

<b:widget id='HTML7' locked='false' title='' type='HTML'>

Step 4: Add this piece of code mobile='only' before locked='false' like this:

<b:widget id='HTML7' mobile='only' locked='false' title='' type='HTML'>

Step 5: Click on save template and you are done. Open your template and scroll to the end to see your related posts widget!

I hope this widget is working fine on your blog, if you are facing any problem tell me by leaving a comment below. Follow and subscribe to get latest news about blogger widgets. 

Search Tags: Related Posts Widget For Blogger Mobile,blogger widgets and gadget,related posts widget,random posts,featured posts,thumbnails,text only,blogger widgets

How to change the date of a photograph in Google Photos

This article shows how to change the date associated with a picture in Google Photos.


Update- August 2015

There is now a feature to change the date of individual pictures or videos in Google Photos.

To use it:

  • Navigate to the picture / video you want to set a new date for
  • Click the "information" icon (small "i" currently near the top-right of the photo viewer screen)
  • In the right hand panel, hover your mouse over the item in Details which has a picture of a calendar beside it.
  • Click on the pen icon which appears while you are hovering
  • Enter the new year, month, date and/or time (in 24-hour clock) for your photo or video.
  • Click Save.
Job Done!   You have now changed the date stored with your image or video.


There are still some photos that you cannot see through Google Photos (eg ones uploaded directly through Blogger with some settings, or shared in Google Hangouts).   For these you need to use the date-editing features in Picasa-web-albums, which are described below.


Original Article

When you open Google Photos by default you see the All Photos tab, which shows every picture in your Google account, sorted by the date on which the picture was taken, with the newest at the top.

This works well for recent photos that were taken with smartphones, and so most likely have the correct date-time attached to them.

But for older photos, that were added to Google in bulk when you finally uploaded them from your camera's memory card, the attached date may not be right.

It's even possible to have some photos with no date attached to them - and it looks like Google Photos, very confusingly, shows a nominal date figure in 2075 for these.

One way to avoid the confusion caused by these wrong dates is just to use the Collections tab to view your pictures, and to put photos with the wrong dates into appropriate collections (aka albums) yourself.

But if you want to keep using the All Photos view, you may want to alter the date for some of your  individual photographs, so they show up in the right order.


How to change the date for a picture in Google Photos

Unfortunately Google Photos doesn't have a feature for doign this (yet).   But you can adjust the date assocaited with with a picture by using Picasa Web Albums - provided you have at least some aspects of a Google+ profile (eg a Google+ Page) associated with your Google account.

Follow these steps:

Go to Picasa Web Albums, using the no-re-direct link: https://picasaweb.google.com/lh/myphotos?noredirect=1

Find the album that the photo(s) you want to change are in

Click on the album - this will open the album, and display each picture in it.

Click on the photo you whose date you want to change.

From the menu bar, choose Actions > Edit on Google+.   This opens the photo in Google+'s photo viewer mode.


Click on the drop-down beside Photo Details in the right hand information bar.


Use the options in the pop-up window to choose the correct date, time and even time-zone.


Click Save


Job Done! If you now look at the picture in Google Photos, you will see if with your newly changed date associated with it.


What if you don't have Google+

If Edit in Google+ is greyed out and cannot be selected, then this means you do not have Google+ associated with your Google account.

 The only work-around for this currently is to share the photo (from Google Photos) with another Google account that does have Google+, and use that to change the date.


Where to get more information


Introducing Google Photos - another tool for managing your photo collection.

Understanding Picasa desktop vs Picasa-web-albums

All about Google accounts

How To Create Transparent Images For Blog Posts

How-To-Create-Transparent-Images-For-Blog-Posts

Blogging and creating a powerful blog post is impossible without images. Images makes a blog post more interesting and easy to understand. Two things which grab interest of visitors are title and images. Other things are also important to create a powerful post like good content, colorful post and frank behavior. As images are important for a good post therefore images should be created in such a way that suits your post. For example some bloggers add effects to images. Sometimes transparent images are needed in post but most of blogger don't know how to create transparent images, so in this post I will show you how to create transparent images using online tools. So in this post you will learn two things:

(1). How to create a new transparent image for blog post.
(2). How to make an existing image transparent.

How to create a new transparent image for blog post:


Step 1: Go to http://apps.pixlr.com/editor/


create-transparent-images

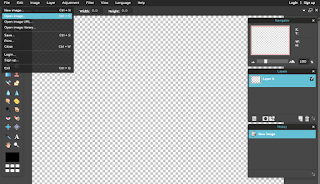
Step 2: Click on create new image.


create-transparent-images-blogger

Step 3: Give a title to your image, choose a size or set a custom size of image and check the transparent option.


create-transparent-images-for-blogger

Now you will have a transparent background, just create your image and move to step 4.


transparent-images-generator

Step 4: Use Ctrl+S to save your image.


create-transparent-images-blogger-101helper

Choose "PNG(Transparent, full quality)" as image format and click on save.

Congratulations! you are done successfully.

How to make an existing image transparent:

Step 1: Go to http://apps.pixlr.com/editor and click on create a new image, choose a size for your image and mark the transparent option.

Step 2: Open your image from computer or url.


how-to-make-an-image-transparent

Step 3: Use Ctrl+A to select your image and then use Ctrl+X to cut it.

Step 4: Now close the new image tab(which is opened because you have opened an image to change its background with transparent) and paste your image which you have grabbed in step 3 on the transparent background. 

Step 5: Remove all the unwanted background which you want to make transparent by using eraser tool.


how-to-make-an-image-transparent-101helper

After creating your image just save it as you saved the previous one and you are done! You can change the mouse cursor by choosing other cursor just above the editor.

Now if the images aren't transparent after upload then you need to make some changes in your blog template so follow below steps to make these changes.

Step 1: Go to template and click on customize.

Step 2: Click on Advanced and then on Images.


how-to-customize-images in blogger

Step 3: Click on Background color and mark the transparent option as shown in below image:


transparent-images-generator-101helper

Step 4: Click on Apply to blog button on the top-right corner of the page.

Congratulations! you are done successfully. You can make further customizations too like removing border of images and caption text color.

Hope you like this post and it helped you out, follow 101Helper by E-mail to get instant updates. Share this post with others.

How To Customize Blogger Static Pages With CSS

How-To-Customize-Blogger-Static-Pages-With-CSS

Static pages are those pages of a blog which are created as posts are created for example Contact page, About page, Sitemap Page, Advertise Page etc. Blogger static pages look like posts except if you have used CSS or Javascript to make it different then post pages. And all the static pages should be different then post pages to make them look like they are apart of posts. So in this post I will show you how to customize static pages in blogger with CSS.


Follow below mentioned steps to customize your static pages:

Step 1: Go to blogger dashboard and navigate to Pages.


Step 2: Edit your page.


how-to-customize-blogger-static-pages-with-css

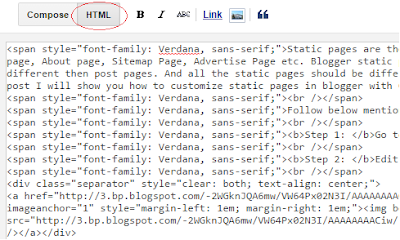
Step 3: Switch to Html editor of the page.


customize-blogger-static-pages-with-css

Step 4: Now you have to add your css codes, so copy your desired code and paste it in your page's html editor:

Before copying code add the below piece of codes in the html editor in the top or bottom of the editor:

<style>


</style>


Now all you have to do is to copy code for desired functions and paste it in between:


<style>


</style>


(1). To Remove Footer:


how-to-remove-footer-static-pages-blogger

To remove footer add the below code between <style>---------</style>


.post-footer {

  display: none;
}

(2). To Remove Blog Pager:


blog-pager-remove-in-blogger-101helper

To remove pager from static page, copy below code and paste it between <style>---------</style>


#blog-pager {

display:none;
}

(3). To Change Background Color Of Your Static Page:


.content{

background:#eee;
}

Replace #eee with your desired color code. Use our color picker tool to get code of a color.


(4). To Customize Page Title:


To customize page title you have to add the following code:


h1.post-title.entry-title {

  border-bottom: 2px solid #93C47D;
  color: #93C47D;
  letter-spacing: 2px;
  font-size: 35px;


If this code is not working use this one:


h2.post-title.entry-title {

  border-bottom: 2px solid #93C47D;
  color: #93C47D;
  letter-spacing: 2px;
  font-size: 35px;
}

To change color replace #93C47D with your desired color code. Use color picker to get code of color.


To change font replace Gruppo with font-family name.


(5). To Customize Content Container Width:

Content container means the box which contains your content. Normally the content container has a small width but if you want to have a full width use below code for it.


.post.hentry {
width:102%;
}

To increase or decrease width replace 102% with the your desired width.


(6). Hide Comments And Comment Box:


To hide comments and comment box read this post.


Step 5: Publish your page and you are done.


Hope you like this post and you found it helpful. If this post help you out please read more posts and share them with others.


Search Tags: Static pages blogger,blogger tips and tricks 101helper,blogger customization tricks css,javascript,remove footer,Static pages full width blogger,blogger remove comments from static pages,customize static pages blogger,edit static pages blogger

Kategori

Kategori