Raja blogger template can be used for any purpose. This template has some unique features with elite color combination. This is 2 Column box style blogger template which is attractive in design. In addition this Raza blogger template based on neat and clean design.
Template Name: Raja
Platform: Blogger / Blogspot
Release date : 25th November 2013
Author : Mohammad Fazle Rabbi
Website: www.bloggerspice.com
License : Creative Commons Attribution 3.0
I am explaining some key features that I have incorporated in this fashionable blogger template that might be helpful for potential users. The main features of this blogger template are as follows-
Flexible Dropdown menu
Raja contain flexible 2 sets drop-down menu which will help your visitor to navigate to different categories.
News Ticker
Raja contain news ticker which will display your recent posts nicely.
Label Base Recent Post
You would able to display 4 Lables base recent posts which will appear at the bottom of the home page above footer.
SEO friendly Colorful Breadcrumb
I have added very attractive and SEO friendly wide style Breadcrumb which will love Visitors and Search Engine. The breadcrumbs will display parent categories of the contents thus visitors can easily navigate your site in depth.
Related Posts
Wide related posts has included which will perfect to display landscape type post image.
Page Navigation
Through page navigation made this template more user friendly. Your visitors can navigate so easily and flexibly.
Social Media Icon
A set of social media icon has added at the top of the template. Which will help your visitors to connect with your social media profile.
Other features
Ads ready space, 2 column blogger template, 3 column Footer section, Customized Label, Threaded comment, Royal color combination. Fast loading.
Social Networking Customization
Step 1 Log in to your Blogger Account and Go to your Blogger Dashboard
Step 2 Now click on -> Template -> Edit HTML
Step 3 Now Find this code like below by pressing Ctrl + F
<li><a class='fbiconx' href='https://www.facebook.com/BloggerSpice'>Facebook</a></li>
<li><a class='twiconx' href='https://twitter.com/BloggerSpice'>Twitter</a></li>
<li><a class='goiconx' href='https://plus.google.com/102331886274459115104/posts'>Google+</a></li>
<li><a class='piniconx' href='http://pinterest.com/BloggerSpice'>Pinterest</a></li>
<li><a class='liniconx' href='#'>Linkedin</a></li>
<li><a class='rssiconx' href='http://feeds.feedburner.com/BloggerSpice'>RSS</a></li>
Step 4 After finding it Replace BloggerSpice & 102331886274459115104 with your URLs and ID.
Step 5 Save the template Now.
Top Menu 1st Menu Set Customization
Step 1 Log in to your Blogger Account and Go to your Blogger Dashboard
Step 2 Now click on -> Template -> Edit HTML
Step 3 Now Find this code like below by pressing Ctrl + F
<li><a href='#'>Menu 1</a></li>
<li><a href='#'>Menu 2</a></li>
<li><a href='#'>Menu 3</a></li>
<li><a href='#'>Menu 4</a></li>
<li><a href='#'>Menu 5</a></li>
<li><a href='#'>Drop Down Menu</a></li>
<li class='dgnsub'><a href='#'>BS Tools</a>
<ul class='submenu hidden'>
<li><a href='#'>Drop Down Menu 1</a></li>
<li><a href='#'>Drop Down Menu 2</a></li>
<li><a href='#'>Drop Down Menu 3</a></li>
<li><a href='#'>Drop Down Menu 4</a></li>
<li><a href='#'>Drop Down Menu 5</a></li>
<li><a href='#'>Drop Down Menu 6</a></li>
<li><a href='#'>Drop Down Menu 7</a></li>
Step 4 After finding it Replace # with your URLs and change the category name
Step 5 Save the template Now.
Main Menu 2nd Menu Set Customization
Step 1 Log in to your Blogger Account and Go to your Blogger Dashboard
Step 2 Now click on -> Template -> Edit HTML
Step 3 Now Find this code like below by pressing Ctrl + F
<li><a class='home' href='http://www.bloggerspice.com/'>Home</a></li>
<li><a href='#'>Nav 1</a></li>
<li><a href='#'>Nav 2</a></li>
<li><a href='#'>Nav 3</a></li>
<li><a href='#'>Nav With Sub Menu</a>
<ul>
<li><a href='#'>Sub Menu</a></li>
<li><a href='#'>Sub Sub Menu</a>
<ul>
<li><a href='#'>Sub Menu 1</a></li>
<li><a href='#'>Sub Menu 2</a></li>
<li><a href='#'>Sub Menu 3</a></li>
<li><a href='#'>Sub Menu 4</a></li>
</ul>
</li>
<li><a href='#'>Nav 4</a></li>
<li><a href='#'>Nav 5</a></li>
</ul>
</li>
<li><a href='#'>Nav 6</a></li>
Step 4 After finding it Replace # with your URLs and change the category name
Step 5 Save the template Now.
Recent Posts With Label Customization
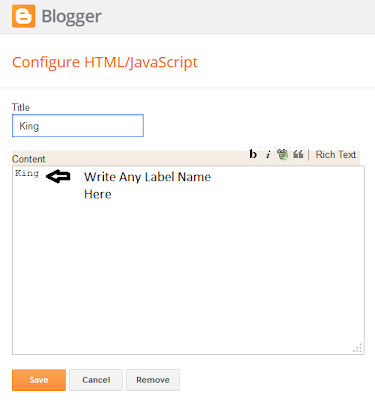
You would get 4 recent posts container. Just write there label name then it will display posts.Step 1 Log in to your Blogger Account and Go to your Blogger Dashboard
Step 2 Now click on -> Layout -> Edit
Write label name like below after Edit each label.
Step 3 Save the template Now.
Set Up News Ticker
Step 1 Log in to your Blogger Account and Go to your Blogger Dashboard
Step 2 Now click on -> Template -> Edit HTML
Step 3 Now Find this code like below by pressing Ctrl + F
"http://raja-bsdesign.blogspot.com/feeds/posts/default")
Step 4 After finding it Replace raja-bsdesign.blogspot.com with your Blog URLs and change the category name.
Set Up Page Navigation
Step 1 Log in to your Blogger Account and Go to your Blogger Dashboard
Step 2 Now click on -> Template -> Edit HTML
Step 3 Now Find this code like below by pressing Ctrl + F
<script type='text/javascript'>
varpageNaviConf = {
perPage: 3,numPages: 3,firstText: "First",
lastText: "Last",
nextText: "»",
prevText: "«"
}
</script>
Step 4 After finding it alter perPage: 3,numPages: 3, digit only.
License
This free Blogger template is licensed under the Creative Commons Attribution 3.0 License, which permits both personal and commercial use.
However, to satisfy the 'attribution' clause of the license, you are required to keep the footer links intact which provides due credit to its authors. For more specific details about the license, you may visit the URL below:
- http://creativecommons.org/licenses/by/3.0/
Credits
- Auto read-more` hack for Blogger by Taufik Nurrohman modified by Blogger Spice
- Menu and Social Icon by MKR modified by Blogger Spice
- Scroll To Top by MBT
Thanks to them for their creative resources.


EmoticonEmoticon