Recent Posts with Thumbnails is an interesting hack that allows you to display your latest posts in various styles. besides making more cool the display, these widgets can also attract the eyes of visitors. If they are not interested in the post title may be the image was displayed can get them interested. This post explains how to add Recent Posts widget in Blogger with image thumbnails.this Gadget will help you to display the most Recent Posts on your Blog�s Sidebar. The Gadget has an options panel and can be configured to meet your needs. You can easily customize whether or not you would like to display thumbnails, post summaries, and the number of comments for each post along side the titles. So just start the tutorial to create a "Recent Posts With Thumbnails".
Read More :
1. Recent Posts Widget for Blogger Text CSS Hover Effect with jQuery2. Animated Recent posts for Blogger with Thumbnails - Simple SpyI have to write two set of instructions for each steps, as some of you are using the default layout, and some of you are using the new layout. So, let's see how to install this cool widget in your blog..
Step 1:
If you're using the old Blogger interface: Go to Dashboard - Design - Page Elements - Add a Gadget.
Add a Gadget of HTML/JavaScript type.
If you're using the new Blogger interface: Go to Dashboard - Layout - Add a Gadget
2.Click on 'Add a Gadget' on the sidebar.
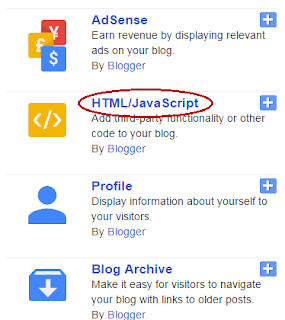
3.Select 'HTML/Javascript' and add the one of code given below
4. Now Click On Save 'JavaScript' You are done.
<div id="24work">
<a href="http://24work.blogspot.com" target="_blank" title="Blogger Widgets"><img src="http://safir85.ucoz.com/24work-blogspot/cursor-24work-10.png" border="0" alt="Blogger Widgets" style="position:absolute; top: 0px; right: 0px;" /></a><script language="JavaScript">
imgr = new Array();
imgr[0] = "https://blogger.googleusercontent.com/img/b/R29vZ2xl/AVvXsEiO-L1YvdhIUx4K9RSXalYpQp5RClvzO3fwTp4y2F2W-1YB-vYnhRiieQpXAUWAga2AyITLIDQ6IozR25EYiAFbeMM5tFn0ylh4PDY8zCY1BDUi2bo3KHH-RZ8wT-7D8WjuYt77lXOgvc8/s400/noimage.png";
imgr[1] = "https://blogger.googleusercontent.com/img/b/R29vZ2xl/AVvXsEiO-L1YvdhIUx4K9RSXalYpQp5RClvzO3fwTp4y2F2W-1YB-vYnhRiieQpXAUWAga2AyITLIDQ6IozR25EYiAFbeMM5tFn0ylh4PDY8zCY1BDUi2bo3KHH-RZ8wT-7D8WjuYt77lXOgvc8/s400/noimage.png";
imgr[2] = "https://blogger.googleusercontent.com/img/b/R29vZ2xl/AVvXsEiO-L1YvdhIUx4K9RSXalYpQp5RClvzO3fwTp4y2F2W-1YB-vYnhRiieQpXAUWAga2AyITLIDQ6IozR25EYiAFbeMM5tFn0ylh4PDY8zCY1BDUi2bo3KHH-RZ8wT-7D8WjuYt77lXOgvc8/s400/noimage.png";
imgr[3] = "https://blogger.googleusercontent.com/img/b/R29vZ2xl/AVvXsEiO-L1YvdhIUx4K9RSXalYpQp5RClvzO3fwTp4y2F2W-1YB-vYnhRiieQpXAUWAga2AyITLIDQ6IozR25EYiAFbeMM5tFn0ylh4PDY8zCY1BDUi2bo3KHH-RZ8wT-7D8WjuYt77lXOgvc8/s400/noimage.png";
imgr[4] = "https://blogger.googleusercontent.com/img/b/R29vZ2xl/AVvXsEiO-L1YvdhIUx4K9RSXalYpQp5RClvzO3fwTp4y2F2W-1YB-vYnhRiieQpXAUWAga2AyITLIDQ6IozR25EYiAFbeMM5tFn0ylh4PDY8zCY1BDUi2bo3KHH-RZ8wT-7D8WjuYt77lXOgvc8/s400/noimage.png";
showRandomImg = true;
tablewidth = 298;
cellspacing = 8;
borderColor = "#ffffff";
bgTD = "#ffffff";
imgwidth = 80;
imgheight = 80;
fntsize = 12;
acolor = "#666";
aBold = true;
icon = " ";
text = "no";
showPostDate = false;
summaryPost = 50;
summaryFontsize = 11;
summaryColor = "#666";
icon2 = " ";
numposts = 5;
home_page = "
http://24work.blogspot.com/";
</script>
<script src="http://safir85.ucoz.com/bdlab-blogspot/24work/rec-thumbnail/recentposts_thumbnail-1.js"></script>
</div>
Explanation:
(Edit the values to fit your blog)
tablewidth - Width of the widgetcellspacing - Space between cells (default one is good)
borderColor - Border color (add the background color of your template to perfectly blend it in the template)
thumbwidth & thumbheight - Width and Height of the thumbnail (default are good)fntsize - Font size of the titleacolor - Color of the titleaBold - you want bold titles? (true or false)
numposts - How many posts you want to show?
home_page : http://24work.blogspot.com/ (change this to your blog url)And now click
Save this widget was made by [ http://www.instantfundas.com ]
you might like the Recent Posts with Thumbnails Widget 2 This post explains how to add Recent Posts widget in Blogger with image thumbnails:
well they are many hacks up there on the net for RECENT POSTS BLOGGER !
and actually i have tried many of them ! and while i was surfing the net than i found this amazing hack !
finally i have got what i want ! this widget was made by the legend �
bloggertricks� we thanks him for this amazing widget ,very simple recent posts �bravo for the great job !
So, let's see how to install this cool widget 2 in your blog..
1. Sign into Blogger dashboard
2. Go to Design � Add a gadget � html/javascript
3. Just copy and paste this code..
<div id="24work">
<a href="http://24work.blogspot.com" target="_blank" title="Blogger Widgets"><img src="http://safir85.ucoz.com/24work-blogspot/cursor-24work-10.png" border="0" alt="Blogger Widgets" style="position:absolute; top: 0px; right: 0px;" /></a><script language="JavaScript">
imgr = new Array();
imgr[0] = "https://blogger.googleusercontent.com/img/b/R29vZ2xl/AVvXsEiO-L1YvdhIUx4K9RSXalYpQp5RClvzO3fwTp4y2F2W-1YB-vYnhRiieQpXAUWAga2AyITLIDQ6IozR25EYiAFbeMM5tFn0ylh4PDY8zCY1BDUi2bo3KHH-RZ8wT-7D8WjuYt77lXOgvc8/s400/noimage.png";
imgr[1] = "https://blogger.googleusercontent.com/img/b/R29vZ2xl/AVvXsEiO-L1YvdhIUx4K9RSXalYpQp5RClvzO3fwTp4y2F2W-1YB-vYnhRiieQpXAUWAga2AyITLIDQ6IozR25EYiAFbeMM5tFn0ylh4PDY8zCY1BDUi2bo3KHH-RZ8wT-7D8WjuYt77lXOgvc8/s400/noimage.png";
imgr[2] = "https://blogger.googleusercontent.com/img/b/R29vZ2xl/AVvXsEiO-L1YvdhIUx4K9RSXalYpQp5RClvzO3fwTp4y2F2W-1YB-vYnhRiieQpXAUWAga2AyITLIDQ6IozR25EYiAFbeMM5tFn0ylh4PDY8zCY1BDUi2bo3KHH-RZ8wT-7D8WjuYt77lXOgvc8/s400/noimage.png";
imgr[3] = "https://blogger.googleusercontent.com/img/b/R29vZ2xl/AVvXsEiO-L1YvdhIUx4K9RSXalYpQp5RClvzO3fwTp4y2F2W-1YB-vYnhRiieQpXAUWAga2AyITLIDQ6IozR25EYiAFbeMM5tFn0ylh4PDY8zCY1BDUi2bo3KHH-RZ8wT-7D8WjuYt77lXOgvc8/s400/noimage.png";
imgr[4] = "https://blogger.googleusercontent.com/img/b/R29vZ2xl/AVvXsEiO-L1YvdhIUx4K9RSXalYpQp5RClvzO3fwTp4y2F2W-1YB-vYnhRiieQpXAUWAga2AyITLIDQ6IozR25EYiAFbeMM5tFn0ylh4PDY8zCY1BDUi2bo3KHH-RZ8wT-7D8WjuYt77lXOgvc8/s400/noimage.png";
showRandomImg = true;
boxwidth = 298;
cellspacing = 8;
borderColor = "#ffffff";
bgTD = "#000000";
thumbwidth = 80;
thumbheight = 80;
fntsize = 12;
acolor = "#666";
aBold = true;
icon = " ";
text = "comments";
showPostDate = false;
summaryPost = 40;
summaryFontsize = 10;
summaryColor = "#666";
icon2 = " ";
numposts = 5;
home_page = "http://24work.blogspot.com/";
</script>
<script src="http://safir85.ucoz.com/bdlab-blogspot/24work/rec-thumbnail/recentposts_thumbnail-2.js" type="text/javascript"></script>
</div>
There are many variables in this script that you need to adjust to blend the widget�s look with that of your blog template. Most of them are self explanatory.
4. In the code, look for the line�
home_page = "http://24works.blogspot.com/";
and replace the blog address with your own blog address
5. How to change the number of posts
By default, this widget is set to display a maximum of 5 recent posts. To change this number,
numposts = 5;
edit line in the code and replace the number 5 with the number of posts desired:
6. How to change thumbwidth & thumbheight
thumbwidth = 80;
thumbheight = 80;
Width and Height of the thumbnail (default are good)
And now click
Save Recent Posts Widget with Thumbnails for Blogger You are surely familiar with the
Recent posts widget for blogger and you can integrate easily into blogger in few steps.But now, Its time to show recent posts widget with image thumbnails in blogger as it will shows your post images with the recent posts in your blog sidebar.Its so easy to implement it into your
blogger templates
just like the typical recent posts widget.Thansk to
Aneesh for this awesome widget!
The main features of this widget are:
*It shows the latest posts with tiny thumbnails images (size 75 x 75).
*It shows a bold title of the posts with summary.
*It shows the number of comments, date and ofcourse, a Read more link.
*And its highly customizable (don't worry, i will tell you how to customize).
This widget can be seen live in my blog sidebar.Anyways step ahead to know how to add it in your blogspot blogs.
How to Add Recent Posts Widget with Thumbnails to blogger:Step 1.Login to your blogger dashboard and go to layout.
Step 2.Now click "Add a Gadget" on your desired sidebar and select "HTML/ Javascript".
Step 3.Now copy the below code and paste it in the "HTML/ Javascript" box:
<div id="24work">
<a href="http://24work.blogspot.com" target="_blank" title="Blogger Widgets"><img src="http://safir85.ucoz.com/24work-blogspot/cursor-24work-10.png" border="0" alt="Blogger Widgets" style="position:absolute; top: 0px; right: 0px;" /></a><style>img.recent_thumb {padding:1px;width:55px;height:55px;border:0;
float:right;margin:0 0 5px 10px;}.recent_posts_with_thumbs {float: left;width: 100%;min-height: 70px;margin: 5px 0px 5px 0px;padding: 0;font-size:12px;}ul.recent_posts_with_thumbs li {padding-bottom:5px;padding-top:5px;min-height:65px;}.recent_posts_with_thumbs a {text-decoration:none;}.recent_posts_with_thumbs strong {font-size:10px;}</style>
<script style='text/javascript' src='http://safir85.ucoz.com/bdlab-blogspot/24work/rec-thumbnail/recentpostswiththumbnailsv3.js'></script>
<script style='text/javascript'>
var numposts = 5;
var showpostthumbnails = true;
var displaymore = true;
var displayseparator = true;
var showcommentnum = true;
var showpostdate = true;
var showpostsummary = true;
var numchars = 100;</script>
<script src='
http://24work.blogspot.com/feeds/posts/default?orderby=published&alt=json-in-script&callback=showrecentpostswiththumbs'></script>
</div>
Step 4.Now Replace
YOURBLOGURL with you desired blog URL and save the widget and you are done.
Customization:Now its easy to customize this widget, just have a glimpse on the above code and you will see some code colored in "
Red".You can play with this code to customize it.You can change the number of posts to show or you can change other options to True/ False to customize it!
Recent Posts Widget Generator1. Change the title of the widget if you want.
2. Change the number of posts links you want to display.
3. Change the number of words you want to include in the summary to display.
3. Click the �Reset� generate button to make the changes take effect, then click on the �Add to My Blog� button.

