
Alexa is a site which keeps data of sites and blogs and give them a rank in that site's region and a Global rank which depends on its traffic, traffic sources, keywords used to reach that site etc in other words Alexa is rich of sites history. It tells people about how famous a site is that's why webmasters try to increase their site traffic and improve their Alexa rank to show people how popular their site is and it improves a site's impression too. But most of people who are not too friendly with site development and internet get confuse with how Alexa works which is very easy to understand. Alexa gets info from search engines and site analytics and show a rank on traffic and search analytics basis.
One more thing is webmasters want to show a desired country on Alexa rank page and don't know how to do that. Only a few know that it could be done by verifying a site with alexa. So in this post I will tell you how to verify your site with alexa. After verifying your site with Alexa you will get following things!
- More accurate and clear analytics of your site e.g search keywords, traffic sources, daily time on page etc.
- You can specify a site to be shown on rank page.
- You can add info about your site e.g contact info, logo etc.
How To Verify A Site With Alexa?
Follow below steps to get your site verified with Alexa!
Step 1: Create an Alexa account.
Step 2: Sign in to your account.
Step 3: Now go to http://www.alexa.com/siteowners/claim?ax_atid=7a1cf237-f464-4daf-98d6-50ef8b4072a0 to claim your site's ownership.
OR
If the above link is not working then follow below link but replace 101helpervideos.blogspot.com with your site url:
http://www.alexa.com/pro/subscription/claim?site=101helpervideos.blogspot.com
Step 5: Now you will be taken to a page where you have two methods to claim your site's ownership:

- Upload an Alexa verification file to your site's root directory.
- Add an Aelxa verification ID to your homepage.
Click on the second one.

Step 6: Now copy your meta verification code.
Step 7: Go to blogger, navigate to template and click on Edit Html.
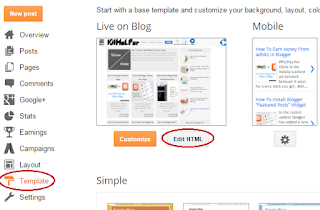
Step 8: Paste the copied verification code inside the <head> region of your template like this and click on save template:

Step 9: Now go back to the alexa verification page and click on Verify my ID.

That's it you will see Your site is successfully claimed.
Also Read:
How To Edit Your Site's Data In Alexa?
Follow below steps to edit your site's data in alexa!
Step 1: Go to Alexa and Login to your account if you are not already logged in.
Step 2: Go to Dashboard and hover Site Management beside site metrics and click on Edit Site Listing.

Step 3: Fill out your site's info e.g: Your site's name, description, site's owner name, address, city, contact info etc.

Step 4: Choose a country of your rank, it will be shown in your site's info.

Step 5: Click on save changes and you are done!
Note: It will take about two days to update changes.
You can get more features like comparison between your site and other sites, adding your site's logo etc but for that you have to upgrade your account.
Thanks for visiting 101Helper. Follow and subscribe for more posts. Keep visiting us.
Search Tags: How to add site info in alexa, Improve Alexa rank, Show rank in your country in Alexa, 101 helper alexa rank tips, verify blogger blof with alexa, seo tips and tutorials for blogger 101helper.
EmoticonEmoticon