Blogger Label widget with Custom Counter Button

label widget

Blogger label is very important because it work like navigation for visitors. There are many label widget has developed by different blogger. Because we can customize the label widget by adding different CSS code. But most of them are based on Cloud style label. But there are very few trick available for list style label with post counter. So I am going to share with you a list style custom label widget with counter button where your label widget will display as a list at left side and number of post per label will display at the right side or the widget. I have also added hover effect where it will change the color on mouse hover. I hope this unique widget you will like. So let's proceed to the tutorial-

hover effect

Step 1 Log in to your Blogger Account and Go to your Blogger Dashboard

Step 2 Click on  Now click on -> Template -> Edit HTML-> Unfold code  ?

Step 3 Now Find this code ]]></b:skin> by Pressing Ctrl + F

Step 4 Paste the below code  Before/above ]]></b:skin> 

/* Widget by www.bloggerspice.com */
.Label li {background: none repeat scroll 0 0 #02D8F8;border: 0 none;color: #666666;margin: 0 1px 1px 0;padding: 0;text-decoration: none;}
#Label1 li a {color: #0676EA;text-decoration:none;}
#Label1 li a:hover, #Label2 li a:active, #Label1 li a:focus {color: #0676EA;text-decoration:none;}
#Label1 li .label-counter {float:right;background-color:#0676EA;color:#fff;line-height:1;margin:2px 0 0;padding:2px 3px -1px 3px;border-radius:2px;text-align: center;font-size:12px;width:50%;height:auto;}
#Label1 li:hover .label-counter {background-color:#000000;color:white}

Step 5 Now find the code like below

<span dir='ltr'>(<data:label.count/>)</span>

Step 6 And Replace the above code by below code

<span class='label-counter'><data:label.count/></span>

Step 7 Save the templates now. 

Customization

  • Alter #02D8F8 this code for background color.
  • Alter #0676EA for counter button background color.
  • Alter #000000 for counter button hover color.

I have tested this custom label widget on Google Chrome, Mozila Firefox and Opera. It is working well. However if your label widget is customized previously then this trick may not work. Anyway best of luck.

Add Disco light effect on Blogger Images

rainbow effect

Though we have already well-known with rainbow effect trick in Blogger different links but now we will able to use a disco light effect in all blogger images which is really charming. A visitor will suddenly attract when s/he will see this effect. Actually this trick support on webkit supported browsers such as Google Chrome, Opera, Safari. But now other browsers are adding this feature where we can see this effect.  Obviously the code is based on pure CSS so it won�t affect on blog loading time.

image search
Image in Normal Mode

blog images
Changeable Colors after mouse over

This trick will work like magic. After adding the code when you mouse over any blog image then the image will change different color like rainbow effect on text. I think this is pretty cool so lets proceed to the tutorial. Installing this trick is very easy and I am sure that your blog visitors will going to like this.

Step 1 Log in to your Blogger Account and Go to your Blogger Dashboard

Step 2 Click on  Now click on -> Template -> Edit HTML-> Unfold code  ?

Step 3 Now Find this code ]]></b:skin> by Pressing  Ctrl + F

Step 4 Paste the below code  Before/above ]]></b:skin> 

@-webkit-keyframes hue {
100% { -webkit-filter:hue-rotate(360deg); }
}
img:hover {
-webkit-animation:hue 1s linear infinite;
}
/* Trick by www.bloggerspice.com*/
::-webkit-selection {background:#FFF;color:#eee;text-shadow:0 -1px 1px #fff;}
/* Scroller browser */
::-webkit-scrollbar {width:19px;}
/* Track */
::-webkit-scrollbar-track {box-shadow:inset 0 0 5px rgba(0,0,0,0.3);-webkit-box-shadow:inset 0 0 5px rgba(0,0,0,0.3);-moz-box-shadow:inset 0 0 5px rgba(0,0,0,0.3);-webkit-border-radius:8px;-moz-border-radius:8px;border-radius:8px;}
/* Handle */
::-webkit-scrollbar-thumb {-webkit-border-radius:8px;-moz-border-radius:8px;border-radius:8px;background:#FF9000;box-shadow:0 0 6px #FF9000;-webkit-box-shadow:0 0 6px #FF9000;-moz-box-shadow:0 0 6px #FF9000;}
::-webkit-scrollbar-thumb:window-inactive {background: #FF9000;}

Step 5 Now Save the template. 

To see the effect just go to your blog and point your mouse on blog image and see the magic. Your blog image will change different color. If you feel any problem then feel free to contact with me. But remember that this effect will visible only webkit supported browsers only. Mozila firefox doesn't support this.

Black professional Responsive drop down menu for Blogger

responsive

Menu is the main function to visit different labels or categories basis posts. It helps visitors to find their desired articles. Though I have shared many menu but this is the trend of responsive. Everything is now designing as responsive thus any widget can adjust with any smart devices. So for this time I am sharing a black professional drop-down responsive menu which will best fit for any devices. It will adjust with any devices. I have made the tutorial so simple that can be install by any blog user. So let�s proceed to the tutorial.


menu


navigation

You can install this drop-down responsive menu 2 ways. I am explaining both method one by one below:

Method 1

Step 1 Log in to your Blogger Account and Go to your Blogger Dashboard

Step 2 Click on  Now click on -> Template -> Edit HTML-> Unfold code  ?

Step 3 Now Find this code ]]></b:skin> by Pressing Ctrl + F

Step 4 Paste the below code  Before/above ]]></b:skin> and Save the templates. 

/*Responsive Menu by www.bloggerspice.com */
#BSResponsivemenu{background:#1a1a1a;color:#fefefe;height:35px;}
#BSResponsivemenu ul,#BSResponsivemenu li{margin:0;padding:0;list-style:none}
#BSResponsivemenu ul{height:35px}
#BSResponsivemenu li{float:left;display:inline;position:relative;font:bold 13px Arial;}
#BSResponsivemenu li a{color:#ccc}
#BSResponsivemenu a{display:block;line-height:35px;padding:0 14px;text-decoration:none;color:#fefefe;}
#BSResponsivemenu li:hover > a,#BSResponsivemenu li a:hover{color:#ffffff}
#BSResponsivemenu input{display:none;margin:0 0;padding:0 0;width:80px;height:35px;opacity:0;cursor:pointer}
#BSResponsivemenu label{font:bold 30px Arial;display:none;width:35px;height:36px;line-height:36px;text-align:center}
#BSResponsivemenu label span{font-size:13px;position:absolute;left:35px}
#BSResponsivemenu ul.BSResponsivemenus{height:auto;overflow:hidden;width:180px;background:#000000;position:absolute;z-index:99;display:none;border:1px solid #ccc;border-top:none;color:#fefefe}
#BSResponsivemenu ul.BSResponsivemenus a{color:#fefefe}
#BSResponsivemenu ul.BSResponsivemenus li{display:block;width:100%;font:12px Arial;text-transform:none;}
#BSResponsivemenu li:hover ul.BSResponsivemenus{display:block}
#BSResponsivemenu a.prett,#BSResponsivemenu a.trigger2{padding:0 27px 0 14px}
#BSResponsivemenu li:hover > a.prett,#BSResponsivemenu a.prett:hover{background:#000000;color:#fefefe}
#BSResponsivemenu a.prett::after{content:"";width:0;height:0;border-width:6px 5px;border-style:solid;border-color:#eee transparent transparent transparent;position:absolute;top:15px;right:9px}
#BSResponsivemenu ul.BSResponsivemenus a:hover{background:#1a1a1a;}
#BSResponsivemenu a.trigger2::after{content:"";width:0;height:0;border-width:5px 6px;border-style:solid;border-color:transparent transparent transparent #eee ;position:absolute;top:13px;right:9px}
 @media screen and (max-width: 768px){
#BSResponsivemenu{position:relative}
#BSResponsivemenu ul{background:#838383;position:absolute;top:100%;right:0;left:0;z-index:3;height:auto;display:none;}
#BSResponsivemenu ul.BSResponsivemenus{width:100%;position:static;border:none}
#BSResponsivemenu li{display:block;float:none;width:auto;text-align:left}
#BSResponsivemenu li a{color:#000000}
#BSResponsivemenu li a:hover{color:#fefefe}
#BSResponsivemenu li:hover{background:#1a1a1a;color:#fefefe;}
#BSResponsivemenu li:hover > a.prett,#BSResponsivemenu a.prett:hover{background:#1a1a1a;color:#fefefe;}
#BSResponsivemenu ul.BSResponsivemenus a{background:#1a1a1a;}
#BSResponsivemenu ul.BSResponsivemenus a:hover{background:#000000;}
#BSResponsivemenu input,#BSResponsivemenu label{position:absolute;top:0;left:0;display:block}
#BSResponsivemenu input{z-index:4}
#BSResponsivemenu input:checked + label{color:white}
#BSResponsivemenu input:checked ~ ul{display:block}
}


Step 5 Now Find <div id='header-wrapper'> or <div id='outer-wrapper'> by Pressing Ctrl + F

Step 6 Paste the below code  after/below 

<div id='header-wrapper'> or <div id='outer-wrapper'>
------Other Code---------
<!--end header-wrapper-->
  >>Paste the below code here<<

<nav id='BSResponsivemenu'>
<input type='checkbox'/>
<label>&#8801;<span>Navigation</span></label>
<ul>
<li><a href='/' title="Home">Home</a></li>
<li><a href='#' title="Menu 1">Menu 1</a></li>
<li><a class='prett' href='#' title="Drop Menu">Drop Menu</a>
<ul class='BSResponsivemenus'>
<li><a href='#' title="Drop Menu1">Drop Menu 1</a></li>
<li><a href='#' title="Drop Menu2">Drop Menu 2</a></li>
<li><a href='#' title="Drop Menu3">Drop Menu 3</a></li>
</ul>
</li>
<li><a href='#' title="Menu 2">Menu 2</a></li>
<li><a class='prett' href='#' title="Drop Menu1">Drop Menu 1</a>
<ul class='BSResponsivemenus'>
<li><a href='#' title="Drop Menu 1">Drop Menu 1</a></li>
<li><a href='#' title="Drop Menu 2">Drop Menu 2</a></li>
<li><a href='#' title="Drop Menu 3">Drop Menu 3</a></li>
</ul>
</li>
</ul>
</nav>


Step 7  and finally Save the templates. 

Customization


  • Replace all # with Label URL
  • Change Menu text with Label name

Method 2

Step 1 Log in to your Blogger account and Go to your Blogger Dashboard

Step 2 Go to your Layout tab.

Step 3 Click on "Add a Gadget" then select "HTML/JavaScript" Gadget.

Step 4 Now Copy the all code from below and paste it in "HTML/JavaScript" Gadget and save it.

<style>
/*Responsive Menu by www.bloggerspice.com */
#BSResponsivemenu{background:#1a1a1a;color:#fefefe;height:35px;}
#BSResponsivemenu ul,#BSResponsivemenu li{margin:0;padding:0;list-style:none}
#BSResponsivemenu ul{height:35px}
#BSResponsivemenu li{float:left;display:inline;position:relative;font:bold 13px Arial;}
#BSResponsivemenu li a{color:#ccc}
#BSResponsivemenu a{display:block;line-height:35px;padding:0 14px;text-decoration:none;color:#fefefe;}
#BSResponsivemenu li:hover > a,#BSResponsivemenu li a:hover{color:#ffffff}
#BSResponsivemenu input{display:none;margin:0 0;padding:0 0;width:80px;height:35px;opacity:0;cursor:pointer}
#BSResponsivemenu label{font:bold 30px Arial;display:none;width:35px;height:36px;line-height:36px;text-align:center}
#BSResponsivemenu label span{font-size:13px;position:absolute;left:35px}
#BSResponsivemenu ul.BSResponsivemenus{height:auto;overflow:hidden;width:180px;background:#000000;position:absolute;z-index:99;display:none;border:1px solid #ccc;border-top:none;color:#fefefe}
#BSResponsivemenu ul.BSResponsivemenus a{color:#fefefe}
#BSResponsivemenu ul.BSResponsivemenus li{display:block;width:100%;font:12px Arial;text-transform:none;}
#BSResponsivemenu li:hover ul.BSResponsivemenus{display:block}
#BSResponsivemenu a.prett,#BSResponsivemenu a.trigger2{padding:0 27px 0 14px}
#BSResponsivemenu li:hover > a.prett,#BSResponsivemenu a.prett:hover{background:#000000;color:#fefefe}
#BSResponsivemenu a.prett::after{content:"";width:0;height:0;border-width:6px 5px;border-style:solid;border-color:#eee transparent transparent transparent;position:absolute;top:15px;right:9px}
#BSResponsivemenu ul.BSResponsivemenus a:hover{background:#1a1a1a;}
#BSResponsivemenu a.trigger2::after{content:"";width:0;height:0;border-width:5px 6px;border-style:solid;border-color:transparent transparent transparent #eee ;position:absolute;top:13px;right:9px}

@media screen and (max-width: 768px){
#BSResponsivemenu{position:relative}
#BSResponsivemenu ul{background:#838383;position:absolute;top:100%;right:0;left:0;z-index:3;height:auto;display:none;}
#BSResponsivemenu ul.BSResponsivemenus{width:100%;position:static;border:none}
#BSResponsivemenu li{display:block;float:none;width:auto;text-align:left}
#BSResponsivemenu li a{color:#000000}
#BSResponsivemenu li a:hover{color:#fefefe}
#BSResponsivemenu li:hover{background:#1a1a1a;color:#fefefe;}
#BSResponsivemenu li:hover > a.prett,#BSResponsivemenu a.prett:hover{background:#1a1a1a;color:#fefefe;}
#BSResponsivemenu ul.BSResponsivemenus a{background:#1a1a1a;}
#BSResponsivemenu ul.BSResponsivemenus a:hover{background:#000000;}
#BSResponsivemenu input,#BSResponsivemenu label{position:absolute;top:0;left:0;display:block}
#BSResponsivemenu input{z-index:4}
#BSResponsivemenu input:checked + label{color:white}
#BSResponsivemenu input:checked ~ ul{display:block}
}
</style>
<nav id='BSResponsivemenu'>
<input type='checkbox'/>
<label>&#8801;<span>Navigation</span></label>
<ul>
<li><a href='/' title="Home">Home</a></li>
<li><a href='#' title="Menu 1">Menu 1</a></li>
<li><a class='prett' href='#' title="Drop Menu">Drop Menu</a>
<ul class='BSResponsivemenus'>
<li><a href='#' title="Drop Menu1">Drop Menu 1</a></li>
<li><a href='#' title="Drop Menu2">Drop Menu 2</a></li>
<li><a href='#' title="Drop Menu3">Drop Menu 3</a></li>
</ul>
</li>
<li><a href='#' title="Menu 2">Menu 2</a></li>
<li><a class='prett' href='#' title="Drop Menu1">Drop Menu 1</a>
<ul class='BSResponsivemenus'>
<li><a href='#' title="Drop Menu 1">Drop Menu 1</a></li>
<li><a href='#' title="Drop Menu 2">Drop Menu 2</a></li>
<li><a href='#' title="Drop Menu 3">Drop Menu 3</a></li>
</ul>
</li>
</ul>
</nav>


Step 5 Place gadget below header. That�s it.

Customization


  • Replace all # with Label URL
  • change Menu text with Label name

If you feel any problem then feel free to leave a comment below. I will reply you as soon as possible. 

Google experimenting with Giant sponsored Banner Ads in their Search Results

Google ad

Google is becoming Excel in all online section and they are constantly experimenting with various ground. We have already got many Google�s outcomes of experiment which is completely unique and improved.

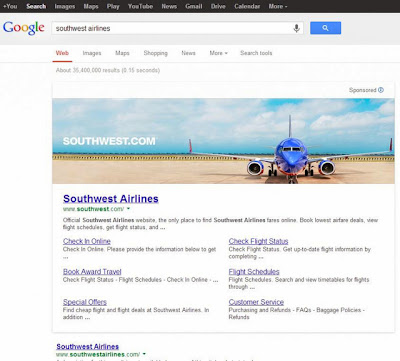
Recently Google is running a �small experiment� with enormous banner advertisements for queries that are associated with brands. A Digital marketing company whose name is Synrgy first discover sponsored ad when Google running this experiment on Southwest Airlines. Synrgy posted a photo on their Twitter page showing the huge sponsored banner that displayed after a search for "southwest airlines".We have seen Southwest Airlines ad takings up an ample portion of the search result page and no that page not any other ads appear.

You can see from screenshot below of search results page for the query about southwest airlines. You will be Notice the non-brand, standard AdWords text ads from CheapOair and Chase credit cards.

giant ads

Google is experiment on the search result cover photo added on Facebook which is followed by some top links on Southwest's official website.Google spokesperson confirmed"This is a very limited test in the US; one of many we run,�.

The main purpose of this giant banner ads to drive more traffic to the advertiser. It will work more wisely than traditional search ads. As a result advertiser will completely benefited when Google will finalize this experiment. Numerous advertise, large size Business company owners will be able to take advantage of that space with their own branded image that will take the user to their website page.

According to Google spoke person they are just in trial stage so if you test on search result to see the giant banner ads then you would not able to see it often. Because this type of results aren't too high just yet. 

Essential Codes For Samsung Mobile Device User's .

Here are some essenial code for samsung mobile to know about mobile details.
So,Now I wil introduced you some codes for you.Please,Save or Reserve all of these codes.
Sometimes we need to check some things for our mobile phone.But,We maximum of time we forget these code by how we can check.

Collect them now !
These are given below :


Software version: *#9999#
IMEI number: *#06#
Serial number: *#0001#
Battery status- Memory capacity : *#9998*246#
Debug screen: *#9998*324# � *#8999*324#
LCD kontrast: *#9998*523#
Vibration test: *#9998*842# � *#8999*842#
Alarm beeper � Ringtone test : *#9998*289# � *#8999*289#
Smiley: *#9125#
Software version: *#0837#
Display contrast: *#0523# � *#8999*523#
Battery info: *#0228# or *#8999*228#
Display storage capacity: *#8999*636#
Display SIM card information: *#8999*778#
Show date and alarm clock: *#8999*782#
The display during warning: *#8999*786#
Samsung hardware version: *#8999*837#
Show network information: *#8999*638#
Display received channel number and received intensity: *#8999*9266#
*#1111# S/W Version
*#1234# Firmware Version
*#2222# H/W Version
*#8999*8376263# All Versions Together
*#8999*8378# Test Menu
*#4777*8665# GPSR Tool
*#8999*523# LCD Brightness
*#8999*377# Error LOG Menu
*#8999*327# EEP Menu
*#8999*667# Debug Mode
*#92782# PhoneModel (Wap

Follow the footprint of Popular Blog to get secret tips

blogger

A new blogger�s dream to make his/her blog successful and make it popular within shortest period of time. But there hasn't any specific guidelines that you would be successful in your blogging careers. So the wise and effective way is to follow the footprint of popular blog to get secret tips. That means if you want to go in a specific distance by your car you have to know how to drive the car. I have summarize some points which can be follow to make a blog successful.

But before that we have to know which blog is popular? Obvious a blog which has got huge readers and fans, higher traffic flow as well as subscriber. From my point of view page rank doesn't mean the popularity. There are many blog with higher page rank doesn't receive big chunk of traffic. On the other hand, lower ranked or zero page ranked blog receiving huge traffic.

1. Branding Strategy

Branding doesn't suit in product only you can brand your blog or website. If you can produce quality tutorials and higher service to solve visitor�s problems then your blog or website will be branded. Most of the popular blog provide superior quality service and solutions to readers and grab them permanently. And they have successfully created a brand image in readers mind. Strong branding means mass reputation and authority in the blogosphere.

2. User friendly Design

By quality content many blogger failed to attract readers because of poor design. If your blog design is attractive then a visitors easily stay on your site for some time and if they feel interesting then they will converted in to loyal readers. Attractive design doesn't mean lots of animation and colors rather it means professionalism. Because a reader always want to learn from expert and skilled person, not from an amateur. Popular blog�s one of the major secret is they use professional design.

3. Quality of content

If goes without say that content is king. And maintaining good quality on blog posts easily able to hold readers. No one visits any site just for browsing rather they want to learn something new from your blog. So, the quality and unique content able to create deep impact on readers mind which is the main strategy of popular blog.

4. Strong Networking

Networking means to keep good relation with other blogger. Appreciate other works. If your network is strong you would get many help from skill blogger. As well as your blog will able to accumulate good reputation over the blogging niche. So connect with other blogger, make comments, share others posts that makes your network strong.

5. Control Bounce rate

Blog bounce rate is a critical issue which you have to control by all means. But it is not appropriate for all site. Suppose your blog is relates to Games live score where many visitors visit only to know the score only. So this kinds of blog get higher bounce because visitors stay only for 5 to 10 seconds. But in case of other blog bounce rate should be control. If you see that visitors are staying in your site at least for 2 or 3 minutes then you should assume that you are producing good content which is reading by your blog visitors. Most popular blog strongly control bounce rate.

tips

6. Smart promotion tactic

Blog promotion is very effective for all older and newer blog. You can advertise your blog for promoting but mostly we can do it through social media with free of cost. So spread your blog voice through popular social media site, blog directory, Forum answering etc.

7. Monetization strategy

Every blogger expect to earn money from their blog but if your blog is new then you shouldn't monetize early. After gaining a stable number of daily traffic then monetize your blog. Because a new blog with bulk advertisement banner visitors don�t like. Popular blog follow this strategy at their beginning of blogging career.

8. Guest posting

This is the most effective way to divert traffic from other blog. If you can produce quality guest post then there are a big chunk of traffic will divert into your blog. Many popular blog who has got higher page rank they have followed this strategy. And now converted those diverted traffic into loyal readers. But you must write higher quality content with fresh ideas.

9. Focus On Popular Blog

Focus is very important for new blogger. Because they don�t follow others what they are doing and how they are gaining traffic. You should focus on others blog more than on your blog. Follow what they are doing and what the latest blogging trend followed by popular blogger.

I hope those points will help you to follow the footprint of popular blog to get secret tips that you can apply into your blog and make it popular. From my point of view you can become a successful blog within 6 months. So follow others and become popular in your blogging niche. 

Adding tooltips or hover text to Blogger posts and gadgets

This article is about putting a "tooltip" (text that is shown when you hover over) into something (eg text, a web-address or even a picture) in a Blogger post or gadget.

What are tooltips?

Tooltips are a feature found in many websites and modern computer based software:  when a viewer hovers their mouse over an item, a small piece of text is shown, generally formatted in a box which is highlighted in some way.

They can be used for all sorts of things, to provide definitions of technical or foreign-language words, additional information about particularly interesting concepts - or as an incentive or invitation to take an action  eg you could tool-tip "click here to enter" with a description of the prize or benefits of entering.)

You can see them in Blogger's Post Editor when you put your mouse over an item in the toolbar.


But tool-tips can be used on other things too, including pictures and text: put your mouse over This Text to see one.

They can be particularly useful if you want to provide a translation for a few words from another language, or a definition for technical terms, but don't have enough to make a glossary worthwhile.


How to add a tool-tip in Blogger


Open the Post (etc) that you are working on.


Create the item that you want the tool-tip to be on (it may be text or a picture).


Select the item, and use the Link button on the toolbar to set up a link for it.  (Do this even if you don't want it to end up linked to anything - you can remove the link part alter on.)


Go into HTML mode (top right side of the editor toolbar), and find the HTML for the item.  
Hints:
  • Use the find feature in your brower - it may be helpful to temporarily put some marker text just before and after the item.
  • If you want to put a tooltip into a text gadget - just put the text into an HTML gadget instead, and that way you will be able to work in HTML mode.
  • The HTML for the item will have this sort of structure:
    <a href="Your Link" > Your item text ... </a>
    or it may be like this if your item is a picture:
    <img border="0" src="URL FOR YOUR PICTURE" style="margin-left: auto; margin-right: auto;" />
    or even like this if it's a picture that's linked:
    <a href="Your Link" img border="0" src="URL FOR YOUR PICTURE" style="margin-left: auto; margin-right: auto;" </a>


Add  title="YOUR HOVER TEXT" to the HTML, so it becomes something like:
<a href="Your Link" title="YOUR HOVER TEXT" > Your item text ... </a>
or, if the item is a picture:
<a href="Your Link" img border="0" src="URL FOR YOUR PICTURE" title="YOUR HOVER TEXT" style="margin-left: auto; margin-right: auto;" </a>


If you don't want the item to be linked, remove the href="Your Link"
part of the statement, so the HTML becomes similar to:
<a title="YOUR HOVER TEXT" > Your item text ... </a>
or, if the item is a picture:
< img border="0" src="URL FOR YOUR PICTURE" title="YOUR HOVER TEXT" style="margin-left: auto; margin-right: auto;" />


If you're working in the post-editor, return to Compose mode (top right of the Post Editor window), so that you aren't faced with HTML the next time you edit a post.


Formatting unlinked text that has tooltips.

If you put hover-text on words that aren't linked to anything, it's good to give them a different format so that readers know to mouse-over them to see the hover-text.    For example
When you visit Ireland, you will undoubtedly experience rain, ceol and great craic.

To do this:


1   Add this CSS rule to your blog's template  (See Adding a new CSS rule to your template if you need help with this):
.toolTippedText {
   border-bottom: 1px dotted red;
}

2   While editing your Post (etc) to add the hover-text, also add this class statement
class="toolTippedText" 
to every URL which has title="YOUR HOVER TEXT" added to it.  So the full statements become
<a href="Your Link" title="YOUR HOVER TEXT" class="toolTippedText"> Your item text ... </a>
or, if you don't want the text to actually be linked to anything:
<a title="YOUR HOVER TEXT" class="toolTippedText"> Your item text ... </a>

It probably doesn't make sense to add a font-decoration like this to tool-tipped images - though it can be done in exactly the same way.


If you don't like using red dots as the way to highlight text that has hover-text, there are other rules you can add to your template.  For example to get a solid underline in the same colour as the text font, use:
.toolTippedText {
 text-decoration:underline;
}

There is more information about some of the options for formatting a line in this article.


Related Articles:

Adding a new CSS rule to your template.

Adding a horizontal line between blog-posts - including CSS line formatting options

Using marker-text to find places in your HTML

Rich Blog Content publicizing through visual Aids

rich blog content

Huge article has written about ��content is king�� and all the blogger and webmaster emphasizing on this quote and stick to the idea. There are millions of blog and website already created and creating everyday this is just now over saturated of information. If you search a topic search engine will display thousands of content links to readers. But which link will be read by readers. Everybody providing same information under same topic. It differ little be in terms of description. So you are writing and publishing many article in your blog but getting only few readers. Some readers stick to your content for 10 to 20 seconds then stop reading, why this is happening? Do you think that you need to do something different to attract readers to stay with your article till the end?

In case of mine, first I read through the whole content if sounds interesting then go for bookmark. And what makes interesting to me? Obviously a post rich in images or videos because it is a most popular techniques to attract readers. Let�s find awesome techniques to create high quality blog content.

1. Relevant Blog Images

Importance of image will come first if you would like to write a high quality blog content. It will help to stay longer your readers. I believe that your written article is very standard but without image no one engage to read. Not only image help you to tailor your content but also it will good for optimization. Everyday millions of search query making on image search this will work fine if your image listed on higher in image search engine result page. That may lead to a good number of traffic diversion into your site.

blog image

On the other hand many social networking service has grown image basis, such as, Pinterest, Stumbleupon etc. where you can share your post. And high quality interesting image get priority among visitors on those social networking site. Ultimately your post images are playing vital role to divert and attract visitors.

2. Video Tutorial for Blog Post

You have written a critical article which is hard to explain sometime and only readers with technical knowledge can understand it. Suppose, your article is about a tutorial of any software then you must include video for better understanding. If you would able to make understand it to your readers then your readers will get connect with your site and may become loyal readers. And adding video in blog post makes your article standard and readers friendly.

video blog

Now the question is how we get the videos? If you are going to explain an entirely new subject then you must create by yourself, this is a best way to gain more exposure from readers. But there are huge video in YouTube which can be used by giving credit to the video owner.

After creating a video then just upload it to YouTube and make sure you are sociable about it. No doubt your readership will appreciate the effort. It is easier for readers to watch something rather reading while on travel or business.

There are also an SEO aspect of using videos on blog post that is tweaking video for search engines. However for tweak a video for search engine you have to edit Meta-data of the post. Meta-data means title, descriptions and data will be branded on YouTube and Google channels.

3. Infographics and content visualizations

The best visualizing tool is Infographics and content visualizations but both are little similar. Infographics can be used for alternative of text. If your article is about 1000 words long then Infographics can explain it by an image which is more attractive way. However inforgraphics are using to attract readers that appeal more visually.

infographics

Beside of Infographics, content visualization work great on online marketing tool belt. Content visualization is extremely efficient because it can explain complex or abstract ideas that are difficult to explain in written form.Content visualization will be successful if you can maintain simplicity and clarity.

This is best for bloggers who are trying to provide an evidence against something, or make a statement, and business owners can use it to make things easier to understand for clients.

4. GIFs and MEMEs for Animation and Fun

Most of the things are done by using CSS and HTML in blogging. Earlier Flash was popular in web to make some animation but it makes slower a site as a result popularity of flash diminished.  Now all the animation are creating by CSS. But in case of image we can use GIFs and MEMEs.

Using gif image in written blog content make it amazing. Still in different chat-room and social media are using GIF image to add some animation. GIF images are capable of adding an interesting visual appeal for a blog or website and to inspire and involve with the public.

MEMEs

Few people are familiar with MEMEs? It was introduce by 9gag (http://www.9gag.com/), and now there are so many funny Memes circulating over the net. MEMEs are appealing, funny and incredible to forget. For establishing a personal brand MEMEs are the best thing you could ever do. However you can�t use it in your blog content but MEMEs are the best way to interact with blog readers.


5. Digital Media Pod-casting

Concept of podcast is not clear to all some are thought that this is just an archive or old things. But a podcast is a multimedia digital file. You can upload your digital file to a portable player which is very useful because both video and audio are an excellent solution for people who like to nudge, travel a lot. Podcast work best for multimedia website or blog. After downloading from multimedia blog or site you can easily upload to any pod-casting platform like iTunes. Generally it will convert the digital file to original. So if your multimedia blog can provide more digital file then more visitors will attach with your site. Eventually that lead to a big chunk of traffic.

podcast

The techniques are above focus only on rich blog content publicizing through visual aids. By learning from this this article you would able to make your web-page more dynamic and flexible. Beside of this you can as slide share presentations, music player, Embedded Tweets and many other things to make your blog content rich.

Kategori

Kategori