Fix Author, name, datePublished, Modified error from Static Page

AMP page error

After introducing AMP (Accelerated Mobile Page) in most of the Blogger template we can see error. However to solve these issues various solution has already explored. But you might see error fixing from Blogger static page is rare. We have very limited guidelines to fix all the issues like Author, name, datePublished missing and required error and dateModified missing and recommended error from Blogger Static Page. Static page basically used for adding fixed content like About us page, Contact us page, different web tools pages etc. And we must fix error from those pages to make our Blogger template 100% error free.

As a result in Structured Data > hatom you might see error. I assume that you have fix all the error from your Blog page but you didn�t think about your Blog static page then still hatom error will display in Google search console.  Even I was trying to solve this issue and finally got the solution. I think I should share this secret solution with my Blog readers. It will greatly help to solve all errors from any static Blog page.

First we have to identify the error from our Blogger static pages. So just visit the below URL and test your any static page�s structured data.

  • https://developers.google.com/structured-data/testing-tool/
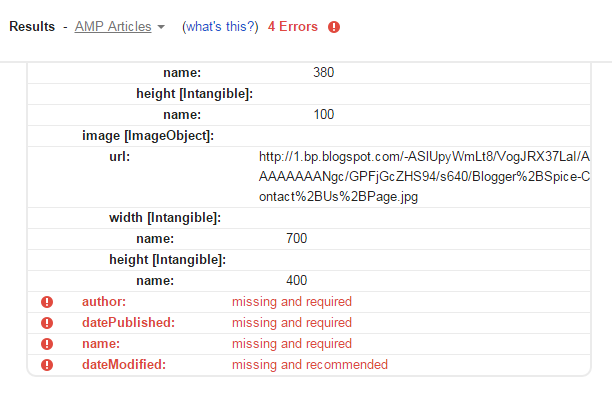
If there error exists then you will see errors like below screenshot.

AMP articles error

In the above image you can see Author, name, datePublished this 3 error which is missing and required but dateModified error missing and recommended, this means we must fix this issue. Whatever in this tutorial I will show you to fix all errors from Blogger static pages.

Step 1 Please visit https://www.blogger.com and Sign in to your Blogger account

Step 2 Now from Blogger Dashboard Click ->Template ->Edit HTML 

Step 3 And locate the script like below from your Blogger template
<article class='post hentry' itemprop='blogPost' itemscope='itemscope' itemtype='http://schema.org/BlogPosting'>

You will find this markup below of <b:includable id='post' var='post'> line. This part includes whole posts or contents of a Blogger site.

Step 4 Now copy the below schema markup code and paste it below of <article class='post hentry' itemprop='blogPost' itemscope='itemscope' itemtype='http://schema.org/BlogPosting'>

<b:if cond='data:blog.pageType == &quot;static_page&quot;'>
<div class='post-meta' style='display:none;'>
<a class='updated' expr:href='data:post.url' rel='bookmark' title='permanent link'><abbr class='published' expr:title='data:post.timestampISO8601' itemprop='datePublished dateModified'> <data:post.timestamp/></abbr></a>
<span class='fn' itemprop='author' itemscope='itemscope' itemtype='http://schema.org/Person'>
<meta expr:content='data:post.authorProfileUrl' itemprop='url'/>
<a class='g-profile' expr:href='data:post.authorProfileUrl' rel='author' title='author profile'>
<span itemprop='name'><data:post.author/></span>
</a>
</span>
</div>
</b:if>

Step 5 Now click on Save template button.

In the above script I have used a conditional tag for static page, thus the script display only on Blogger static pages.  And also used a simple CSS code to hide the whole script, as a result search engine will get information about your Blog�s static pages but page visitors won�t able to see this. So you don�t need to worry about static page design.

Google didn�t provide any specific solution to solve the static page error but by applying this trick we can easily solve issues from our Blogger static pages.

Amp articles error fixed
Now check your Blogger static page on Google structured data markup testing tool and see all error has gone and displaying green signal. Congratulation you have successfully have solved and fixed all errors from your Blogger static pages. For any further help regarding this issue, please feel free to write me. Thank you. 

An update on Google Blogger�s Live on Blog Preview

Live on Blog

Google is making their platform up to date. As a result they have brought different changes on entire Blogger platform. Now Blogger support many advance coding which was to usable in past. However I love most its script minifying feature. Now we can code any widget more easiest way.

Whatever, from the beginning of Blogger�s journey Google has brought many changes on their dashboard and made it more users friendly. And yesterday I have seen significant changes on Live on Blog section. But this will not affect our Blog and not very important but it will give a fresh look to the older users and new users will attract to see this. Moreover, this has spice up blogger dashboard and help to do blogging more fun way. 

Generally in this section we see the preview after uploading a Blogger template. But most of the cases the template preview box was view able perfectly. Because we could able to see only upper part of our Blogger template.

But after making changes now we can see almost 50% of our Blogger template both in Desktop and mobile preview.

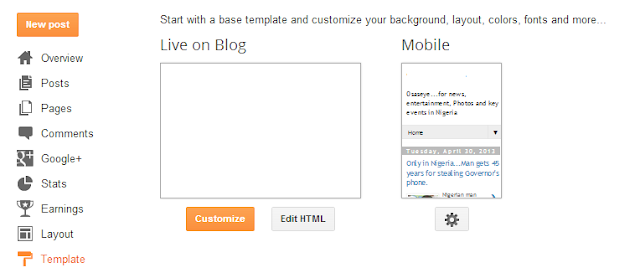
You will see the difference from below screen shots. Formerly the preview box was very small. And template format was not good in Live on Blog preview section.

Blogger template preview

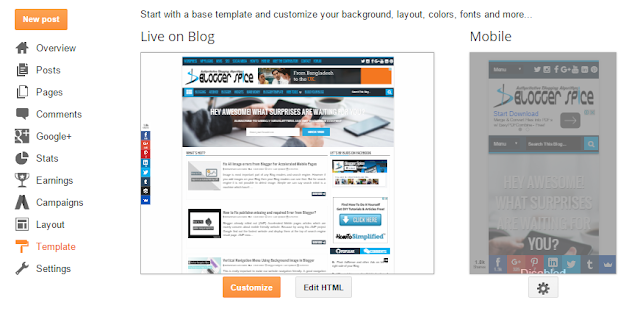
 But now we can view the template perfectly with well format.

Live on Blog new style

To see this preview just follow the below steps-

Step 1 Go to http://blogger.com/ and Sign in to your Blogger account.

Step 2 From Blogger Dashboard Click on Template

Now you would able to see the new looks of your template preview. Isn�t great? I just love it. I think the concept has taken from WordPress dashboard but brought little changes.

Google is trying to grab the new users by changing their looks and by updating the platform time to time. I appreciate this kind of change. However this news also not very important but for spreading the news I have written this short note. Lol.

Wish you best of luck and happy journey on your Blogging career with Google Blogger. Thank you.

Fix All Image errors From Blogger For Accelerated Mobile Pages

blogger template image error

Image is most important part of any Blog readers and search engine. However if you add images on your Blog then your Blog readers can see that. But for search engine it is not possible to detect image. Simple we can say search robot is a machine which hasn�t capability to detect image.

But almost all major search engines developed a common language for search machine to understand the all property of your Website. For example if you add post title then you must denote it by adding an attribute that this is your content�s post tile. Similarly in case of image you must declare to search engine that this is an image. And after declaration search engine will get additional information from your Blog about image object.  So in this article I will show you how to solve the image error from your Blogger template to have them prominently served to desktop and mobile users.

First you should aware about image error on your site. For diagnosing the error you must use any structured data testing tool, I always use Google structured data testing tool for finding any kinds of error on my Blogger template.  Just visit the below URL and by click on Fetch URL test your Blog site.
  • https://developers.google.com/structured-data/testing-tool/
In case of image error you will see 2 types of error. Image is missing and required error and second is image error under Accelerated Mobile Pages (AMP). I will show you to solve the both error from your Blogger template.

How to solve image: Missing and Required Error from Blogger Template?

This is general error this is happen due to wrong indication of Blog post image. Formerly in almost all Blogger template used image_url attribute for declaring image for search engine. But after introducing the schema.org markup image_url attribute become invalid. Now if you test your website then you would see image: missing and required error. Because blog page contains property image_urlwhich is not part of the schema.org. but we can solve this very easily. Just follow the below steps-

Step 1 Go to https://www.blogger.com and Sign in to your account

Step 2 From Blogger Dashboard click on ->Template ->Edit HTML 

Step 3 And locate all image_url by pressing Ctrl+F (Windows) or CMD+F (Mac)

Step 4 Simply replace all image_url with image.

Step 5 Finally click Save template button.

Now you would see all image: missing and required error has gone. But still images are showing with red alert. What�s the reason behind this?

This is happening for AMP article�s error. And for solving this error we have to add extra piece of script. I will discuss it below.

How to solve image Error from AMP article?

AMP used to serve mobile users outstanding way. Under AMP you must indicate and give details information about image and its dimension. Don�t worry I will show you how to do it?

Step 1 Visit https://www.blogger.com and Sign in to your account

Step 2 From Blogger Dashboard click on ->Template ->Edit HTML 

Step 3 And locate script like below from your Blogger template

<article class='post hentry' itemprop='blogPost' itemscope='itemscope' itemtype='http://schema.org/BlogPosting'>

You will find this markup below of <b:includable id='post' var='post'> line.

Step 4 Now copy the below schema markup code and paste it below of <article class='post hentry' itemprop='blogPost' itemscope='itemscope' itemtype='http://schema.org/BlogPosting'>code.

<b:if cond='data:post.firstImageUrl'>
<div itemprop='image' itemscope='itemscope' itemtype='https://schema.org/ImageObject'>
<meta expr:content='data:post.firstImageUrl' itemprop='url'/>
<meta content='700' itemprop='width'/>
<meta content='400' itemprop='height'/>
</div>
</b:if>

Customization

  • Please change the 700 and 400 with any image dimension. Google recommend is 800px X 800px. In case of my template all first image dimension is 700px width and 400px height.As a result this will give additional information to search robot that my entire blog�s first image dimension is 700px X 400px.
Step 5 Now click on Save template button from top right corner of the screen.

Now check your Blogger template by visiting https://developers.google.com/structured-data/testing-tool/URL. Now see all image error has gone from your template.

I hope this problem solving article will help you to make your template error free. If you face any trouble to apply this markup then please write in comment section. And if you have any alternative ideas then please share with me. Thank you. Happy Blogging!!!

How to Fix publisher:missing and required Error from Blogger?

Blogger SEO

Blogger already rolled out (AMP) Accelerated Mobile pages articles which are mainly concern about mobile friendly website. Because by using this AMP project Google find out the fastest website and display them at the top of search engine result page.

AMP measure a site�s performance by several attributes. And among them Publisher is very important attribute. Through this attribute search robot can understand who the publisher of a website is?
Generally publisher is not the author or admin. You may think you are publishing articles so you are publisher. This is absolutely wrong. Because you are the author or admin of your site but the publisher is your Site. For example, in my site
  • Author: Mohammad Fazle Rabbi
  • Publisher : Blogger Spice
Publisher is an item of https://schema.org/Organization. Two things are different from each other. Recently you will see publisher error in most of the Blogger template or WordPress theme. For finding the error you must use any structured data testing tool, just visit the below URL and by click on Fetch URL test your Blog site.
  • https://developers.google.com/structured-data/testing-tool/
If your Blogger template has this error then you will see publisher:missing and required in red color text like below image.
AMP articles error

This means search engine can�t understand who is the publisher of your site? If you add the attribute with author then it won�t help you to solve the issue. So in this tutorial I will show you how exactly we can fix this error?


However remember that Google hasn�t provided any specific guidelines to fix error. So we can solve this issue in different way. For this reason I am sharing the solution which one I have used in my Blogger template to solve the issue.

Step 1 Go to https://www.blogger.com and Sign in to your account

Step 2 From Blogger Dashboard click on ->Template ->Edit HTML 

Step 3 And locate script like below from your Blogger template
<article class='post hentry' itemprop='blogPost' itemscope='itemscope' itemtype='http://schema.org/BlogPosting'>
Generally this markup remain below <b:includable id='post' var='post'> line.

Step 4 Now copy the below schema markup code and paste it below of <article class='post hentry' itemprop='blogPost' itemscope='itemscope' itemtype='http://schema.org/BlogPosting'>code.

<div itemprop='publisher' itemscope='' itemtype='https://schema.org/Organization'>
<div itemprop='logo' itemscope='' itemtype='https://schema.org/ImageObject' style='display:none;'>
<img src='Your Logo URL Here'/>
<meta content='Your Logo URL Here' itemprop='url'/>
<meta content='380' itemprop='width'/>
<meta content='100' itemprop='height'/>
</div>
<meta expr:content='data:blog.title' itemprop='name'/>
</div>

Customization

  • Please replace Your Logo URL Here with your logo image URL.
  • And alter the Logo Image width 380 and height 100. I have added this dimension because my logo Image URL size is 380px X 100px. Your Logo size may be different so first measure the dimension by using any photo editing software and then alter the dimension width and height. Google required 600px X 600px size publisher Logo.
Step 5 Now click on Save template button from top right corner of the screen.

Now it�s time to test the site to see the publisher attribute. If Error is still remaining then it will show red alert. If not then you will see the result like below image.
publisher error fixed

Congratulation you have successfully fixed the publisher error. Publisher scripts for AMP articles we have place it inside Blog post. But we are using image object (Logo image) for our publisher identity for search engine, as a result image will be visible inside our Blog post. But don�t worry, in this script I have added a CSS code thus image object remain hidden inside Blog post body. Thanks for reading and following my guidelines. If you are facing any trouble for fixing the error then feel free to write me.

Vertical Navigation Menu Using Background Image in Blogger

navigation friendly

This is really important to make our website navigation friendly. A good navigation affects the site�s page view, Income and Branding. You may think how income is related? While you are applying for AdSense then you might see AdSense decline reason your site hasn�t any clear and user friendly navigation system. So we should emphasize on it to get approval from AdSense by adding user friendly navigation.

I have seen many WordPress websites that has integrated vertical navigation with beautiful image background. This is not only helped to make your site navigation friendly but also this will create a brand image on viewers mind.


But vertical navigation has some limitations, such as; you won�t able to add many label or categories at a time, because it occupies large steps. If your template is not fast to load then it will also affect the loading time. So I think these types of vertical menu should be added on a faster loading website.

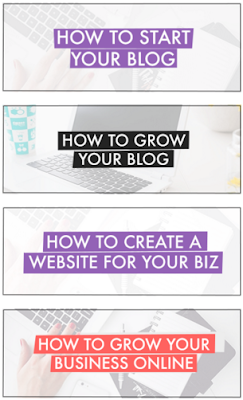
For example purpose I have added the images from a Wordpress site. But you have to create the image by using any Photo Editing software like Photoshop.


vertical menu

Best image dimension for vertical navigation menu is 400px X 150px but you can also create 300px width and 150px height.  So create the image first and upload it in your Blogger static page or in any other image hosting site like Photobucket, tinypic etc.


I guess that you have created image and uploaded in an image hosting site. And now proceed to the next level to integrate the vertical menu in your website�s sidebar.

Step 1 Log in to your Blogger Account and Go to your Blogger Dashboard

Step 2 Go to Blogger Layout section.

Step 3 Click on Add a Gadget then select HTML/JavaScript Gadget.

Step 4 Leave the Title field blank or write any desired title whatever you would like.

Step 5 And copy the script from below and paste the widget code in HTML/JavaScript Gadget and press the Save arrangement button from the top.

<style>
.vmenubox {
width:85%;
clear:both;
display:block;
float:left;
padding:20px 30px;
margin:0
}
.vmenubox {
overflow:hidden
}

@media only screen and (max-width: 1140px){
.vmenubox {
width: 86%;
}
}
@media only screen and (max-width: 1030px){
.vmenubox {
width: 82% !important;
}
}
@media only screen and (max-width:767px){
.vmenubox {
width: 80% !important;
}

</style>

<div class="vmenubox">
<center>
<p><a href="Label URL Here"><img src="Image URL Here" alt="Image Alt Title"></a></p>
</center>
</div>

Customization


  • Please replace the Label URL Herewith your label or category�s URL.
  • Please alter Image URL Herewith hosted image URL.
  • And replace Image Alt Titlewith image title. This will help to index image in image search engine.
Now check your Blogger site and see cool vertical navigation menu with background. Though I have added responsive Code so this widget will able to adopt any size according to device dimension. I think your blog readers will mainly focus on your menu if you can make a beautiful image for vertical menu. If you face any trouble then feel free to leave a comment below. Thank you.

How To Change Keyboard Settings & Type Marathi / Hindi or Any Language in Windows without Any Software [Tutorial]

Have you ever wanted to be able to type on the computer in multiple languages; then you are at right place. Learn to change keyboard language & type Marathi language or any preferred language in all type of Windows Operating Systems. There is no need to install third party software. The input language is a setting in Windows that controls the language you use to type information on your computer. You just need to change keyboard settings, enable inbuilt keyboard layout driver from control panel. Set up Windows so you can type any language. Moreover, you can make it easier to enter text or edit documents in multiple languages by changing the input language. Windows offers almost any language you needed for like Chinese, Japanese, Korean, Arabic, Hindi, Tamil, Telugu, Punjabi, Kannada, Bengali, Urdu, Gujarati, Malayalam, Odia or many more... So just look for your preferred language and make setting according to that. You just need to change Keyboard Language in Windows. Here's how to type any language in Windows without any software.
How To Type Marathi in Windows [Tutorial]
In previous article we have seen how to share PC Internet over WiFi for FREE, but today we are going to see new tutorial to find inbuilt Windows feature about changing keyboard language to any language, where you can use any local language for writing purpose. But as topic, we are going to find Marathi today...

Change your input language & Type Marathi/Any Language in Windows

  1. Go to Control Panel
  2. Find and open Region and Language
  3. Go to Keyboards and Languages tab
  4. Click on Change Keyboards
  5. New Window will open, Text Services and Input Languages
  6. Don't change Default input language, and below that, you will see Installed services
  7. Click Add, then select the language to add using the check-boxes
  8. Now find Marathi in list, open its lists and choose Keyboard >> Marathi.
  9. Click Apply and then Ok for remaining Windows.
  10. Goto Wordpad tool, use shortcut Left Alt+ Left Shift, your language is now changed to Marathi.

That's one of the easiest tutorials to type in any language in ONE CLICK. If you have any suggestions then let us know via comments.. We would love to add it directly on this page..

Social Tags: #Windows #Tut #Tutorial #HowTo #Marathi #Hindi #Kannada #Punjabi

How to use your own icons in Google My Maps

This article shows how to use your own icons to label places in maps that you make with the My Maps' feature in  Google Maps.


My Maps is a tool provided by Google Maps that lets you make a map showing a specific collection of places.

Why is this helpful?   Well, you can search for a collection of places in regular Google Maps, and share the maps you can see - but if you do this, other people will see different places that are marked on the version of the maps that Google shows them, not the same as the places that are marked for you.    To guarantee what set of places other people see, you need to make a map in My Maps, and then you can share this specific map.

My Maps provides a standard set of icons that can be used for labelling places - and these days it's a pretty impressive standard set.   But it still doesn't include numbers, letters or other labels - and the icons provided may not be styled the way you would like.

Luckily Google have provided a way for you to use any icon to label points on a map you make.


How to use your own custom icon in a My Maps map

Make your map, and add the place(s) you would like to attach a custom icon to.

In the bar on the left hand side, hover your mouse over a place-marker which you want to assign a specific icon to.   

The line for that item will highlight slightly, and a small colour / paint-tipping icon appear will to the right of the place description, like this:


Click on the paint-tipping / colour icon

This opens a small hover-window, where you can choose the colour or icon shape.


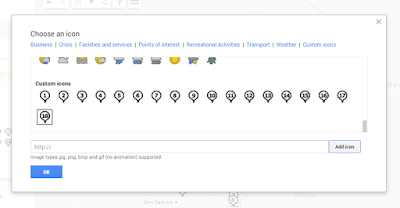
Click the button at the bottom labelled More Icons.

On the pop-up that opens, you are able to select an icon from one of the categories available (currently Business, Crisis, Facilities and services, Points of interest, Recreational Activities, Transport, and  Weather).   Don't select any of these.


Instead, at the bottom of the screen, enter in the URL (ie website address) of a  file that you want to use as a marker.  (.jpg  .png  .bmp, and .gif   files can all be used).

Click Add Icon.

This adds the picture that you linked to the list of items available under Custom Icons, and selects it.


Click Ok to apply this icon to the point-marker that is being edited.


Job done!   Your map now has a marker that is made from your own image.


Things to be aware of / Troubleshooting

  • You need to load the image file to a file-host which handles picture files yourself:   there is no option to load a file directly from the More Icons tab.
  • The image file needs to stay, unchanged, in the place where you linked to - and that place has to be available to anyone who might look at the map: if you are sharing the map with "anyone in the world" then the markers need to be available like that, too.
  • The image file should be small to speed up loading time:   images in the set of markers I use are approx 2k each.
  • Markers will be displayed in the same small size as Google's markers, ie 32x32 pixels:   there's no point using a large, detailed photograph if it will shrunk down to so tiny that the details can't be seen.
  • You must provide the actual URL of the picture you want to use as a marker, not the Google Photos shareable link.   (Because the latter includes more than just the photo).
  • I don't know any way to bulk-load many custom icons into a My Maps map at the same time.   (There was a way to do this in the old Google Custom Maps, but this doesn't work in My Maps.)    Or to make one icon available to many / all your your My Maps at once.   If you have a solution for this, please leave a comment below.
  • If you your icon background to be transparent, then you need to create it in RGB colour mode: Icons with a transparent background created in Indexed colour mode don't work.


Related Articles

File hosts:  places used to store pictures used in Blogger

Hosting pictures outside of Google Photos / Picasa Web Albums

How to get shareable links to Google Photos

How I Have Branded My Feedburner Email For Feed Subscriber?

google feedburner

Blogger Platform users use only Feedburner to syndicate the entire content of your Blog. But blogger has full control over Feedburner that how much portion of an article they will syndicate? But Feedburner hasn�t much attractive feature to attract subscribers. In this tutorial I will share with your some subtle unused features that remain unused by Feedburner users.

After subscribe to a feed your blog subscriber will start receiving email from Feedburner. But the outlook of that email is very dull. But I have used a simple feature of Feedburner for branding my email for feed subscriber. This technique will help you to brand your email for your feed subscriber. Before branding the email let�s see my Feed email that is receiving my feed subscriber.

email from Feed

I have added custom Email subject, added my Blog Logo and customize the Email title and Font. Altogether that made my email unique and has given different looks.

Step 1 Please visit http://feedburner.google.com/fb/a/myfeedsand enter into your feed (in case of multiple sites included under one feedburner account).

Step 2 Now go to Publicize tab from Feedburner dashboard and select Email Subscriptions from left vertical menu. Generally Email Subscriptions offer feed updates via email.

Step 3 Under Email Subscriptions more options will expend. Now let me explain one by one.

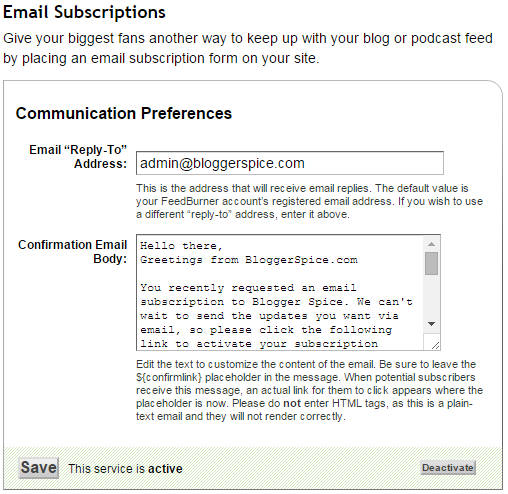
  • Subscription Management- Here you will get the Feedburner email subscription form code.  This can be used in your Blog directly. In addition you can see all subscriber information such as, their email address, subscription status active or Unverified. If you wish to transfer all your email subscriber email address to another third-party email newsletter service provider then Export the CSV file and upload it in other service provider. For example, if you wish to use Mailchimp but formerly using Feedburner then you can export the CSV file from Feedburner and upload it in Mailchimp.
email subscriptions
  • Communication Preferences �This feature will enable Feedburner users to add the email where they will receive notification. You can change it any time. But for branding our Email we will change the Confirmation Email body. There you will find system default email, and after subscribing to your Blog feed this email will automatically delivered to subscriber�s email address for confirmation. So simply change it with your own words to make it meaningful.
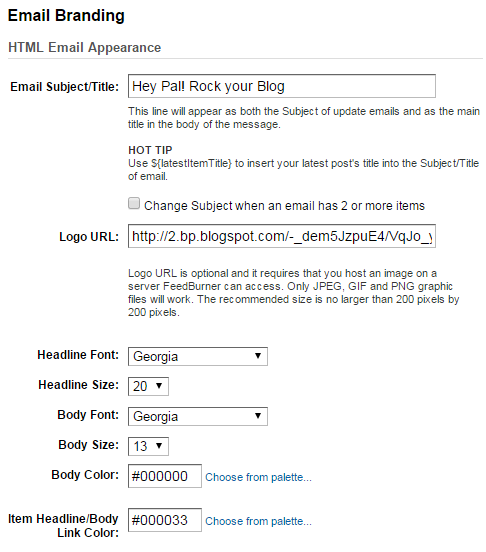
email branding
  • Email Branding � Feedburner has a smart feature to branding your email. Under Email Branding remove the old Email Title and add a Rocking title, thus subscriber will feel interest to open your email and reed. However if you wish you can use your latest post title by inserting ${latestItemTitle} into the Subject/Title of email.Next add your Blog Logo to branding your email. Logo is the main identity of a website. After subscription readers may forget your site. But if you use logo on your Blog then it will display at the top right of your email body. And subscriber will easily understand and recognize your site.Now it�s time to customize your Feedburner email headline Font, text and Link color. You will see all options there and change it according to your own way. After making necessary changes click Save button from below.
delivery options
  • Delivery Options � This is very important part of any email subscription service provider. Because if subscriber receive email constantly then they may feel annoyed and unsubscribe from your Email subscription list. So you must select a schedule email delivery time thus only one time in a day email will delivered to your subscriber. Use Select Timezone and Schedule Email Delivery option to adjust the email delivery time. After making necessary changes click Save button from below.
This is all about branding a Feedburner email. I have adopted this technique to brand my Feedburner email and got positive result in email subscription. I hope now you will now brand your Feedburner email that will help to increase your feed subscriber�s engagement with your Blog. 

Making someone an author on your blog

This article shows you how to set up another person (ie another Google account) as an author for your blog.

Google, Blog-Authors and Blogger

Setting someone up as an "author" in Blogger is one way that you can let other people post to your blog.

It's easy to do: you tell blogger to create an invitation, which sends the person an email saying you would like to be an author, they click a link in the email and then sign in with a Google account to accept the invitation. And once it is done, the person can write and edit their own posts.
All you need to know is the person's email address: it doesn't matter if it's a gmail address or not.  You can send invitations to people with hotmail, yahoo, and indeed any email address where your invitee can read their email.

 However the other person will need to use a Google account (which doesn't necessarily include Gmail) to accept the invitation: don't waste time inviting people who are allergic to Google and not willing to sign up for an account.


How to make someone an author on your blog

Send them an invitation:
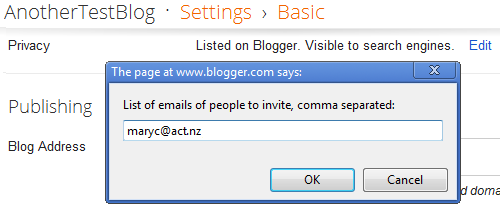
  • Go to Settings > Basic > Permissions
  • Beside Blog Authors, click + Add Authors
  • Enter the email address of the person you want to invite
  • Click Ok


A few minutes later, the email address that you sent to receives an email invitation, like this, from no-reply@google.com:
-------- Original Message --------
Subject: You have been invited to contribute to AnotherTestBlog
Date: Tue, 06 Dec 2011 20:47:45 +0000
From:   THE NAME OF FROM YOUR BLOGGER PROFILE 
To: maryc@act.nz

The Blogger user Mary has invited you to contribute to the blog: AnotherTestBlog.

To contribute to this blog, visit:
http://www.blogger.com/i.g?inviteID=468-GEEKY-LOOKING-CODE-973&blogID=31-GEEKY-LOOKING-CODE-83

You'll need to sign in with a Google Account to confirm the invitation and start posting to this blog. If you don't have a Google Account yet, we'll show you how to get one in minutes.

To learn more about Blogger and starting your own free blog visit http://www.blogger.com.


When the person who gets the email clicks on the link, they are taken to Blogger, and asked to sign in

Once they have clicked the link and sign in, the Google account that they log in with has "author rights" to your blog (just the one you invited them to, not any others you've made).

The person does not need to have a gmail or Google account for you to invite them to be an author - but they will need to sign in using a Google account (new or existing) to accept the invitation.


What you will see

Once the person has accepted the invitation, the Google account name (which looks like an email address) that they use to accept it is shown as an author on the permissions tab (the one that you went to to invite them to be an author):


If they accept the invitation by signing to Google in with a different email address than the one you invited, you will get a message telling you about this. It says
-------- Original Message --------
Subject: Your invitation was accepted using a different email address
Date: Tue, 06 Dec 2011 22:51:33 +0000
From: Blogger
To: YOUR-EMAIL-ADDRESS

Your invitation for THE-EMAIL-ADDRESS-YOU-INVITED for your private blog "AnotherTestBlog" has been accepted, but using a different email address. It has been accepted by THE-ACCEPTING-EMAIL ADDRESS.

If your invitation has been accepted by someone you do not know or did not intend to invite, please visit the Permissions tab of your blog where you can choose to revoke access.

Thanks,
 The Blogger Team


What your new author will see

When your new author logs in to Blogger.com - using the Google account they accepted your invitation with - they see a regular Blogger dashboard, except that they only have access to a limited range of functions:


An author can:

  • Create a post,
  • Edit the date for posts they have made
  • Turn comments of for posts they can edit (provided the default setting is On)
  • Edit a post that they made
  • Add a mobile device so they can post using SMS/MMS - (this may only work in certain countries)
  • Set themselves up to post using email (the mail2Post feature) - note that their "secret words" address is different to yours - and that an author could use this feature to let anyone else post from their account.
  • Remove themselves as an author


An author cannot:

  • Edit posts made by other authors or administrators
  • Change the template, layout or gadgets
  • Change the blog's URL, title or description
  • Set up for any email address to receive comment-moderation alert messages
  • Moderate comments (even about their own posts), or change the global comments settings
  • Edit any of the blog's Pages
  • See the blog's statistics
  • Install AdSense into the blog (although they can put ad-units of their own inside their own posts)
  • Give other people permission to write on the blog - except by sharing their own mail2Post "secret words" address.
  • Change the default language and date/time settings for the blog
  • Alter the RSS feed settings in any way
  • Set up Google Analytics for the blog
  • Edit the Adult-content warning setting, or the blog's Open-ID URL.


Troubleshooting

Be sure your transfer works

If you are accepting the invitation yourself (eg you are transferring the blog to another Google account that you control), then make sure that you either
  • [Recommended]: use a different browser for each Google account, or
  • Each time you need to change Google accounts, log out of the present account, clear your cache and re-start your browser.

Make sure the emails arrive

We sometimes see questions in Blogger Help Forum from people who say that they sent invitations, but the email message was never received.

The most common solution is that the author-to-be needs to check their spam folder - very often that's where the messages have gone.  If that doesn't work:
  • Try sending the person an email address from your regular email account - so you know if there's a  problem with their email.
  • Cancel the invitation (there's a link in the Invitation screen), wait a few minutes and try again.
  • Try sending an invitation to a different email address that you control, and forwarding that message (without clicking the accept link) to the person.yourself.

If none of this helps, post a question in Blogger Help Forum: tell us your blog's URL, and exactly what options you have tried.


More things to think about

As well as giving the person rights, you may also need to work with them to make sure they understand how you use certain features in Blogger:
  • What policies do you have for responding to comments - Who is notified about comments left about their posts?  What guidelines are followed about complaints?  How do you deal with spam and abuse - and what do you regard as abuse?
  • How do you organise pictures, and other external files that your blog uses?
    I always upload pictures to Picasa-web-albums outside of Blogger, LINK so I can control the picture size/resolution. If you do this, you need to make sure that your new author knows where to file their pictures.
  • Have you got a place where you keep policies, documetation, ideas for new posts, etc (eg I use a separate documentation blog for this) - does your new author need access to this?


What next?

Giving someone administrator access to your blog.


Related Articles

Understanding Google accounts

Putting AdSense ads into your posts

How to put posts into your blog's pages

Why RSS / Subscribe to Posts matters for your blog

Your blog and the so-called-social networks:  Facebook, Twitter, eg al

Putting pictures onto your blog

Advertising and your blog, some things to consider

Perk up Post Engagement by CSS Message Highlighter

highlighting notification text

We all know that post or content is the king of any Blog. If you have more quality content then there is a chance to keep readers engaged with your Blog. But most of us we write bigger content with monotonous design. For making a ideal content you must use graphics, quotes, test highlighter and more importantly splitting the large article into small paragraph. This gives your article a fresh looks and readers don�t feel annoying to read large article.

While writing a Blog posts then we often use different messages such as updates, alert, notification, information, warning, error etc. But we don�t use any message highlighter; as a result readers don�t notice or give any special attention on your messages. So we need to pay special attention to develop those message highlighters.

Live Demo

By adding separate color and text we can make it more eye-catching for our Blog readers. And they will love to read your content with full energy. For this reason I am going to share sets of notification message highlighter to spice up you�re your content and you will able to perk up post engagement by 30% more. Trust me!


CSS3 text highlighter

Step 1 Log in to your Blogger Account and Go to your Blogger Dashboard

Step 2 Click on -> Template -> Edit HTML->

Step 3
 Now find the ]]></b:skin> by pressing Ctrl+F (Windows) or CMD+F (Mac)

Step 4 Copy the script from below and Paste it above/before ]]></b:skin>

/* Notification Message Highlighter by http://www.bloggerspice.com */
.bstext{color:#FFF;margin-bottom:15px;border-radius:3px;padding:10px}
.bssuccess{background-color:#AA5CB8}
.bsalert{background-color:#5BA5DE}
.bswarning{background-color:#C619CC}
.bsupdate{background-color:#1D89E5}
.bsinfo{background-color:#18A8AA}
.bserror{background-color:#d9534f}
.headertext{font-size:16px;background-color:rgba(0,0,0,0.30);padding:8px 10px;margin:-10px;margin-bottom:10px}
.headertext > .fa{margin-right:5px}
.bloggerspice {overflow: hidden;}

Step 5 Now again find the </head> by pressing Ctrl+F (Windows) or CMD+F (Mac)

Step 6 Copy the script from below and Paste it above/before </head> 

<link href='//netdna.bootstrapcdn.com/font-awesome/4.5.0/css/font-awesome.min.css' rel='stylesheet'/>

Step 7 hit the Save templatebutton from the top.

You have successfully added CSS script now go for HTML script. 

Highlighting the Notification Message

After implementing the CSS script now we have to add HTML script for highlighting the specific text. In Blogger we can do it by switching the Blog Post writing editor into HTML view.

Step 1 Log in to your Blogger Account and Go to your Blogger Dashboard

Step 2 Click the New Post button from the top.

Step 3 Now from post editor click on HTML button.

Step 4 And Copy any script from below and Paste it there.

update message box


<div class="bloggerspice bsupdate bstext" icon="info-circle" title="Update message">
<div class="message-wrapper">
<div class="headertext">
<i class="fa bloggerspice-icon fa-bullhorn"></i>Update message</div>
This is a Sample Message for Update Box.</div>
</div>


alert message box

<div class="bloggerspice bsalert bstext" icon="info-circle" title="Alert message">
<div class="message-wrapper">
<div class="headertext">
<i class="fa bloggerspice-icon fa-cut"></i>Alert message</div>
This is a Sample Message for Alert Box. </div>
</div>

success message box


<div class="bloggerspice bssuccess bstext" icon="check-circle" title="Success message">
<div class="message-wrapper">
<div class="headertext">
<i class="fa bloggerspice-icon fa-check-circle"></i>Success message</div>
This is a Sample Message for Success Box. </div>
</div>


warning message box

<div class="bloggerspice bswarning bstext" icon="exclamation-triangle" title="Warning message">
<div class="message-wrapper">
<div class="headertext">
<i class="fa bloggerspice-icon fa-exclamation-triangle"></i>Warning message</div>
This is a Sample Message for Warning Box. </div>
</div>

info message box


<div class="bloggerspice bsinfo bstext" icon="info-circle" title="Info message">
<div class="message-wrapper">
<div class="headertext">
<i class="fa bloggerspice-icon fa-info-circle"></i>Info message</div>
This is a Sample Message for Info Box. </div>
</div>


error message box


<div class="bloggerspice bserror bstext" icon="exclamation-circle" title="Error message">
<div class="message-wrapper">
<div class="headertext">
<i class="fa bloggerspice-icon fa-exclamation-circle"></i>Error message</div>
This is a Sample Message for Error Box. </div>
</div>

Customization

  • Please replace the text with your notification message.  
Step 5 Finally hit the Publishbutton to publish your article.

Now check your Blog post and see beautiful notification message highlighter box. I am sure this will help to perk up post engagement and you will notice that soon. Thank you. 

Kategori

Kategori