Grow Your Pinterest and Instagram Following faster By MiloTree

Grow Your Pinterest and Instagram Following faster By MiloTree

Blogger always keep busy to grow their website traffic and social media page. Social Media site plays a significant role to influence readers. Maybe you don�t have much traffic in your Blog but there are huge traffic visiting various social media sites. So we can optimize our social media sites to increase traffic flow in your website. Most of the Blogger use only Facebook to grow their traffic and divert traffic. But after certain period of time you would see facebook is dying and bringing very few traffic on your site until you pay for advertisement. If you have taken facebook your only social media traffic source then you just narrowed your website growing plan, because you won�t find any alternative way to grow your Blog and traffic. There are good alternative to divert traffic from social media and those are Pinterest and after that Instagram. But we have to properly utilize all the power of social media site to grow our website like pro.

If you properly optimize your Pinterest page then you would able to diver significant number of traffic from this social media site. And alternatively Instagram work best if you can optimize your instagram profile wisely.

Just integrating Facebook, Pinterest or Instagram static widget you may not see any changes about fan and flower, because research shows that pop-up works best to grow audience in social media site. But popping up a widget at the middle of the webpage many visitors will feel annoying. And they can switch to other site. But �Smart Pop-Up� work best to increase social media site steadily. Smart pop up only appear at the bottom left or right side of a webpage and when visitors scroll download then it become visible. And Milotree use �Smart Pop-Up� technique to grow your social media site fan and followers.

What is MiloTree?

MiloTree launch January 2016 powered by CatchMyParty. MiloTree is an online tool which helps to grow Pinterest and Instagram followers rapidly. Howerver you can also use to grow your Facebook page. Generally it uses Smart Pop-up technique to collect followers on your Pinterest and Instagram page. And it will pop up to a user according to preset condition.

Which Platform MiloTree Support?

MiloTree is going through its emerging time. However it doesn�t become so popular but soon it will get huge popularity. Currently it supports 7 Platforms, where we can easily install the Plugin.
  • WordPress
  • Bigcommerce
  • Blogger / Blogspot
  • GoDaddy Website Builder
  • Shopify
  • Squarespace
  • Weebly
I think they will make compatible their plugin for other platform very soon. So if you are using any of above platform then you can go with MiloTree.

How much does it cost?

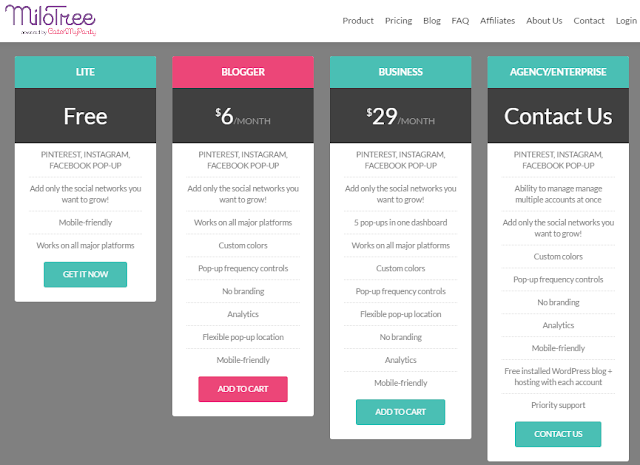
You can use MiloTree free plan but it has some limitations. MiloTree offers 4 subscription plans including free Plan. Those are as follows-

  • Lite - Free Plan with limitations.
  • Blogger - $6 per month.
  • Business - $29 per month.
  • Agency/Enterprise � You have to contact with them for pricing.
how to grow Your Pinterest and Instagram Following faster

However you can also use their premium services for three months by purchasing a Hosting plan from BlueHost, but you have to use their coupon code.

How to Setup MiloTree?

MiloTree is very easy to setup and the total setup process will take less than 10 minutes. I am showing you how to setup MiloTree for your Blog. Please go through the Steps guide-

Step #1: First visit Milotree.comand scroll down select any subscription Plan. As a Blogger I recommend to select �Blogger� Plan. Because you can track the performance through analytics report.

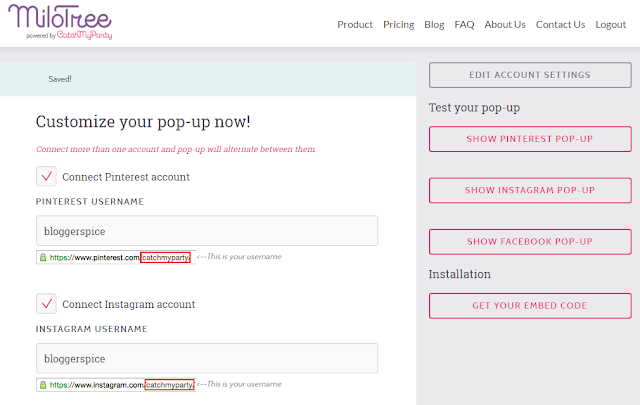
Step #2: After selecting your desire plan you will head to Widget customization page. There put tick to enable the pop up service. And write your social media name only. e.g BloggerSpice (My Pinterest page name). After adding your social media page name you can click �SHOW PINTEREST POP-UP� to test your pop-up from the right nav.
milotree setup

Step #3: It�s time to select about pop up frequency setup. This will help to control the widget pop up time. You can select 2/3 in a day thus visitors don�t feel annoying by watching pop up frequently.

Step #4: In �BACKGROUND COLOR� section select the popup widget background color. Its recommended to use matched color with your website background color.

Step #5: After that change the font color of widget from �TEXT COLOR� section.

Step #6: MiloTree also has options to select where op-up will appear. You canposition it at �Bottom Left� or �Bottom Right�, but MiloTree provides more freed to advance plan subscriber.

Step #7: And now click �GET ALL PREMIUM FEATURES - $6/MONTH� button or �GET BASIC FEATURES � FREE� button. If you select premium plan then a popup window will appear to take your card details. And in free plan you have to provide your name, email address and Password.
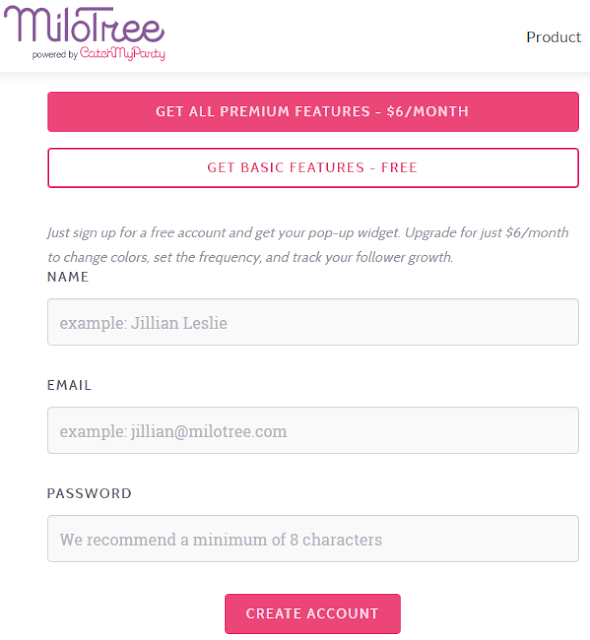
Grow Your Pinterest and Instagram Following faster By MiloTree


Step #8: Finally click �CREATE ACCOUNT� button. Instantly Installation �Plugin� and �JavaScript� will appear at the right side of the page.
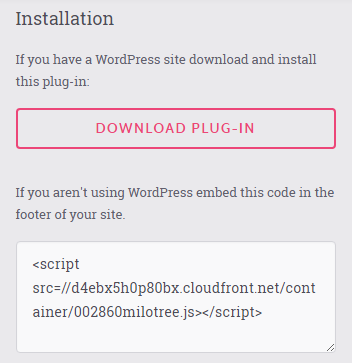
MiloTree plugins for Pinterest and Instagram

You just completed your MiloTree account and widget setup process. After setting up you will get MiloTree code snippet/Plugins and you have to use code snippet/Plugins according to your Blogging Platform.

In case of WordPress download the Plugin and install it. And Google Blogger platform user can add the widget JavaScript file into a HTML gadget. I will show you how to use MiloTree in WordPress and Blogger site below.

How to Install MiloTree in your WordPress Site?

You can install MiloTree plugin in your WordPress site very easily. But before that you have to download the MiloTree WordPress plugin on your Customize Pop-up page (.zip file). Plugin zip file you will receive after registering and setting up the MiloTree widget. After downloading the Plugin file please go through the below steps-

Step #1: Login to your WordPress admin site and Go to Dashboard.

Step #2: Click on �Plugins� in the left vertical nav bar.

Step #3: Now click �Add New� at the top of the �Add Plugins� page.

Step #4: Click �Upload Plugin� at the top of the page and browse to choose Plugin .zip file from your PC.

Step #5: After selecting the file click �Install Now�button. And finally click �Activate Plugin� URL to activate the MiloTree plugin for your WordPress site.

How to Install MiloTree in your Blogger Site?

Blogger platform doesn�t support Plugins but we can easily add code snippet manually. So you have to add the MiloTree widget code into a Blogger Gadget manually.

Step #1: Log in to your Blogger account and Go to your Blogger Dashboard

Step #2: Go to your "Layout" tab.

Step #3: Click on "Add a Gadget" then select "HTML/JavaScript" Gadget.

Step #4: Copy the custom MiloTree code snippet from your account and paste it into the �Content� box of the �Configure HTML/Javascript� window (Please leave the �title� field blank). Click �Save� button to save the code snippet.

Step #5: Click �Save Arrangement� at the top of the page.


MiloTree for Pinterest Grow
Grow Your Pinterest and Instagram Following faster By MiloTree 

That�s it your MiloTree is now ready to popup in your website. Now your MiloTree popup widget will appear from the bottom or the page for your website visitors. Obviously it will boost up your fans and follower in your social media site.

Cover Image Size Cheat Sheet For Your Social Media Page and Profile

social media pages cover image size

While we create cover banner for our social media sites then we become confuse, because we are not aware about the exact size of cover image dimension. These days you won�t promote your product, content and business without social media site. So for promoting our Blog and website we must use social media site intelligently.

When visitors in social media site first see your cover image and if your cover image is not attractive then they may skip your business page and visit other pages. As a result we are losing many leads from our social media site only for unattractive cover image. It goes without say that social media site�s cover image must be eye-catching but the pre-requisite of creating a cover image knowing the exact dimension of the cover image.

There are various social media site where it requires adding cover images so if you want to use same cover image with same dimension then it won�t fit with different social media sites. So I will share with you the exact sizes or dimensions of cover image on various social media sites.

#Facebook Cover Image Dimension: Facebook is pretty well known and almost all we use this social media site for sharing our content. For adding a cover image with perfect size you have to create graphics with 828px Width X 315px but previously the image dimension was different Height 851px Width X 315px Height. Facebook updated their Image dimension in April 2016. So you don�t have to drag or adjust the cover image if your image got this dimension.

#Facebook Group Cover Image Dimension: Facebook Group use different image dimension for the cover. Obviously smaller than Facebook page/profile cover. Currently the ideal image dimension is 784px Width X 250px.

#Twitter Cover Image Dimension: Twitter supports image large dimension but they have updated to new square format for mobile devices in January 2016. But Generally Twitter page�s cover image dimension is 1500px Width X 500px Height.  However you will see difference when you open your twitter page on any Smartphone.

#Google Plus Cover Image Dimension: Google Plus cover photo size is 1080px Width X 608px height and Google+ is recommending this dimension. But still many users are using classic interface of Google Plus so the cover image size sometimes crop horizontally.

#Google Plus Collection Cover Image Dimension: Google+ collection use smaller image in their new interface. The image dimension is 480px Width X 270px Height.

#Google Plus Community Cover Image Dimension: Google+ community is recently use similar cover image in new interface. The image dimension is 480px Width X 270px Height.

#LinkedIn Background Image Dimension: LinkedIn don�t call cover photo, rather they call it profile background. LinkedIn now support profile background, you can upload according to your desired background. The background dimension of LinkedIn is 1400px Width X 425px Height.

#YouTube Channel Art Image Dimension: In terms of YouTube they use channel art, I mean they call cover image or background as Channel art. YouTube has increased the channel art image dimension now the optimal size of YouTube Channel art 2560px Width X 1440px Height. YouTube using large image because of varieties uses of YouTube on TV, Mobile, Desktop etc.

I hope this simple cheat sheet will help you to create suitable cover images with perfect dimension for your various social media profile and pages. However social media is just like jungle and every day it is changing, so image dimension may change. So my recommendation is to use little taller and wider images than optimal cover dimensions. Then it will automatically adjust with new changes.

social media cover image
Cover Image Size Cheat Sheet For Your Social Media Page and Profile


 If you wish to add something with that then feel free to share. And thanks for reading this article. 

9 Ways to Improve CTR Click-Through Rate, CPC & CPM [Quick Tips]

So your ad click-through rates are lower? There are lots of things you need to consider for Adsense optimization. Getting Adsense account approved is one thing and making it generate high revenue is the next hard job. After you have joined the Google Adsense program successfully, you really need to work on how to improve CPC, CTR & eCPM, otherwise with high organic search traffic and good Adsense clickthrough rate you might not be making good money & AdSense CPCs got you down. Improving your AdWords click-through rate is easy. Your CTR, CPC & eCPM can be improved by doing a lot of different things. Publisher always seems to be expected to show both text & display ads responsively & that approach will tend to make them take new working decisions for successful attempt to monetize their organic traffic. And the Adsense that's why got popularity in a case of PPC Ad networks. Learn Google Adsense optimization and how to improve Adsense revenue by following quick tips. In short, clickthrough rate measures the amount of traffic driving to your website on that particular ad and we are going to learn how to improve your website Click-Through Rate (CTR), CPC & CPM.
Improve CTR, CPC & eCPM - Google Adsense Optimization
Before you go further in deep, check adequate detailed information about Adsense terms and definitions that publishers/bloggers can�t ignore. Fundamentally you need to improve the depth of quality of your site content, keywords & niche. The best strategy for improved cost-per-click is writing fresh, updated & innovative content; that is CPC focused on increasing your estimated earnings. CPC is based on your quality of the Content and type of traffic you getting on your site.

Also, check: Top 8 Google Adsense Alternatives | Best CPM Ad Networks To Make Money Online From Blogging [2016]

Improve CTR, CPC & eCPM [Quick Tips]

Here are a few guidelines for practice to improve Adsense CPC with simple tweaks. There is no tip anyone can provide that will going to work with your blog/website perfectly. You have to keep checking multiple things and keep changing & improving it around; so the user will not become blind to ignore your ads. Follow these quick tips to grow & generate your estimated Adsense revenue.

1. Don't forget AdSense guidelines ever

Always follow all the instructions and rules provided in the policy and terms of Adsense Program.

2. Check your template & test your website design

Check your site template is responsive with fast loading that user want to navigate easily on all over the pages. Check your mobile site analysis shown by Google analytics and try to increase mobile traffic.

3. Follow Adsense Heatmap with recommended ad unit

You need to check Adsense Heatmap and place the recommended ad units according to your website structure. Display ads in a proper way.

4. Pick the Most Popular Ad Blocks

Along with the design, the placing and positioning of Ads are also most important part to get higher revenue in Adsense.

5. Opt-in to Both Text and Image Ads

It's the best way to place both text and image ads that give more chances for advertisers to place high CPC ads on your site. Don�t forget to merge your ad color with your theme.

6. Avoid too much internal linking

Limit the number of internal links showing on a single page. Moreover, you must fix any broken link from any of your page. That not only hurt you in SEO but also cause unexpected drop in revenue.

7. Display Google search box

Searching option helps the visitor to find exactly what he wants from your sitemap. Moreover, search page includes extra ads, resulting that it will also help you to see growth in your earning.

8. Don't do any trick

Avoid any click generating campaign or any paid traffic that will make users to mistook your ads placed nearby any tricky images. Don�t align ads with your images that will also affect your reputation.

9. Monitor Ad blocking

Ad blocking option is provided by Adsense ad review for QC [quality control] reasons. If you are going to use it as an optimization tool, then make sure to monitor all the results executed by ad performance & measure them regularly.

Don't forget to read our next post on How To Improve page RPM in Google Adsense Optimization.

Follow these quick tips and let us know which tip actually worked with you via comments. If you have any other working tip then we would love to add it on this page. Suggestions are always welcome.

Social Tags: #HowToBlog #Adsesne #CTR #CPC #eCPM #Google #AdsenseOptimization #HowTo

How To Use Dynamic Description To Boost Traffic From Search Engines

seo optimization tutorials 101helper blogger

Post description and blog description are very important, not because it tells visitors about your blog or post content because nobody reads it, I am talking about me, I don't read description of a site... Don't know about you :P . To me blog or post description both are just a way to show posts and blog on search engines. Because I use keywords in description so that search engines show my blog when someone types a relevant keyword which is present in my description.

But what if you are using best keywords and still you get only fewer views or no views from search engines? if its happening with you then it means that the description that you are using is not having keywords which visitors are searching, so you need to find these keywords and replace them with existing ones.

One best way that you can use to find best keywods for your content is to use Google Trends. You can guess keywords too, which you think vistors can use to search but accurate keywords are those which you will find in Google Trends.

Another way to find best keywords is to find similar sites to your site which have good traffic and grab the keywords that they are using and put them in your site. It will not cause a � copyright issue.

So Dynamic Description is description that is variable and changes according yo demand. For example I have post about blogger templates and I created it in 2016 and in description I wrote "best blogger templates 2016" and now its 2017 and the visitors are searching for "best blogger templates 2017" now I may get my blog indexed in 3rd or 4th page of search engine results but there are more changes that other sites having 2017 In there description will get indexed on first page. So I need to update my description to get my blog indexed on the first page.

You have to change your blog or post description frequently to get + positive results. So dynamic description is a way to increase yraffic from search engines. And if you get traffic from search engines, it means you are a successful blogger!

One last thing that I am going to tell you in this post is that if you change description again and again, you will need to wait for atleast 1 week to let search engines crawl your site and update the description. Which will definitely take alot of time  because you will not get the best results from first changes but you might need to change description several times until you get some + positive results. So I brought a simple solution for this, now you don't have to wait for a week but you can set a time after which search engine robots will recrawl your site.

So you can change, watch results and see if its improving your traffic or not.

The solution for fast crawling is a meta tag mentioned below. You need to put it in your blog's template below <head> and set the time after which robots will crawl your site again.

<meta name="revisit-after" content="1 days">


Remember that too much crawling of a site is not good so you need to change your description between given time and look for + positive results. After getting more traffic remove the meta tag.

I hope you found this post meaningful. If you have any doubt, questions, suggestion and want to send us feedback, please leave a comment below.

Read others posts and don't forget to share atleast one post.

Thanks for visiting 101Helper, do visit again!

Search Tags: How to get more traffic from search engines, how to use description to boost traffic in blogger, how to update blogger blog faster in search engines, increase organic traffic to blog, Seo optimization tutorials blogger

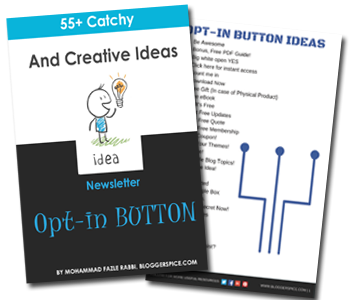
55+ Catchy and Creative Ideas For Your Newsletter Subscription Button

55+ Catchy and Creative Ideas For Your Newsletter Subscription Button

You got a fantastic Website. Creating great content and regularly updating your site but you don�t have any subscriber then everything will be useless. If Blog visitors are heart of a Blog then loyal readers (subscribers) are the heartbeat of it. You have many followers in your social media site but anytime social media site can disable or ban your account and you will lose your all subscriber at once. So this is a good idea to build your own subscriber list and keep them update time to time.

Subscriber rate can be grow in different ways and among them subscription widget work best, either simple or popup but it works. But Blog visitors don�t like to see the old dialogue or written text on button. They always want some fresh ideas and these ideas inspire them to subscribe in your mailing list.

If you are currently happy with your old scrap �Sign Up� or �Subscribe� button then this article is not for you. But those who want to increase their subscription rate more than before they can utilize this article to boost up subscription rate.

We can increase our newsletter subscription rate by using little technique and this is the changing the subscription button design and text. Obviously subscription button design influence potential subscriber to subscribe with your opt-in service but we can spice it up by using different text on subscription button. Sometimes it works like charms. You will receive more subscriber as well as it will create a positive impact on your site�s subscriber mind. It will help to drive more subscriber than before. So I hope you would love these ideas. Please go through below to grab your Catchy and Creative Ideas for opt-in button.  


55+ Catchy and Creative Ideas For Your Newsletter Subscription Button 

  1. Be Awesome
  2. Bonus, Free PDF Guide!
  3. Big white open YES
  4. Click here for instant access
  5. Count me in
  6. Download Now
  7. Free Gift (In case of Physical Product)
  8. Free eBook
  9. Go It�s Free
  10. Get Free Updates
  11. Get Free Quote
  12. Get Free Membership
  13. Get Coupon!
  14. Get Your Themes!
  15. Gimme!
  16. Give Me Blog Topics!
  17. Give me Idea!
  18. Get it!
  19. Get Started
  20. Get Sample Box
  21. Get Them.
  22. Get The Secret Now!
  23. Get Updates
  24. Go
  25. Heck Yes!
  26. Heck yeah!
  27. How can I resist?
  28. I�m in!
  29. I want that NOW
  30. I want it
  31. Join Now
  32. Let�s do this!
  33. Let�s go!
  34. Let�s Do It!
  35. Need More Inspiration?
  36. Newsletter Sign Up
  37. Ooh yes!
  38. Send
  39. See The Proof
  40. Sign me up!
  41. Sign up Free!
  42. Show me how
  43. Subscribe Now
  44. Subscribe To ______
  45. Strike Now (In case of Price hike)
  46. Start Here
  47. Submit
  48. Tell Me More
  49. w00t. Let Me in!
  50. Yes! Send my free ______ now
  51. Yes! Send me free Report.
  52. Yes, send me your ______
  53. Yes, Let�s Start The FREE Course
  54. Yes! I�m ready to ______
  55. Yes, Give Me Instant Access!
  56. Yep!
  57. Yes please

I have included some basic and known button text idea for including all types of text. But you can use exceptional one for your website.


If you have better idea then you can modify the text from above and make your unique subscription button text. Just focus on your niche and use appropriate one to drive more subscriber.

Catchy and Creative Ideas For Your Newsletter Subscription Button
55+ Catchy and Creative Ideas For Your Newsletter Subscription Button 

I know you have better ideas than me, if you so kind then please share in comment section?

Increase uTorrent Downloading Speed

The utorrent - a torrent software - it is one of the most recommended application nowadays for downloading big size files with resumable capability. It's really annoying if your torrent slowly downloads and takes hours or even days to finish. The less number of seeders and slow internet speed are the basic reasons for slow downloads. How To Speed Up uTorrent Downloads? how to increase downloading speed in uTorrent/BitTorrent? Make utorrent turbo booster to download by using these killer ways to boost torrent speed in Windows. Here we are going to see quick tips on how to download torrent files faster via torrent software. Boosting the downloading speed is not the only intention of this post but to solve one of the utorrent problems where you all readers normally get stuck to download a file and your utorrent downloader is lacking seeders, and you seem to be in waiting for a long time. Follow these steps to maximize torrent speed by tweaking uTorrent settings & optimizing internet connection. Furthermore, learn to add faster torrent trackers to increase the seeders which will improve your downloading speed. Learn to increase uTorrent/BitTorrent downloading speed of the best torrents downloader windows clients.
Increase uTorrent Downloading Speed
Last time we have seen, Firefox booster - SpeedyFox to make Firefox run faster; and today we are going to see one of the essential tutorials that will help you to get top speed in utorrent by using best uTorrent settings, and I am sure it will work as a utorrent turbo booster.

Also, check; Top 6 Tips to Speed Up, Optimize & Improve Windows PC Performance

Settings to Speed Up uTorrent Download Speed

So here is the hack to overcome these slow speed utorrent problems, the following steps are optimized to provide you best torrent settings that will improve the internet speed.

1. First open utorrent go to Options >> Preferences >> Network

2. Under 'Port used for incoming connections', enter any port number. Usually, it should be above 10000....I am using 24389.

3. Look for 'Randomize port each start' uncheck this option

4. Look for 'Enable UPnP port mapping' uncheck this also.

5. Look for 'Add utorrent to Windows Firewall exceptions'. Uncheck this too�

6. Now go to >> Bandwidth

7. Look for 'Global Maximum upload rate' set the value to 20.

8. Look for 'Global Maximum Number of Connections' and set it to 150. (Don't set this too high may cause speed slowdown)

9. Look 'Maximum Number of connected peers per torrent' and set this to 75.

10. Look for 'Number of upload slots per torrent' and this set to 50.

11. Check this: 'Use additional upload slots if upload speed <90%'

12. Now Go to >> Queuing

13. Look for 'Maximum number of active torrents' and set this to 3.

14. Also, set 'Maximum number of active downloads' to 3. This means at once there may be at least 3 files are downloading. (Don't increase more than this)

15. Now go to >> BitTorrnet

16. Check following options:
'Enable DHT Network'
'Enable DHT for new torrents'
'Enable Local Peer Discovery'
'Enable Peer Exchange'

17. Uncheck 'Ask Tracker for scrap information'


That's all you can now check by adding new torrents to your utorrent downloader...

Bottom Line
ALWAYS TRY TO COPY TRACKERS FROM EVERY XYZ.torrent FILE AND KEEP ALL THOSE TRACKERS IN ONE .txt FILE. WHENEVER YOU ADD ANY FILE COPY ITS TRACKERS AND PASTE WITH NEW TRACKERS WITHOUT DELETING PREVIOUS TRACKERS...

By this method, you always have broad chances to obtain more availability of any file you are downloading.

Add Pulse effect on Font Awesome Heart Icon with CSS3 Animation?

Add Pulse effect on Font Awesome Heart Icon with CSS3 Animation?

A website�s footer credit section contains information about copyright, Designer�s website URL, information about different informative page links etc. But most of us ignore this section, because we think that this part is useless. But to give a professional look to your site you must craft your site top to bottom professionally. Many web designer design site�s footer credit section different way. Some are gives emphasize on design and some are leave it with simple or without design. We see many popular website those who are using a text in footer section that said �
  • Crafted With Love + A Heart image
This is a message towards site visitors, nothing else. Some of them are showing heat with pulse effect. This is really cool staff and makes our web site�s footer section eye-catching. In this tutorial I will show you the way that how easily we can add this effect on a heart icon and add it in our Blogger template footer section. So hang tight and go ahead with me.

First we need to create a heart icon. Now using image is pointless because it can affect loading time. Instead of image we will use Font Awesome icon for heart creating heart shape. So let�s proceed to the step guide below.

If your template already containing Font Awesome file then please just skip this step. But if you want to add latest Font Awesome version then you can go through this steps.

Step #1: Go to �https://www.blogger.com� and Sign in to your account

Step #2: From �Blogger Dashboard� click on ->Template ->Edit HTML 

Step #3: And locate the <head> section in your Blogger template

Step #4: Finally copy following line of markup and paste it below <head>

<link href='//netdna.bootstrapcdn.com/font-awesome/4.6.3/css/font-awesome.min.css' rel='stylesheet' type='text/css'/>

Step #5: Now scroll down and locate you blogger footer text where maybe written �All rights reserved 2016� or something else. And add below code for after text. You can change the �#FF0000� code for altering the heart color.


<i class='fa fa-heart fa-lg' style='color:#FF0000'/></i>

Step #6: After that hit the Save template� button.

The above steps will help you to add latest Font Awesome core file into your Blog, and a heart icon into your site�s footer section. You can check your website now to see the heart icon.

crafted with love

How to add pulse effect on Heart Icon with CSS3 Animation?

Now we need to do small code for adding pulse effect on the heart icon that we have displayed by using Font Awesome icon code. Please go through the below steps guide-

Step #1: Go to �https://www.blogger.com� and Sign in to your account

Step #2: From �Blogger Dashboard� click on ->Template ->Edit HTML 

Step #3: Now Find this code ]]></b:skin> by pressing Ctrl+F (Windows) or CMD+F (Mac) 

<i class='fa fa-heart fa-lg' style='color:#FF0000'/> </i>

Step #4: Paste the below code Before/above ]]></b:skin>

.pulse{-webkit-animation:pulse .8s linear infinite;-moz-animation:pulse .8s linear infinite;-ms-animation:pulse .8s linear infinite;animation:pulse .8s linear infinite}@keyframes &quot;pulse&quot;{0%{-webkit-transform:scale(1);-moz-transform:scale(1);-o-transform:scale(1);-ms-transform:scale(1);transform:scale(1)}50%{-webkit-transform:scale(0.8);-moz-transform:scale(0.8);-o-transform:scale(0.8);-ms-transform:scale(0.8);transform:scale(0.8)}100%{-webkit-transform:scale(1);-moz-transform:scale(1);-o-transform:scale(1);-ms-transform:scale(1);transform:scale(1)}}@-moz-keyframes pulse{0%{-moz-transform:scale(1);transform:scale(1)}50%{-moz-transform:scale(0.8);transform:scale(0.8)}100%{-moz-transform:scale(1);transform:scale(1)}}@-webkit-keyframes &quot;pulse&quot;{0%{-webkit-transform:scale(1);transform:scale(1)}50%{-webkit-transform:scale(0.8);transform:scale(0.8)}100%{-webkit-transform:scale(1);transform:scale(1)}}@-ms-keyframes &quot;pulse&quot;{0%{-ms-transform:scale(1);transform:scale(1)}50%{-ms-transform:scale(0.8);transform:scale(0.8)}100%{-ms-transform:scale(1);transform:scale(1)}}

Step #5: Now locate the pulse icon code from your Blogger footer section

Step #6: And replace the above code by below code. In below code I just added �pulse�text to integrate the CSS effect with heart icon.


<i class='pulse fa fa-heart fa-lg' style='color:#FF0000'/></i>

#Alternatively you can add some text if you wish to add with it like below. Please replace Blogger Spice with your Blog name.


All Rights Reserved � 2016. Crafted With Love <i class="pulse fa fa-heart fa-lg" style="color: #FF0000;"> </i> By <a expr:href="data:blog.homepageUrl" href="https://www.blogger.com/null"> <span itemprop="name">Blogger Spice</span></a>

Step #7: And click "Save template� button from the top.

All done! Now visit your Blog or website and see footer section. I am sure that your heart icon has got pulse effect. This is looking just like heart beat. Your site visitors obviously love to see this effect on footer credit section.

blogger widget with CSS3 animation
Add Pulse effect on Font Awesome Heart Icon with CSS3 Animation?

What steps you have taken to make your website footer credit section attractive?

Top 6 On-Page SEO Basics To Consider Before You Build an SEO Optimized Web Page

Are you looking to build an optimized page mostly for search engines to index quick in SERP? Want you to list in Top SEO rankings? then SEO is the most important term you need to consider to archive it which enables google search architecture to display your listing in higher positions without any web optimization tools. One of the biggest challenges for writers is writing the content that is fully SEO optimized for search engines, and that also further need to engage your readers. Your SEO website ranking is the most important part for your position in search results. You need to keep an eye regularly on SEO technology that describes how to build an SEO optimized web page and most essentials things while optimizing your site pages. And that is why today we are going to see the most basics of SEO-Friendly design strategies & development process that not only appeal your visitors but also for search engines. SEO is not that much complicated rather it's the most misunderstood term even by biggest SEO companies but, lately, you will get realize that SEO is most essential, effective and necessary topic once you started to understand that your readers gonna react first before search engine. Learn essential guidelines for building web pages that are optimized for search-engine and the basics of professional SEO services in simple steps.
Things to Consider Building an SEO Optimized Web Page
Last time we have seen On-Page SEO Checklist & Techniques to optimize SEO page to rank higher in SERP. No need to be confused now, as today you are going to see the ultimate list of the reasons why we need SEO and how to do that in simple steps that will assist you in small business search engine optimization as well. Many of these guidelines are so wise and you cannot ignore them without reading. You can make this as your base for making future pages. So just bookmark this page and you will be on the good start.

Also check: SEO Guide - 15 Tips to Improve SEO Ranking That'll Generate Huge Traffic To Your Site

What Actually Search Engines Are Looking for in your site:

While knowing about SEO, I got to known about this question, actually what google and all other search engines looking in to my page, so I mentioned those points here:
  • Performance: does your site load properly and quickly? 
  • Authority: does your content are relevant to the keywords and description of the site.
  • Navigation: do you have done proper navigation, internal linking? Safe browsing with low bounce rate.

Follow these guidelines to make your page in effective SEO way:

Step 1. Onsite SEO URL Tips for Online Marketing

The first three words of your URL are played a vitally significant role in SEO. These first three or five words gives extra weight in search results. Keywords in the URL show up in search results, and research has shown that the URL is one of the most prominent elements searchers consider when selecting which site to click. Moreover, I would like to mention that, the content is also important because Google bot not only index the URLs but also the words from the page contents for displaying in SERP.

Read: Online META Tag Generator from URL For Website - Free SEO Tool

Step 2. Write Title Tags & URLs For Search Engine Optimization

Short URLs are much effective in SERP and those are most preferable these days. But no need to be so careful about this, if your URLs are already less than 55 characters. But in case, if you have more than limit, then probably you need to edit it and make it less to get value in search results.

The <TITLE> tag is only described in html page once and it should be in <head> tag.

Example:
<html>
 <body>
   <head>
    <title>title for optimization</title>
   </head>
 </body>
</html>

Before making, make sure, this <title> tag should be unique and readable for easy to search by search engines. As per the Google search display properties, Google displays the title which fits into the frame of 512 pixels moreover it comes with the first 50 to 60 characters of the title tag. The keywords are used into the title should be in the proper manner. Search engines are extremely watching to those keywords. The titles should be in a <h1> tag (as per the developer requirements). Also, be aware and avoid spamming of titles. Be creative and original with popular keywords.

You would like to check: Improve Search Engine Ranking [PageRank] by Generating HTML Meta Tags

Step 3. Optimize Images, Media & Site Navigation for Better Search Engine Rankings

40 percent of people will abandon a web page if it takes three plus seconds to load. So videos, images or pictures you used in the pages are preferably not only more attractive but also have less size as it causes low bounce rate and further it helps to quick loading of the full page.

Preferably, you need to put site navigation structure to be simple, efficient and easy for Google and your visitors to follow. Because of this, it helps to boost user navigation that search engines has been paying more attention on user activities as well. In short, it helps to google to find the data relevancy in the articles. Breadcrumb - it's a best practice to put it on and is an addition to the page navigation system to offer better understandability of the structure followed by your page which represents the path from which the reader arrived on the current page. Read: Breadcrumb In Google Search Result Page [Why & How]. Some of the websites mention their navigation at the start point of the web page and some of the websites are describing the navigation by the left side or right side of the web site. It does not matter where you are mentioned your navigation but the main thing is, it should describe the proper navigation to deal with the data.
Make sure to put the media [audio, video or images] relevant to the content on your page. You'll lose ranking if there's no relevance and people won't stay on your site.

Don't forget to give your images an <alt> tag. The ALT Tags are used for the images. As it helps to inform the search engines what your page is about, they're important for accessibility. If you have your original images, then it should be used proper file name and <alt> tags. it will show the information of your images. It will generate the 24% traffic because of SEO optimized tag.

Step 4. Social Media Linking & Ranking In Search Results

If your site is already added to various social networking sites, then it obviously going to help the search engines to index your pages quickly. Moreover, in Google point of view, it surely helps to crawl your links in SERP and to get the topic of the content described in page.

Then social media came along and now changed everything. Align your social media and SEO efforts through content quality, social sharing, optimized images and Google Authorship. While social shares may or may not affect a webpage's position in search listings, your social profiles definitely influence the content of your search results. When you are adding a social sharing button into your site then it will indirectly your site is going to be added to those social networks and it will work as backlinks to your content by means of inbound links. Many traditional SEO tactics aren�t as effective as social sharing.

Search engines have begun to integrate social counts (Facebook likes, retweets, +1s and so on) to update their search results. Facebook/Twitter are best practice for link marketing and getting related traffic to that page. These definitely helps for getting people to engage with it much more strongly with SEO optimized page than all traditional SEO techniques. Furthermore, don�t forget, Google displayed the Google+ profile information in the right-hand sidebar at the very top of the search results page.

Read Top 500+ High PR Sites | Build SEO Quality Backlinks 2016

Step 5. Better SEO Keyword Research � KEY TO SEO

Keywords are the most important SEO element for every search engine, they are what search strings are matched against. According to Google/MOZ, your keywords should be in 100-150 words of the article. Google has a technology called LSI, which is concentrating on the keywords that are mentioned in the web pages. LSI [Latent Semantic Indexing] - The contents of a web page are crawled by a search engine and the most common words and phrases are collated and identified as the keywords for the page. It adds an important step to the document indexing process. Latent Semantic Indexing keywords can make your content look more natural to search engines.

Your SEO keywords are the key words and phrases in your web content that make it possible for people to find your site via search engines. If you are using proper keywords related to your article, then it simply helps to generate your pages in SERP as per the SEO requirements. Choosing the right target keywords builds the foundation for an entire SEO optimized page.

Moreover you can show star rating reviews for each link in Google search results page for better SEO; learn How to Show Star Rating Review In Google Search Results - Rich Snippet.

Step 6. SEO Benefits of Responsive Web Design

Responsive website design is not only for usability but it has many benefits in terms of Search engine ranking. Responsive web development can help a site to shine in the SERPs. As the more traffic coming from the mobile platform to browse the Internet, it has now become necessary for developers to make their sites that work across any platform, your visitors are attracting on that also. There are so many software�s available into the market for that, you can use the proper code for that.

If your site is not as much as sufficient to open into mobile devices, then it causes the bounce rate of your site as well as the poor user-interaction signals. If you are going to see the sites about mobile games, then you will get to known, that there are 14000+ sites to serve all public in responsive design. So responsive design can be detrimental to SEO.

You must read: Making Blogger Responsive Mobile-friendly Template Design | Responsive Web Development

Follow these simple steps and make your optimized pages for SEO. You should always keep SEO in the head, and always try to use in every page you going to write in future. Ignoring these basics will not only you gonna mess with your site but also preventing yourself from making effective revenue you getting it from writing pages. Share what you thought while reading this via the comment section below. I would glad to add it on this page if you know something new tho this page.

Remove "Showing Posts with label.. Show Older Post" from Blogger | Blog Websites Design

It is one of the best blogging tips for all the blogger especially for those who are using BlogSpot platform for their blogging websites. This free blogging websites platform have some optional unwanted widgets & features. And sometimes, it badly affects your blog design and adds an unsuitable finishing look on the best blogging business professional sites. We are here to convert your free blogging site design to business blogging site theme. When a visitor clicks on any of the label or categories from your label-cloud they get a default message "Showing Posts with Label (label name). Show all posts" on top of the same page and above the post which shows that they are now seeing all the published articles that are filtered and classified under that label. Today we are going to see how to remove this unwanted and unnecessary message from your blog design that many probloggers like to have it removed from their free blogging sites and I insists every blogger implement this trick. Moreover, you can change it as per your requirement or if you want to show the custom message. If you are wishing to make your blogger blog look like a professional blog or a business website, it is better to hide this 'showing posts with label' message. Follow this tutorial to get more about these blogger HTML editing techniques.
Remove Showing Posts With Label in Blogger
These labels are nothing but the topics or you can say categories under which all your blog posts are divided separately. This helps all your blog reader to find all posts that come under that particular label. It's very convenient to categorize the blog pages very friendly. Like in Responsive Web Development label, last time we have seen, How to Build Responsive Blogger Template CSS and today we are going to see advanced tutorial to remove showing posts with label in Blogger.

Also read: Making Blogger Responsive Mobile-friendly Template Design | Responsive Web Development

Remove/Delete Showing Posts With Label in Blogger

In most of the time when a reader clicks on any label, many related posts with that label will open in main-wrapper. At this time, if you look at the top-most part of the main-wrapper there is a message that contains: "Showing Posts with label� Show Older Post". As shown in the picture.

Remove Showing Posts With Label in Blogger

Remove Showing Posts With Label in Blogger:
Step 1. First backup your blogger template. Then go to your template HTML editor.
Step 2. Click 'Expand Widgets Templates'.
Step 3. And then look for the following part of code:
<b:includable id='status-message'>
<b:if cond='data:navMessage'>
<div class='status-msg-wrap'>
<div class='status-msg-body'>
<data:navMessage/>
</div>
<div class='status-msg-border'>
<div class='status-msg-bg'>
<div class='status-msg-hidden'><data:navMessage/></div>
</div>
</div>
</div>
<div style='clear: both;'/>
</b:if>
</b:includable>

Step 4. Now you have to just replace this code with the following Boost code:
<b:includable id='status-message'>
<b:if cond='data:navMessage'>
<div>
</div>
<div style='clear: both;'/>
</b:if>
</b:includable>
Step 5. Now save the template.
Step 6. Click on any label and see the difference.


Don't forget to backup your template before applying any trick or hack. This always assures in most of the time while editing HTML? template and getting back to previous working stage.

On-Page SEO Checklist & Techniques That'll Rank You TOP in SERP

Every Internet-related object relies on one or more search engines as the way of bringing visitors to its real web page. We've all heard at least a million times about Search Engine Optimization [SEO] as a way of improving the rating when it comes to achieving the best possible position in a search result for a particular keyword. As a rule of thumb, the first thing that comes to mind when planning your SEO page efforts is building a respectable and proper backlink portfolio - inbound links from external domains that point to your homepage or a page within your website. Also as a rule of thumb, internet marketers will often prioritize this type of activity since it requires little to no previous knowledge of web technology and SEO onpage optimization. But when it comes to achieving the best possible results, one must always start by cleaning one's own house. Here is a checklist of the key things to have in mind about on-page SEO optimization before even thinking of off-site optimization and learn SEO strategies and techniques & how to increase SEO.
On-page SEO Checklist To Build Perfectly Optimized Web Page
In case, you are in search of what is search engine optimization ranking and why is it important? then, recently we have published; Things to Consider Before Building an SEO Optimized Web Page in the SEO category. But to improve seo ranking much more, today we are going to publish On-Page SEO Checklist which is one of the major factors you can't ignore to optimize search engine & to build a perfect SEO page that forces the search engine to index quick in SERP.

Also read: 15 Tips to Improve SEO Ranking That'll Generate Huge Traffic To Your Site | SEO Guide

Keyword optimization - Secrets to Selecting Highly-Effective SEO Keywords

  1. Title - Start your post titles with the right search engine keywords you want to be ranked for. If your intention is to write an article focused on On-page SEO, the title should start with On-page SEO. An 'SEOMoz' study has clearly shown that the position of the highly effective SEO keyword in a title plays as a ranking factor - and having the keywords in the middle or in the back caused the results to rank lower.

    You can also read Online Meta Tag Generator for adding Meta Tags to each page.

  2. SEO-Friendly Permalinks - You don't want to start your URLs with numbers and unnecessary symbols that would give unclear signals to a search engine crawler. Avoid horrible URLs at any costs, for.ex. yourdoman.com/p=4452368, since Google stated that first 3-5 words in a URL are given the most weight. So it's better to change your permalinks for SEO Friendly URLs.

Check out: Why Meta Elements are Important to Improve Search Engine Ranking [PageRank]

Content optimization & Search Engine Success Factors

  1. Headline Tag - Most popular CMS platforms, like Wordpress, automatically embed the title into the H1 (headline) tag. But be careful of this, since some themes override this function. Always double check in the code if the H1 tag is added to your title.
  2. Keyword Placement - Don't forget to implement the keyword in the first 100-150 words of the article. Having a keyword in the first paragraph gives a signal to the search engine that the content is actually about the keyword.
  3. Outbound Links - Using quality backlinks to relevant sources and authority sites such as .gov, .org sites or Wikipedia links helps to improve your PageRank.
  4. Multimedia - Written content can�t always get you far enough. Enriching your content with multimedia such as images, videos and graphs can greatly influence the bounce rate of your site, and increase time spent by visitors on your site. Both of these are two important interaction-based ranking signals for Google.
  5. Headline Modifiers - Using title modifiers such as "Fix", "Best", "Tut", "Popular", "How to", "Guide", or "Review" can help you rank higher for the long tail versions of your keywords.
  6. Length of the Content - Although still debatable, the length of the content can be used to determine the search rank. The absolute minimum word count recommended in order to achieve any form of quality is 500 words, but there are studies claiming that you should aim for at least 1500 words when targeting very competitive keywords

Optimize web pages for SEO to rank better in Google SERP

  1. Speed, give me what I need - If your site loads more than 4 seconds, you are much more likely to lose your visitor. Not only that, loading speed is also an important ranking signal for most search engines. You can improve the loading speed by compressing your multimedia, choosing a good hosting plan, using a CDN (content delivery network) etc.

    Read how to use CDN in blogger blog to make blog to load faster.
  2. Social-Sharing buttons - Online presence is almost nothing without a good social media coverage. Social shares are also an important ranking signal, and prominent and well-designed social sharing icons can help increase the social shares up to 700%.

    Read how to use Full CSS3 Optimised Shocial Sharing widget to prevent blocking of page loading.
  3. Cut down the Bounce Rate - A bounce is an occurrence of a visitor quickly leaving your site. That might happen for a number of reasons and Google uses Google toolbar, Chrome browser, and Google Analytics data to control and analysis the bounce rate of your every web page. To lower your bounce rate, you could work on improving the internal link structure on your site, writing a good copy, and investing in a clean site theme that would work in tone with your branding design.
  4. Sprinkle the LSI Keywords - These are the keywords related to the keywords you are searching for, and can be found at the bottom of your Google search page. LSI (Latent Semantic Indexing) keywords are synonyms used to define a page�s relevancy, and possibly even quality.
  5. HTML stuffed content - Sometimes the Google crawlers have greater difficulty on crawling when looking at what is relevant or what is not; since they spend a lot of time roaming through your HTML code. For example, having a paragraph style or inline group tag that repeats itself each time you enter a different piece of code can work very negatively towards the readability of your site.

If you're already doing, at least, a couple of these things, then your site might be on a good run. Do your best to implement as many of this advice and techniques before, or at least, simultaneously with your off-site SEO campaign. As you see, all you need is a bit of time, patience, and some skills with HTML to significantly improve your site's performance and boost your rankings in the process.

Article By Raul Harman - is a B.Sc. in Innovative entrepreneurship and his main areas of interest is digital marketing for enterprises and small businesses. He is also a regular contributor on technivorz.com.

Top 6 Tips to Speed Up, Optimize & Improve Windows PC Performance

Is your computer extremely slow or freezes up regularly? How to fix slow Windows? From last decade, these Windows 7, 8 and now Win 10 are the brand new operating systems from Microsoft and it is known as a big addition in terms of new features as compared with other OS. As more features are build, these windows are then eating more resources that causing lagging & incredibly slow operations. And now the question is how to optimize Windows? how to make Windows faster that ever? How to disable, enable unwanted features? What are quick ways & essential tips to speed up a slow windows PC? How to speed up laptop for gaming? If you want to find out what makes a computer fast and top tips & tricks to make Windows faster then you are on right page. This page also offers helpful directions & suggestions to speed up laptop in easy steps. What is the best way to make computer faster - Here today, I listed below to offer you some quick, easy ways & steps to improve and optimize Windows for better performance. Learn more about speed up computer & Windows update issues on slow computers that include optimizing RAM, Hard Disk with troubleshooting Windows update.

These are best ways to boost Windows performance. I found these methods working super to run my computer smooth & dramatically faster after troubleshooting windows & taking Windows performance monitoring to a new level. I have combined and listed only best ways from my experiments. Moreover, these steps don't require any paid third party software nor technical knowledge. Follow these free, easy and working tips to make windows faster and faster. This is the ultimate guide to optimizing your computer for peak performance without buying new hardware. You can boost OS operations & performance reliability with these following simple tweaks & techniques.
Tips to Speed Up, Optimize & Improve Windows PC Performance
Once, I had received the question - how to solve a slow PC by disabling unnecessary Windows services? how to fix the computer loads slow? how to make my system faster? in answering to it last time we have seen Quick 5 Tips to Speed Up Windows, Boot Time & Make Windows Faster 2016 and in continuing it, I have added more techniques that will also boost your current windows operation & response time that makes you work faster with the same machine. Follow these steps to speed up your PC 3x faster than ever.

Also read: How to Play HD Video on Slow Computer

Top 6 Tips to Optimize & Improve Windows Performance

In most cases, the PC slows down after installing the Microsoft windows developer updates. The performance optimization is an extremely broad subject, there are various free softwares and other methods which can raise & improve your system performance. But we are going to optimize & improve your windows PC or Laptop in a safe manner without any software or tool. Learn to speed Up, clean Up, & revive your Windows PC.

1. Speed Up Your Computer's Boot Time

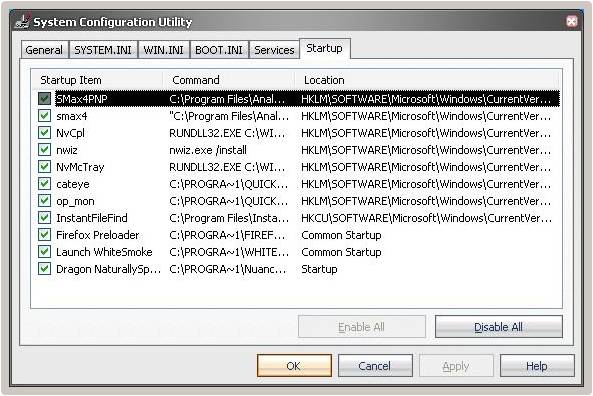
Specific programs are ready to start up at the time of windows booting, they all causes CPU speed down. Additional or unneeded components in the startup list will clearly lay down your startup time. For examples, yahoo messenger, gtalk, utorrent, quick time or any other unwanted tools... In case, if you don't know about any software stuff, it's not a considerable trouble, perhaps you may ignore by removing them from the startup list. And if you get any problem further, you may restore all desired items into the startup list as it is.... These are the adjustable tricks, without any external software support.

Top 6 Tips to Speed Up, Optimize & Improve Windows PC Performance

Just follow the given steps:
  1. Click Start button >> RUN
  2. "msconfig", without quotas. Press, Enter
  3. A "System Configuration Utility" window will open
  4. Click the Startup tab. Now you will observe the columns like startup items, commands, etc.
  5. Now you have to uncheck the undesired startup items from this list
  6. After this, press OK button
  7. It prompted to restart the computer to apply changes
  8. After restarting, a bulletin will be displayed. You select the option that, "Don't show this message or launch the System Configuration Utility when Windows start"

You may like to read: How To Change Keyboard Settings & Type Marathi / Hindi or Any Language in Windows without Any Software

2. Add the Quick Launch Bar to the Taskbar

Use quick launch instead of Desktop icons. On computer start up, the desktop icons will take some time to appear. And this causes some delay to begin work. So you do better make your desktop free of icons. However, about regular softwares, use quick launch. Means, create the shortcuts of your regular softwares and drag these shortcut icons on the quick launch bar.

Top 6 Tips to Speed Up, Optimize & Improve Windows PC Performance

To enable a quick launch:
  1. Right click on the taskbar
  2. Under "Toolbars" select the "Quick Launch" option.
The quick launch appears beside the Start button as shown in the image.

Also read: Turn Laptop Into WiFi Hotspot To Share An Internet

3. Turn Off Indexing in Windows for Better Performance

Indexing Services is a system process which indexes and renovates lists of all the files present over the entire disk on your computer. Furthermore, it uses large amounts of memory and this will make your computer speed lay down. When you search for something on your PC, it helps to search faster by examining the indexed file lists. If you don�t use windows search on your computer frequently, then you can disable file Indexing service.

Top Tips to Speed Up, Optimize & Improve Windows PC Performance

To disable indexing service, do the following:
  1. Go to Start >> Select the Control Panel option
  2. Then Double-click on "Add/Remove Programs" and Click the 'Add/Remove Windows Components' icon on the left side of the window. This may take a few seconds to load. Wait for a while.
  3. Look for the "Indexing Services"component in the list and Uncheck the Indexing Services item from it.
  4. Click Next
  5. Click Finish

The alternative way to search the file from your computer is using the quick searching softwares like AvaFind, Instant File Find. This software finds any desired file you want within a fraction of seconds, perhaps, it finds a file while you're typing the file name. Also, it doesn't cause any memory related problem.

4. Change the theme & optimize visual display quality to speedup PC operations

Windows Visual Appearance is full of visual effects, looks very appealing but displaying all the visual items can waste system resources. It is high time that you disabled all that resource-hogging eye candy to free up precious system resources. Turning off the graphical enhancements in Windows is very easy. For a good report, aesthetics and performance, leaving only the following options enabled. These enhancements, although fancy-looking, do take a heavy toll on your system resources at times.

Top Tips to Speed Up, Optimize & Improve Windows PC Performance

Just follow the steps given below:
  1. Right click on My Computer
  2. Select properties
  3. Go to Advanced tab
  4. In the Performance box click Settings
  5. Under visual effects choose "best performance" You will notice that all the items get unchecked
  6. Now tick only the following items:
    "Use common tasks in folders"
    "Use drop shadows for icons labels on the desktop"
    "Use visual styles on windows and buttons"
  7. Finally, you will see that the option got set to custom automatically, don't bother about it.
    [You can adjust these settings as per your view and requirements]
  8. Click Apply and OK.
After this, your computer will run much faster than previous.

Check out : [FIX] Desktop Display Screen Flickering /Flashing Error in Windows | Troubleshoot Refresh Rate

5. Change the size of the virtual memory paging file

Paging file present on the hard disk which is used by windows regularly as like a RAM. The page file in XP is a hidden file called pagefile.sys. It is regenerated at each boot. Whenever, you are going to do some operation that means, you are doing the operation with your data or files, which always uses actual RAM. In a short way, the actual traffic on the file operation can be minimized by maximizing the paging file size, by means of virtual memory.

Top Tips to Speed Up, Optimize & Improve Windows PC Performance

Optimize the Paging File in Windows:
  1. Right click on My Computer.
  2. Select properties.
  3. Go to Advanced tab In the "Performance" box click Settings.
  4. Go to "Virtual Memory" box click Change.
The Virtual Memory window will appear In "Paging file size for selected drive". Specify for Custom size - initial size(in MB) to 2500 and maximum size(in MB) up to 4000 (This is the maximum value for FAT file system). For NTFS file system, you can specify the maximum size(in MB) to more than 4000.

6. Improving Windows Explorer by Tweaking the Folder Options

Whenever you are going to browse the folders into your system, most of the time you open �My Computer�, here you may notice that there is a minor delay for opening the window. Which is because of Windows automatically searches for network files and printers every time you are going to open Windows Explorer. To resolve this, and to increase browsing speed considerably.. follow the important steps stated below.

Top Tips to Speed Up, Optimize & Improve Windows PC Performance

Improve Windows & File Explorer Using Folder Options:
  1. Open My Computer
  2. Go to Tools menu
  3. Choose Folder Options. You can find it in Control Panel too.
  4. Select View tab
  5. Uncheck the "Automatically search for network folders and printers"
  6. Click Apply & OK.

Bottom Line

All these tips & tricks are fully Tested-OK, so you can try it on your system without any worry... Just follow those steps properly and you feel the boosting energy into your systems like never seen before... Don't forget to share your experience... Plus if you know any better way to speed up the computer system, then you can share it via comment section shown below, I would glad to add it directly into this page.

Kategori

Kategori